
The Swarm is here. It is here to help us developers focus more about the relations between the components of our architecture and less about the physical machines and their IP addresses. If you need a refresher I spoke about and wrote an introduction to orchestration and the Docker tools: have a listen or read and come back because we are bringing this knowledge to the next level today.
When working with self-organizing infrastructure you still need some key pieces of architecture to be stable, manually assigned. For example you need to have public DNS entries and at least one fixed IP address for your users to reach.
While your orchestration framework spins up and down, moves and balances your services, a reverse proxy needs to constantly keep tabs on available services and route traffic accordingly. This is the focus of this post: let’s setup a fixed entry point to a sample application and make sure a self-updating reverse proxy can route traffic to all back-end instances. Here’s the final result I have in mind:
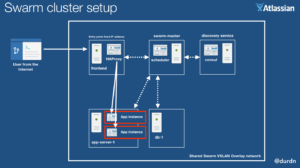
Starting setup: Cluster built with Docker Machine and Swarm
To start my exploration I setup the four node cluster below – plus a Consul server:
NAME             ACTIVE   DRIVER         STATE     URL                         SWARM
consul           -        digitalocean   Running   tcp://146.185.143.64:2376
cluster-master   *        digitalocean   Running   tcp://188.166.52.137:2376   cluster-(master)
frontend         -        digitalocean   Running   tcp://188.166.105.50:2376   cluster-master
app-server-1     -        digitalocean   Running   tcp://188.166.58.175:2376   cluster-master
db-1             -        digitalocean   Running   tcp://178.62.249.212:2376   cluster-master
For the commands used to set it up see the appendix.
Choose the Reverse Proxy
For this example cluster I’ve decided to use HAProxy and Interlock:
- HAProxy is a gateway and reverse proxy with crazy good performance. We could also use nginx to accomplish the same result.
- Interlock is an event loop which ties to a Docker back-end — including a Swarm back-end — and reacts to things like starting/stopping containers across the Swarm cluster. It has a plug-in architecture supporting HAProxy, nginx, and others. This allows us to notify and reconfigure HAProxy when a new container serving port 8080 is started or stopped. HAProxy will start redirecting traffic to that running container right away.
Pick a test web application
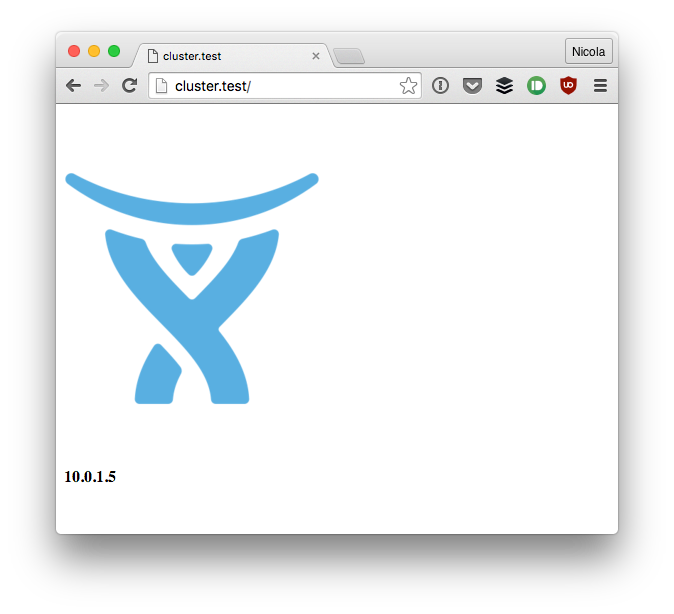
To test the cluster configuration I wrote a few lines of Go, a little web-serverino which just spits out a logo and its own IP address (source code here):
[...]
func main()
    port := "8080"
    ip, _ := externalIP()
    log.Printf("Listening on port: %v", port)
    http.HandleFunc("/", func(w http.ResponseWriter, r *http.Request) {
        log.Printf("Received: %v", r)
        w.Write([]byte(fmt.Sprintf(`<html>
              <body>
                <img width="256" src="https://design.atlassian.com/images/brand/logo-02.png" />
                <div><strong>%s</strong></div>
              </body>
            </html>
        `, ip)))
    })
    http.ListenAndServe(":"+port, nil)
}
This tiny concoction results in a neat and useless:
Create Compose configuration and start the apps
Let’s write a Docker compose YAML (haproxy-demo.yml) file to tie our HAProxy/Interlock pair to our frontend node and our web back-ends to non-overlapping back-end nodes:
interlock:
  image: ehazlett/interlock
  container_name: interlock
  ports:
    - "80:80"
    - "8080:8080"
    - "8443:8443"
  volumes:
    - /etc/docker:/etc/docker
  command: >
    --swarm-url ${DOCKER_HOST} --swarm-tls-ca-cert=/etc/docker/ca.pem --swarm-tls-cert=/etc/docker/server.pem --swarm-tls-key=/etc/docker/server-key.pem --plugin haproxy start
  environment:
    - "constraint:node==frontend"
web:
  image: durdn/test-backend
  ports:
    - "8080:8080"
  hostname: cluster.test
  environment:
    - "affinity:container!=*interlock*"
    - "affinity:container!=*web*"
The docker compose configuration for the interlock container is a yaml-ified version of the HAProxy Interlock instructions.
We can control the cluster by switching our docker command to it with:
eval $(docker-machine env --swarm cluster-master)
Now we can start the applications on the cluster with:
docker-compose --x-networking -f haproxy-demo.yml up -d
Note the --x-networking flag which turns on the overlay networking for the cluster and allows all nodes to see eachother in a private VXLAN.
Once we need to scale the web backend to other nodes we can let Compose take care of it by typing:
docker-compose --x-networking -f haproxy-demo.yml scale web=3
Testing the setup
If everything is working you can see front-end and back-end up in the HAProxy administration interface.
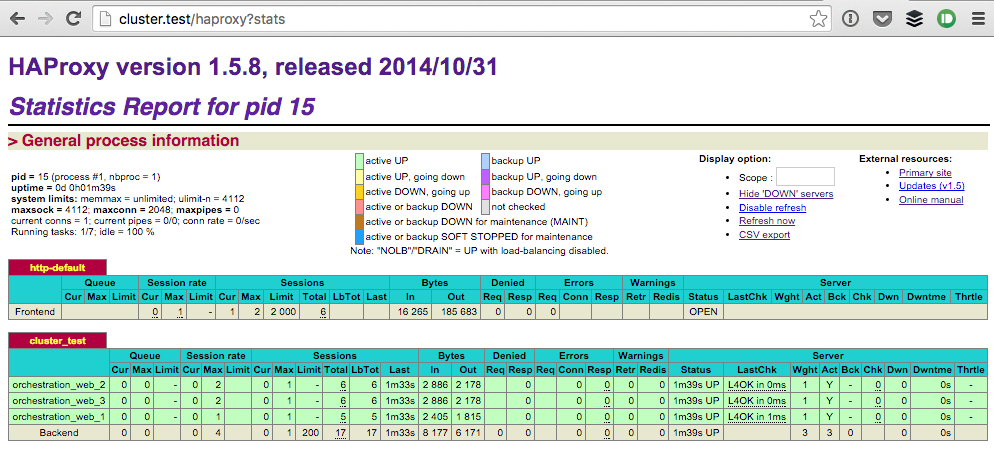
- Check that HAProxy is running on our front-end machine:
open http://stats:interlock@$(docker-machine ip frontend)/haproxy?statsYou can set the password via an environment variable (for this demo I left the default).
- To configure a persistent domain while we test things, let’s add a quick entry
to /etc/hosts automatically:
sudo echo "$(docker-machine ip frontend) cluster.test" >> /etc/hosts
Then you will be able to access the front-end at:
http://stats:interlock@cluster.test/haproxy?stats
Stay tuned
This concludes the first part of the series. If you want to be notified when the next installment is out follow me at @durdn or my awesome team at @atlassiandev.
Appendix: setting up the Docker Swarm cluster using Docker Machine
- Consul is a prerequisite: we skip creating the cluster with docker machine, if you need that part check out setting up Docker Machine with Consul to get up and running.
- Create the Swarm master:
docker-machine create -d digitalocean --digitalocean-access-token=$DO_TOKEN
  --digitalocean-image "debian-8-x64"
  --digitalocean-region "ams3" --swarm --swarm-master
  --swarm-discovery=consul://$(docker-machine ip consul):8500
  --engine-opt="cluster-store=consul://$(docker-machine ip consul):8500"
  --engine-opt="cluster-advertise=eth0:2376"
  cluster-master
- Create an entry point server or front-end node:
docker-machine create -d digitalocean --digitalocean-access-token=$DO_TOKEN
  --digitalocean-image "debian-8-x64"
  --digitalocean-region "ams3"
  --swarm
  --swarm-discovery=consul://$(docker-machine ip consul):8500
  --engine-label instance=entrypoint
  --engine-opt="cluster-store=consul://$(docker-machine ip consul):8500"
  --engine-opt="cluster-advertise=eth0:2376"
  frontend
- Create a node that will run our application server:
docker-machine create -d digitalocean --digitalocean-access-token=$DO_TOKEN
  --digitalocean-image "debian-8-x64"
  --digitalocean-region "ams3"
  --digitalocean-size "2gb"
  --swarm
  --swarm-discovery=consul://$(docker-machine ip consul):8500
  --engine-label instance=appserver
  --engine-opt="cluster-store=consul://$(docker-machine ip consul):8500"
  --engine-opt="cluster-advertise=eth0:2376"
  app-server-1
- Create a node to run our database:
docker-machine create -d digitalocean --digitalocean-access-token=$DO_TOKEN
  --digitalocean-image "debian-8-x64"
  --digitalocean-region "ams3"
  --swarm
  --swarm-discovery=consul://$(docker-machine ip consul):8500
  --engine-label instance=db
  --engine-opt="cluster-store=consul://$(docker-machine ip consul):8500"
  --engine-opt="cluster-advertise=eth0:2376"
  db-1
After all of the above this is how the cluster looks like:
NAME             ACTIVE   DRIVER         STATE     URL                         SWARM
consul           *        digitalocean   Running   tcp://146.185.143.64:2376
cluster-master   -        digitalocean   Running   tcp://188.166.52.137:2376   cluster-master (master)
frontend         -        digitalocean   Running   tcp://188.166.105.50:2376   cluster-master
app-server-1     -        digitalocean   Running   tcp://188.166.58.175:2376   cluster-master
db-1             -        digitalocean   Running   tcp://178.62.249.212:2376   cluster-master
We can control the cluster by switching our docker command to it with:
eval $(docker-machine env --swarm cluster-master)