
Atlassian provides two standard frameworks to get up and running with Atlassian Cloud App development quickly. They are:
However, the Atlassian App framework was explicitly designed to make it easy to integrate any web App with Atlassian Cloud, and this guide aims to show you how. You should be able to integrate your specific programming language (and web framework/library) with Atlassian Cloud.
However, what do you need to do to integrate your web App with Jira and Confluence Cloud? This blog post is going to show you!
What type of App are we building?
In this tutorial, we are going to guide you through writing a “dynamic” Atlassian App because most web frameworks involve writing server-side code.
Note: The definition of a static App is:
An Atlassian App that only relies upon static assets that could be served by a CDN; like HTML, CSS, JavaScript and JSON files.
Conversely, the definition of a dynamic Atlassian App is:
Not a static app. It likely requires a server backend. It can also do work outside of the client’s browser.
Why would we want to build a dynamic App instead of a static app?
Static apps are awesome. They have many advantages:
- Static apps are cheap to run.
You can host your static resources with a static hosting provider, and your App runs in the user’s browser.
- Static apps can still access the product REST APIs
One of the best features in the Atlassian App framework is the
AP.requestmethod. It lets a static app, running inside an App iframe, requests data or takes actions against the parent product, on behalf of the user that is currently viewing the app. You can read more about this in the AP.request documentation. - Static apps can persist data in Jira and Confluence Jira and Confluence have a feature known as Jira entity properties and Confluence content properties respectively. They are like a key-value store with a twist, in that you can save your keys and values against entities in the parent product. For example, in Jira, you can store key-value data against issues, boards and projects (to name a few). This key-value data allows your static App to remember what a user did in the past against a specific part of the product. To learn more, read up on the general concept called Storing data without a database.
Unfortunately, static apps can’t do everything. Here are some of the use cases that you might have that would cause you to want to write a dynamic Atlassian App:
- Listening to events from the products End-users can perform actions in our products; creating a Jira issue or commenting on a page in Confluence. When this happens, your App might like to know. To do that, you need to have a running web service that can listen to Webhook events.
- Integrating with any non-Atlassian services
With a static app, you may be able to make REST calls to an external service that has a CORS-enabled API. However, there are many services out there on the web that you want to integrate with that don't provide such REST APIs. However, if you want to integrate your service with Atlassian Cloud via the REST APIs (without Webhooks or providing UI inside of Jira or Confluence) then Atlassian has introduced a new App feature that might be interesting to you: OAuth 2.0 authorization code grants (3LO) for apps. We don’t discuss this new feature further in this post.
- Processing data
Many apps take data from the host product, operate on that data, and then return it to the user in a much more useable manner. Atlassian Connect apps that provide reports are an excellent example of typical behaviour. For example, instead of calculating a result from scratch in the user's browser often your App can be more performant by saving customer data in your own data structures and performing queries on that instead.
These are just some of the factors that may push you towards deciding that your situation requires you to write a dynamic Atlassian app. You may find more reasons when you develop your own Atlassian Apps.
With that in mind, you may have some questions:
- How do we write dynamic Atlassian apps in our language of choice?
- How do I extend an existing application to work with Atlassian Cloud?
The following sections answer those questions.
Which languages/frameworks can I use to write a dynamic Atlassian app?
Short answer: Any programming language at all so long as you respond correctly to the Atlassian App interface. Any web service can behave like an Atlassian App.
To prove that you can write an Atlassian App in any language look no further than the previous Atlassian Apps that I have written:
- My Reminders for Jira (Haskell) [Source code – Marketplace]
- Hackathon for Jira (Haskell) [Source code – Marketplace]
- Entity property tool for Jira (Node.js) [Source code – Marketplace]
- Sketchfab for Confluence (Static app) [Source code – Marketplace]
The Atlassian Ecosystem team maintains a list of other languages and frameworks that are available for use. Please choose any framework or tool that best suits your needs when writing an Atlassian App.
What do I need to build to make my web App behave like an Atlassian App?
The question that naturally arises is:
I want to write an Atlassian App in <web framework>. What code do I need to write so that it integrates seamlessly?
The answer to that question is the subject matter of this post:
- Handle the
installedevent.You are required to handle the
installedlifecycle flow so that you can save tenant-specific information. JWT authentication requires this information. [Source code] - Validate incoming JWT tokens.
You need to validate incoming JWT tokens to ensure that iframe page load requests and webhook POSTs come from Atlassian Cloud and not somebody pretending to be Atlassian Cloud.
- Load
all.jsin your iframe.All Atlassian Apps must load the
all.jsfile in their iframes to set-up a bridge between your App and the host product. - Sign outgoing requests with JWT tokens.
If you want to make an HTTP request back to the host product, then you need to sign the HTTP request with a JWT token that proves to Atlassian Cloud that you are an App it knows about and therefore should have access to customer data.
In pictorial form, these steps look like this:
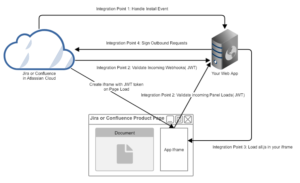
If you implement a web framework so that it can handle these four stages, then you have effectively made your web framework behave like an Atlassian App.
Writing code to accomplish the above four tasks is quite achievable. In this post, we punctuate descriptions with links to working code samples that implement the explained topic.
Creating a Tenant model in your Atlassian App
Atlassian Cloud has thousands of customers (where a customer is a site like https://your-domain.atlassian.net), and your App needs to be able to handle being installed in any (or all) of them.
For example, 1000 Jira customers could choose to install your App, and you need to have a way to separate the data for each customer from each other cleanly. It is a privacy and security issue if one customer is ever able to see another customer’s data.
For this post, we consider each unique “host product” (Jira or Confluence) that installs your App to be a “Tenant” of your app.
When a customer installs your App into an Atlassian Cloud product, you receive an installed lifecycle event that contains a set of valuable information you need to save and be able to recall for future requests. The data structure that you use to store this information is your “Tenant model”.
In the Atlassian Connect for Sprint Boot framework, we use the Spring Boot Persistence layer to enable you to store this data in a SQL or NoSQL database; the choice is yours. However, the data model that we store is the same. Please have a quick read through the Atlassian Host Tenant model definition. To learn more about this data structure you can read through the Lifecycle structure in the documentation.
The most important detail of this Tenant model is that you should be able to look up the Tenant model data by clientKey. If you store this data in a relational database, then clientKey should be unique, and it should be an indexed column in your table.
You can create your Tenant model in any way that you wish but you must have a tenant model, and you must be able to persist the data provided by your tenants. To authentication requests in the future, you need this information.
Handling the installed lifecycle event
In the previous section we talked about the installed event, but we did not talk about what triggers it or how to handle it.
Let’s start with how the lifecycle event is triggered:
- Your App declares that it requires authentication
In your App descriptor, you must declare that you require
jwtauthentication. If you don’t, then the lifecycle event will never be sent because we assume that you don’t need this information for future HTTP requests. [Documentation] - An administrator installs your App
When an Administrator installs your App your descriptor is read, the product provisions your modules and webhooks and, most importantly, your App is permitted to receive and post requests to that customer’s tenant. During that flow, Atlassian Cloud sends your App an HTTP POST that is the
installedlifecycle event. Atlassian Cloud uses the url of your App that you declared in thelifecycle.installedfield in your descriptor. [Documentation] - Your App handles the event
When your App receives the lifecycle event, it must decide what to do with it. If it accepts the request, then it should respond with an HTTP 204. If it blocks the request, then it should return an HTTP error code, like an HTTP 403 Forbidden. If an App returns a success response in all cases, then it has been implemented incorrectly.
However, how do you know if you should respond with an HTTP 204 or an HTTP error for any particular request? A better question might be:
How could a third party attacker exploit this system to gain access to customer data?
We want to block an attacker from getting access to customer data. Thus any installation attempt that could take an existing customers tenant and turn it into the attacker’s tenant should result in an error.
In the Atlassian App framework, every time your App updates it receives a new installed event. Thus Apps must handle two general install scenarios:
- The very first installation a Tenant for your cloud app.
- A subsequent update of a Tenant for your cloud app.
If the Atlassian host product thinks that it is installing your App on this Tenant for the first time, it does not set a JWT token on the installed HTTP Post request. Therefore, the presence of the JWT token is optional on the installed HTTP request.
With every installed request you receive the lifecycle payload, which contains the clientKey field. Every Tenant that an App installs into has an Atlassian Cloud unique identifier called the clientKey. You then persist these clientKeys into your storage layer.
You can see this if you use the Connect Inspector developer tool. Here is an example of an initial install (bottom) followed by a new install that is an update (top):
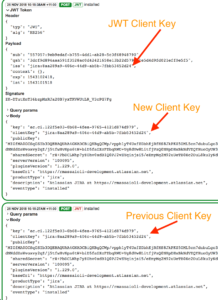
In the initial install, you can see that there is no JWT token. Atlassian Cloud provides the clientKey and sharedSecret in the lifecycle body.
In the update install, you can see that there is a signed JWT token present. Atlassian Cloud signs The JWT token with the sharedSecret from the last successful installed request. Also, the iss field set to the clientKey from the last successful installed request.
Given that, we should be able to implement the following logic:
if (!There is a JWT token on the request) {
  Extract the newClientKey from the body of the request;

  if (The newClientKey already exists in your persistence layer) {
    // Forbid an attacker from taking over this installation.
    return HTTP 403;
  }

  Save the new tenant data in your persistence layer.;
  return HTTP 204;
} else {
  Extract the clientKey from the jwt token;
  Load the Tenant data from the persistence layer using
  the clientKey;
  if (You could not find a tenant with that client key) {
    // This is an odd situation; the Tenant thinks that your
    // App is installed already, but your App thinks that
    // it has never seen it before. Save nevertheless because
    // there is no data for a potential attacker to get access
    // to.
    Save this as a new Tenant;
    return HTTP 204;
  }

  Validate the JWT token on the request using the persisted sharedSecret for that clientKey;

  if (The token is invalid) {
    // Forbid an attacker from taking over this installation.
    return HTTP 403;
  }

  Perform an update of your Tenant model with the new data;
  return HTTP 204;
}
Using the excellent code2flow app, we can convert this into a flowchart for you to implement:

(P.S. code2flow has a Jira Server and Confluence Server App on the Atlassian Marketplace!)
You can see that logic implemented in:
- Atlassian Connect for Spring Boot (Java)
- My Reminders (Haskell)
- Atlassian Connect for Node.js Express (JavaScript)
With that information, you should be able to handle the installation of any Atlassian App in any programming language and any web framework.
Verifying incoming requests from Atlassian Cloud
Your App is going to have incoming HTTP requests that will either ask to get data from your App (iframe loading) or try and give data to your App (Webhooks). You must validate that these HTTP requests originated from Atlassian Cloud and not some attacker.
You can use the Tenant model data that you saved in the previous step to validate incoming HTTP requests from Atlassian Cloud products. You must perform JWT validation.
The process, generally speaking, involves the following steps:
- Read the JWT token from the incoming HTTP request It may exist in query parameters with the key
jwtor theAuthorizationheader with the prefixJWT<space>. - Read the client key out of the token.
The token issuer (
iss) should match the client key of the host product that made the request. You should be able to extract it directly. You do not need to do any validation on this step. - Load the
sharedSecretfor that tenant from storageUsing the client key as an identifier look up the matching tenant in your persistence storage. Perform this lookup so that you can get the
sharedSecretfor validation purposes. Hold on to the tenant. (If you can’t find a tenant for theclientKeythen validation has already failed.) - Using the
sharedSecret, validate the original JWT tokenNow that you have the
sharedSecretyou can validate if the original token was legitimate. Important: This means that you need to be able to parse the JWT token and validate in separate steps. Make sure that your JWT library of choice can do that; most should be able to. It also means that you need to be able to validate the query string hash. - Cache the Tenant in memory for the current HTTP request.
That way you don't have to continually look up the tenant for the remainder of your request handling code.
That is all that you need to do. If you encounter an error at any point in the time, then you can fire back the appropriate HTTP error code.
If you want to see examples of this incoming HTTP request JWT validation, you can look at examples in:
- Atlassian Connect for Spring Boot (Java)
- My Reminders (Haskell)
- Atlassian Connect for Node.js Express (JavaScript)
Incoming request validation is a common task so all of these frameworks have centralised this logic into common functions that can just be easily applied where needed.
These examples should give you a good starting point for implementing similar login in your web framework of choice.
Writing a base Atlassian App iframe panel template/wrapper
The Atlassian App framework uses iframes to sandbox Apps when they provide user experiences inside the products. For example:
- In Jira, Apps can provide Web Panels (iframes) that can appear to as a gadget to the right-hand side of an Issue.
- In Confluence, Apps can provide Macros that appear inline on Confluence pages.
When a page first loads with these iframes present, the iframes are not shown immediately. Instead, a spinner is shown in their place and does not disappear until the all.js file is loaded and run into the iframe.
Including this snippet as the first element in the <head> ensures that all.js loads on the page before any other JavaScript executes:
<script src="https://connect-cdn.atl-paas.net/all.js"></script>
To learn more about AP and the all.js script, please read the documentation.
Since this logic needs to run on every page in your Atlassian Cloud App, we highly recommend that you turn this into an HTML template/wrapper that you can include or use in every iframe.
Now is probably a good time to note that, for frontend development, Atlassian has the Atlassian Design Guidelines. These Design Guidelines are implemented by Atlaskit and available for use in your App so that your App can be themed correctly and quickly. Atlaskit is delightfully easy to use and built on React.
Signing outgoing requests to Atlassian Cloud
At this point, we can save tenants, verify incoming requests and create iframes that render inside an Atlassian host product. The missing part of this picture is our App server making requests to the host product. To solve that we need to prove to the host product that we are the App that installed into it; we need an authentication mechanism.
JWT is the authentication mechanism required to talk from the App to the host product.
The process of generating a valid JWT token is explained thoroughly in the documentation, but we can surmise some key points:
- Generating the Query String hash (qsh) is the hardest part
The hardest part of generating the JWT token is providing the only part of the token that is not part of the vanilla JWT specification: the query string hash. The query string hash is used by Atlassian products to ensure that you can only use the JWT token to make an HTTP request to the exact URL that the JWT token was generated to access. We do this so that, if an attacker got hold of the JWT token, they could only make the request that the token was explicitly designed to make. Generating this token is tricky but the Atlassian documentation has an excellent guide on how to write a generator. There are also existing implementations that you contrast with your implementation. [Example implementation in Haskell]
- The JWT issuer (iss) should be your App key
At the top level of your descriptor, you would have provided an App key. The App key must be used as the issuer (iss) when generating the JWT token.
- Sign using the shared secret for the host
The shared secret for the host that you are trying to communicate with must be the shared secret that you use to sign the JWT token. Lucky for you, you have a Tenant model, so it should be easy to look up the shared secret for any given host product.
With that in mind, you can look at these examples of signing outbound HTTP requests:
- Atlassian Connect for Spring Boot (Java)
- My Reminders (Haskell)
- Atlassian Connect for Node.js Express
However, each of these implementations is relatively simple, in essence, they:
- Set the issuer to be the App key.
- Generate the QSH for the JWT token.
- Put the JWT token on the outgoing request.
Congratulations, this is the final step required to integrate your web framework with the Atlassian App framework for Jira and Confluence.
Where to go to from here?
Making it through this entire guide is a huge achievement! Congratulations and well done!
From here, I would encourage you, learned reader, to go and put this all into practice by listening to a Jira Issue, or Confluence page, update Webhook event in your App and then reacting to it by putting a comment on the issue or page respectively. Doing this forces you to exercise:
- The installation handler, to get your App installed.
- The verification of a JWT token in the incoming Webhook event.
- The signing of a JWT token for a request back to the host product.
This covers the majority of the steps that we ran through in this post and thus would be valuable to your new integration in a new web framework.
We are looking to make changes in the future to simplify this integration story even further. We want it to be straightforward to integrate your web App with Atlassian Cloud.
On that note, we can't wait to see what you build next, and we hope that this guide helps you build great Atlassian Cloud integrations. If you build one, then don't hesitate to let us know about it! We would love to see it.