
In the world of REST APIs, it is no longer necessary to rely on a service to provide an official SDK. While API wrappers may add some semantic sugar, it is often just as easy to use simple HTTP client libraries. In Python, Requests is often all you need to make use of the Bitbucket Cloud REST API. Just look at how simple this code is:
>>> import requests
>>> r = requests.get('https://api.bitbucket.org/1.0/user', auth=('email', 'password'))
>>> r.json()
{u'repositories': [{u'scm': u'git', u'has_wiki': False, u'last_updated':
...
Works great! Unless, you’ve enabled two-factor authentication (and I hope you have). When you have enabled two-factor authentication, then you are no longer allowed to access Bitbucket’s API with Basic Authentication. Instead, you have to use OAuth. With the additional security comes a little more code.
1. Add OAuth consumer
Let’s start by adding an OAuth consumer in Bitbucket. First, find Bitbucket Settings under your account. Then, find OAuth under Access management. Toward the bottom of the page, you’ll find the button for Add consumer. On this page, enter a human-readable name and description. In time, you may have many OAuth consumer entries, so the name and description are mainly for you to remember what they are. Here’s a consumer I created.
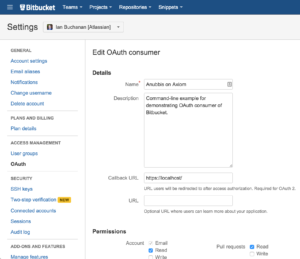
Bitbucket supports both OAuth 1.0 and 2.0. For this example, we’ll use 2.0 so we must provide a callback URL. We’ll provide https://localhost/ even though there isn’t any web application. Also for this example, we’ll enable the Account Read permission. If you are following along, you can come back to edit the consumer if you decide to grant your code more permissions.
After we click the Save button, we can click on the name of the new consumer to reveal a key and secret. We will need these in the client code so we’ll leave the browser open to keep them handy.
2. Get requests_oauthlib
Fortunately, Requests already has an extension for OAuth support, called requests_oauthlib. I prefer to install libraries into Python virtual environments. In any case, we can install the library with pip install requests_oauthlib. For Bitbucket, the version of this library is important. As of writing, the latest version (v0.6.0) is required because it contains my patch to make it work with Bitbucket.
Next, you’ll want to grab the following snippet:
#!/usr/bin/env python
# -*- coding: utf-8 -*-

from requests_oauthlib import OAuth2Session

class ClientSecrets:
    '''
    The structure of this class follows Google convention for `client_secrets.json`:
    https://developers.google.com/api-client-library/python/guide/aaa_client_secrets
    Bitbucket does not emit this structure so it must be manually constructed.
    '''
    client_id = "Shown as Key in the Bitbucket Cloud UI"
    client_secret = "Shown as Secret in the Bitbucket Cloud UI"
    redirect_uris = [
      "https://localhost"  # Used for testing.
    ]
    auth_uri = "https://bitbucket.org/site/oauth2/authorize"
    token_uri = "https://bitbucket.org/site/oauth2/access_token"
    server_base_uri = "https://api.bitbucket.org/"

def main():
    c = ClientSecrets()
    # Fetch a request token
    bitbucket = OAuth2Session(c.client_id)
    # Redirect user to Bitbucket for authorization
    authorization_url = bitbucket.authorization_url(c.auth_uri)
    print('Please go here and authorize: {}'.format(authorization_url[0]))
    # Get the authorization verifier code from the callback url
    redirect_response = raw_input('Paste the full redirect URL here:')
    # Fetch the access token
    bitbucket.fetch_token(
      c.token_uri,
      authorization_response=redirect_response,
      username=c.client_id,
      password=c.client_secret)
    # Fetch a protected resource, i.e. user profile
    r = bitbucket.get(c.server_base_uri + '1.0/user')
    print(r.content)

if __name__ == '__main__':
    main()
To run this example, you’ll need to replace the client_id string with the key you obtained from creating an OAuth consumer in Bitbucket. And the client_secret with the secret.
3. Run it
When we run the code, we are prompted to go to a URL to approve.
Please go here and authorize: https://bitbucket.org/site/oauth2/authorize?response_type=code&client_id=bWmhNJ89sM5nzPv6P&state=9RkeiUw4d8NswlgMIaSfTYdsHo97x
Paste the full redirect URL here:
(If you use try to use the exact link shown above, it won’t match the client_id and state provided by any real consumer so it won’t work.)
Once you click the approve button, your browser will redirect to localhost with a query parameter. Unless you are actually running a web application on your machine, you should just get a simple 404 error from your browser. That’s expected. Just copy the URL from the browser and paste it back to your command-line program. It might look something like this:
https://localhost/?state=9RkeiUw4d8NsSwlgMIaSfTYdsHo97x&code=c5LQuyquUyDT3ysSgr
That was the OAuth dance, so the code just spits out some JSON for a normal REST API request.
That’s all?
I wish. If you were writing a command-line application, there are better grant types than the default one for requests_oauthlib. That flow is the first one in the OAuth 2.0 specification, known as Authorization Code Grant. It is the most popular implementation on servers, which means it is the one flow surely supported by every OAuth library or tool. To set a baseline with a new library or tool, I always start with this flow. However, popularity doesn’t mean the authorization code grant flow is good for command-line applications. Although we saw how it can work, all the copy paste stuff is error-prone and tedious. A better grant flow would be Resource Owner Password Credentials Grant. In requests_oauthlib, you’ll want to learn more about the legacy application flow and the LegacyApplicationClient. On the other hand, if you are writing a web application, you will replace those 2 awkward copy-paste steps need with real web interactions. The first, where users authorize, can just be a web redirect. The second, where users return with an authorization code, should redirect to a real URL within your application, not localhost. Also, this contrived example only made a single HTTP request. If our code is going to make multiple requests over time, we would need to account for the fact that OAuth tokens time-out and need to be refreshed. In requests_oauthlib, you’ll want to learn more about refreshing tokens.
I hope you find that a useful starting point. If you have questions or need other help working with the Bitbucket API in Python, tweet me at @devpartisan or my team at @atlassiandev.