Internationalizing your plugin
Applicable: | This tutorial applies to JIRA 5.0 and later and Confluence 4.0 and later. |
Level of experience: | Intermediate. Our tutorials are classified as 'beginner', 'intermediate' and 'advanced'. This one is at 'intermediate' level. If you have never developed a plugin before, you may find this one a bit difficult. |
Plugin Source
The source code of the plugin used in this tutorial is available in the Atlassian public source repository. You can check out the source code from Bitbucket: https://bitbucket.org/atlassian_tutorial/jira-i18n.
Overview of the Tutorial
This tutorial shows you how to internationalise your plugin; that is, provide locale- and language-dependent text appropriate to the user's preferences.
In order to do this, you will create a JIRA plugin. Your plugin will consist of the following components:
- Java classes encapsulating the plugin logic.
- Resources for display of the plugin UI.
- A plugin descriptor (XML file) to enable the plugin module in the Atlassian application.
All these components will be contained within a single JAR file. Each component is further discussed in the examples below.
Be aware that the techniques described in this tutorial rely on Atlassian cross-product (or common) technologies and should be applicable to almost any recent Atlassian product release.
Required Knowledge
To complete this tutorial, you must already understand the basics of Java development: classes, interfaces, methods, how to use the compiler, and so on. You should also understand:
- How to create an Atlassian plugin project using the Atlassian Plugin SDK.
- How to open the plugin project in your IDE, such as Eclipse or IDEA.
- How to compile your project and create a JAR file using Maven.
Step 1. Create the Plugin Project
Use the appropriate atlas-create-application-plugin command to create your plugin. For example, atlas-create-jira-plugin or atlas-create-confluence-plugin.
When prompted, enter the following information to identify your plugin:
- group-id:
com.example.tutorial.plugins - artifact-id:
tutorial-i18n-plugin - version:
1.0 - package:
com.example.tutorial.plugins
Step 2. Add Plugin Metadata to the POM
Now you need to edit your POM (Project Object Model definition file) to add some metadata about your plugin and your company or organisation.
-
Edit the
pom.xmlfile in the root folder of your plugin. -
Add your company or organisation name and your website to the
<organization>element:1 2
<organization> <name>Example Company</name> <url>http://www.example.com/</url> </organization> -
Update the
<description>element:1 2
<description>This plugin demonstrates how to implement i18n into your plugins.</description> -
Save the file.
Step 3. Add your Plugin Modules to the Plugin Descriptor
Now you will add some plugin module(s) to your plugin descriptor at src/main/resources/atlassian-plugin.xml. The plugin descriptor is an XML file that identifies the plugin to JIRA and defines the functionality that the plugin requires.
Here is a basic plugin descriptor, with no plugin modules yet defined:
1
2<atlassian-plugin key="${project.groupId}.${project.artifactId}" name="${project.artifactId}" plugins-version="2">
    <plugin-info>
        <description>${project.description}</description>
        <version>${project.version}</version>
        <vendor name="${project.organization.name}" url="${project.organization.url}" />
    </plugin-info>
</atlassian-plugin>
Note that some of the information from the POM is transferred to the plugin descriptor using variable names such as ${project.artifactId}.
You will need the following plugin modules (or available resources):
- Component Import -- for SAL's
I18nResolverand ATR'sVelocityTemplateRenderer. - Servlet -- to render the Velocity template.
- Resource -- for the i18n properties. (This is not a plugin module type per se - just an available resource within your plugin.)
- Web Resource -- for the JavaScript resource, which we will add later on in the tutorial.
Let's use the plugin module generator, part of the Atlassian Plugin SDK, to generate the stubs for our modules.
-
Open a command window and go to the plugin root folder (where the
pom.xmlis located). -
Run
atlas-create-jira-plugin-moduleSee atlas-create-jira-plugin-module for details on this command.
-
Choose Component Import (no. 1).
-
When prompted, enter the following information to describe your plugin module:
- Enter Fully Qualified Interface:
com.atlassian.sal.api.message.I18nResolver
- Enter Fully Qualified Interface:
-
Accept the default values for the next two options. (They are only mentioned here so you can see how the values specified here are added to your plugin descriptor file.)
- Module Key:
I18nResolver - Filter (not required): Just press the 'Enter' key.
- Module Key:
-
When prompted with Add Another Plugin Module, choose 'Y' (for 'Yes').
-
Choose Component Import (no. 1) again.
-
When prompted, enter the following information:
- Enter Fully Qualified Interface:
com.atlassian.templaterenderer.velocity.one.six.VelocityTemplateRenderer
- Enter Fully Qualified Interface:
-
Accept the default values for the next two options:
- Module Key:
velocityTemplateRenderer - Filter (not required): Again, just press the 'Enter' key.
- Module Key:
-
When prompted with Add Another Plugin Module, choose 'Y'.
-
Now choose Servlet (no. 21).
-
When prompted, enter the following information to describe the plugin module:
- Enter New Classname:
RenderingServlet
- Enter New Classname:
-
Accept the default value for the next option:
- Enter Package Name:
com.example.tutorial.plugins.servlet
- Enter Package Name:
-
When prompted with Show Advanced Setup, choose 'N' (for 'No').
-
When prompted with Add Another Plugin Module, choose 'N'.
Check the atlassian-plugin.xml file and confirm that the module generator has yielded the correct configuration:
1
2<component-import key="i18nResolver"
    interface="com.atlassian.sal.api.message.I18nResolver"/>
<resource type="i18n" name="i18n" location="atlassian-plugin"/>
<component-import key="velocityTemplateRenderer"
    interface="com.atlassian.templaterenderer.velocity.one.six.VelocityTemplateRenderer"/>
<servlet name="Rendering Servlet" i18n-name-key="rendering-servlet.name"
         key="rendering-servlet"
         class="com.example.tutorial.plugins.servlet.RenderingServlet">
    <description key="rendering-servlet.description">The Rendering Servlet Plugin</description>
    <url-pattern>/renderingservlet</url-pattern>
</servlet>
Step 4. Add a Dependency to Your Project's POM
While JIRA bundles the Atlassian Template Renderer as part of the Plugin Development Platform, it is not included by default in JIRA's Maven dependencies list. Therefore, we will need to add it manually to our plugin's pom.xml file.
Open the pom.xml file in your plugin's root directory and locate the jira-api <dependency/> element:
1
2<dependency>
  <groupId>com.atlassian.jira</groupId>
  <artifactId>jira-api</artifactId>
  <version>${jira.version}</version>
  <scope>provided</scope>
</dependency>
Insert the following Atlassian Template Renderer <dependency/> element just below this:
1
2<dependency>
  <groupId>com.atlassian.templaterenderer</groupId>
  <artifactId>atlassian-template-renderer-api</artifactId>
  <version>1.3.1</version>
  <scope>provided</scope>
</dependency>
This will bring the renderer's public API into our classpath.
Specifying provided in a dependency's <scope/> element instructs Maven to make this library available at runtime, but not bundle it into our final plugin.
Step 5. Develop the plugin
Follow these steps to build and install your plugin, so that you can test your code. If you have not already started the application, start it now:
- Open a command window and go to the plugin root folder (where the
pom.xmlis located). - Run
atlas-run(oratlas-debugif you might want to launch the debugger in your IDE).
From this point onwards, you can use QuickReload to reinstall your plugin behind the scenes as you work, simply by rebuilding your plugin.
FastDev and atlas-cli have been deprecated. Please use Automatic Plugin Reinstallation with QuickReload instead.
To trigger the reinstallation of your plugin:
- Make the changes to your plugin module.
- Open the Developer Toolbar.

- Press the FastDev icon.
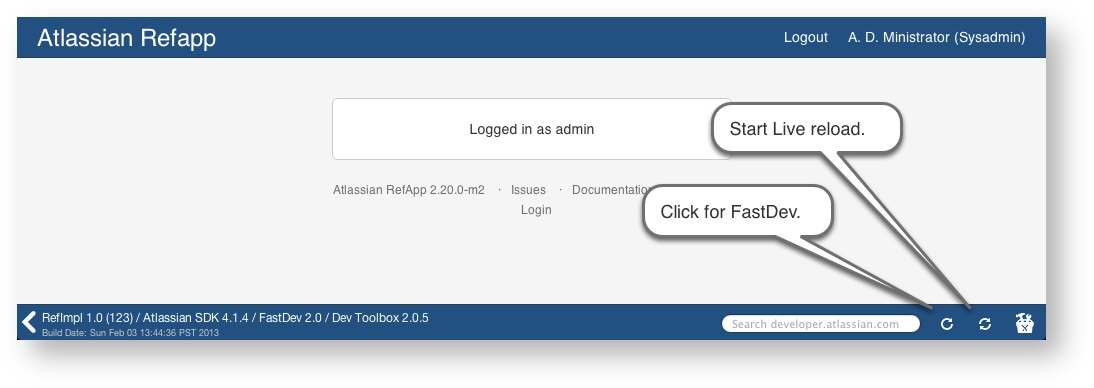
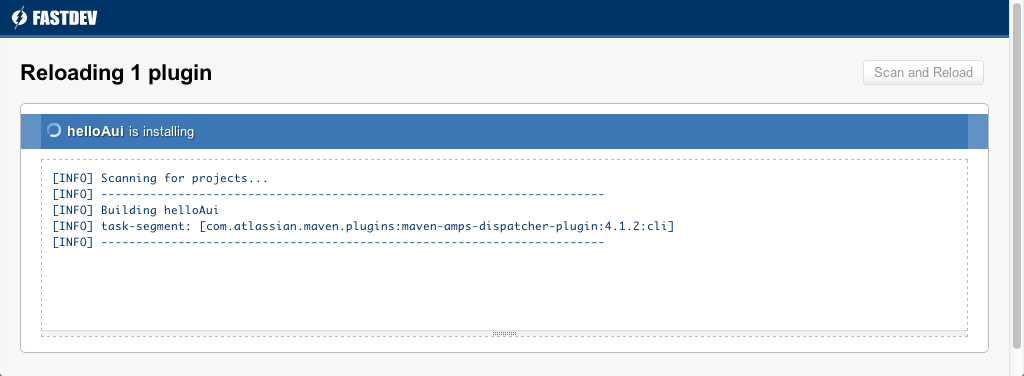
The system rebuilds and reloads your plugin:
Use live reload to view real-time updates to templates and other resources:
- Open the Developer Toolbar.
- Press the live reload icon.
The icon starts to revolve indicating it is on. - Edit your project resources.
- Save your changes:
Back in the host application, your plugin displays any user visible changes you make.
Go back to the browser. The updated plugin has been installed into the application, and you can test your changes.
The full instructions are in the SDK guide.
Now that the preliminaries are done, let's proceed with the code.
We'll get started with the following:
- Create a Velocity template for the final page;
- Flesh out the servlet we just created to render the template;
- Add some entries to the
atlassian-plugin.propertiesto render in the template.
Step 5a. Create the Velocity template
Create a basic Velocity template file at src/main/resources/templates/page.vm and give it these contents:
1
2<html>
    <head>

    </head>
    <body>
    Hi, I'm a Velocity template!
    </body>
</html>
We'll add something more interesting to this file later on.
Step 5b. Flesh out the servlet
Open the RenderingServlet Java class file (created by the plugin module generator in step 3 above), which should be at src/main/java/com/example/tutorial/plugins/servlet/RenderingServlet.java, and enter the following:
The comments in the section of code below indicate lines (or sections) of code which are additional to the default RenderingServlet.java code stub that was automatically generated when you created the servlet plugin module (above). You can omit these comments ![]()
1
2package com.example.tutorial.plugins.servlet;

import com.atlassian.templaterenderer.TemplateRenderer;  // new!
import com.google.common.collect.Maps;
import org.slf4j.Logger;
import org.slf4j.LoggerFactory;

import javax.servlet.ServletException;
import javax.servlet.http.HttpServlet;
import javax.servlet.http.HttpServletRequest;
import javax.servlet.http.HttpServletResponse;
import java.io.IOException;
import java.util.Map;

public class RenderingServlet extends HttpServlet {
    private static final Logger log = LoggerFactory.getLogger(RenderingServlet.class);
    private static final String TEMPLATE_PATH = "/templates/page.vm";  // new!

    private final TemplateRenderer templateRenderer;  // new!

    // new!
    public RenderingServlet(TemplateRenderer templateRenderer) {
        this.templateRenderer = templateRenderer;
    }

    @Override
    protected void doGet(HttpServletRequest req, HttpServletResponse resp) throws ServletException, IOException
    {
        Map<String, Object> context = Maps.newHashMap();  // new!

        resp.setContentType("text/html;charset=utf-8");  // modified!
        templateRenderer.render(TEMPLATE_PATH, context, resp.getWriter());  // new!
    }
}
This code is the minimum required to render a Velocity template.
Save and return to your terminal window.
If you have not already done so, run atlas-run to start JIRA.
Once JIRA has started, browse to http://localhost:2990/jira/plugins/servlet/renderingservlet (logging in if necessary) and you should see a friendly greeting from the freshly rendered template. Make sure that you keep this browser tab open as we'll be using it from now on.
Step 5c. Get some internationalised values from atlassian-plugin.properties
Open the src/main/resources/atlassian-plugin.properties file and add the following line:
1
2internationalized.greeting=I came from the properties file!
Now go back to RenderingServlet Java class and add the I18nResolver object to the constructor:
1
2package com.example.tutorial.plugins.servlet;

import com.atlassian.sal.api.message.I18nResolver;
import com.atlassian.templaterenderer.TemplateRenderer;
import com.google.common.collect.Maps;  // new!
import org.slf4j.Logger;
import org.slf4j.LoggerFactory;

import javax.servlet.ServletException;
import javax.servlet.http.HttpServlet;
import javax.servlet.http.HttpServletRequest;
import javax.servlet.http.HttpServletResponse;
import java.io.IOException;
import java.util.Map;

public class RenderingServlet extends HttpServlet {
    private static final Logger log = LoggerFactory.getLogger(RenderingServlet.class);
    private static final String TEMPLATE_PATH = "/templates/page.vm";

    private final TemplateRenderer templateRenderer;
    private final I18nResolver i18nResolver;  // new!

    public RenderingServlet(TemplateRenderer templateRenderer,
            I18nResolver i18nResolver) {
        this.templateRenderer = templateRenderer;
        this.i18nResolver = i18nResolver;  // new!
    }

    @Override
    protected void doGet(HttpServletRequest req, HttpServletResponse resp) throws ServletException, IOException
    {
        Map<String, Object> context = Maps.newHashMap();
        context.put("greeting",
            i18nResolver.getText("internationalized.greeting"));  // new!

        resp.setContentType("text/html;charset=utf-8");
        templateRenderer.render(TEMPLATE_PATH, context, resp.getWriter());
    }

}
The I18nResolver interface is provided by Atlassian's Shared Access Layer (SAL).
Each product implements this interface such that any plugin can read a correctly localised value from its properties. Here, we use it to retrieve the value we just added for internationalized.greeting and store it in the Velocity context under the symbol "greeting".
Finally, open the basic Velocity template you created above and add specify the "greeting" symbol in it:
1
2<html>
    <head>

    </head>
    <body>
    Hi, I'm a Velocity template! $greeting  ## new!
    </body>
</html>
At render time, Velocity will replace $greeting with the value contained under that name in its context.
Rebuild your plugin, and return to your browser and refresh.
The QuickReload feature will notice the changes you made to your plugin's code and do the behind-the-scenes work required to refresh it with these changes. When the page finishes loading, you should see the same friendly greeting along with a new one explaining just where it came from.
Step 5d. I18n inside the Velocity template
You may be thinking that fetching i18n values from the Java code is only slightly better than hard-coding the values themselves and you would be right. There is not any compelling reason as to why the servlet should have to provide values through the Velocity context - especially not when the template can access them on its own!
Hence, now remove the following line from the servlet's doGet() method:
1
2context.put("greeting", i18nResolver.getText("internationalized.greeting"));
Rebuild your plugin, which will once again be reinstalled with QuickReload , and notice that the second greeting is now missing, replaced only by "$greeting".
If Velocity cannot find the named reference in the context, the default behaviour is to simply print the reference verbatim.
Reopen the Velocity template and change the greeting line to the following:
1
2Hi, I'm a Velocity template! $i18n.getText("internationalized.greeting")
Shift-reload your browser page and you will see that the greeting has returned! How is this possible? Where did the $i18n reference come from?
TemplateRenderer has a bit of magic: the SAL I18nResolver is automatically appended to the Velocity context under the name i18n, so it is always available in any template that TemplateRenderer renders. Apart from being useful, this allows us to localise concerns.
The template is the only place where we need to worry about internationalisation. While it is certainly possible to use the servlet to provide human-readable text, we can rid ourselves of this 'middleman' context and make the intention crystal clear.
Step 5e. I18n on the client
So far, we have seen how to implement i18n from the 'back-end' code. Now it is time to see how to accomplish this from the 'front-end'.
The Atlassian User Interface (AUI) library, contains CSS and JavaScript resources designed to make it easy to give Atlassian applications - and plugins - a consistent, attractive look and feel, as well as helpers for very common front-end tasks. One of those tasks is i18n and AUI's current method for implementing this is through the AJS.params JavaScript object.
Return to the Velocity template and enter the following code inside the <head> element:
1
2<meta name="decorator" content="atl.general">
Shift-reload your browser page and you will see that our boring old page has been transformed into something that matches other pages in JIRA perfectly. JIRA uses SiteMesh during page rendering to surround a page's content with the JIRA look and feel; the <meta> tag we added tells SiteMesh which of its configured decorators to use.
Some contexts are supported in all products, while some others are only applicable in a specific one. You can look through other available JIRA decorators for other options. Here, we are using the atl.general decorator, which is meant for all pages except those displayed as part of admin-only configuration.
Applying this decorator does another important thing: it applies the standard JIRA front-end resources to the page and makes them available to our plugin. This includes AUI, so now the AJS.params object is available to use.
Return to atlassian-plugin.properties and add the following line:
1
2javascript.greeting=I will wind up in JavaScript!
Return to the Velocity template and enter the following code immediately after the existing greeting line:
1
2<form id="parameterContainer">
  <fieldset class="hidden parameters">
    <input type="hidden" title="greeting" value="$i18n.getText('javascript.greeting')">
  </fieldset>
</form>
The key here is the <fieldset> element's class parameter: hidden parameters:
- The
hiddenclass prevents the fieldset from being displayed on the page, which is deliberate because we are not intending to show the form on the page. - The
parametersclass is a signal toAJS.paramsthat the<input>elements should be collected and added as properties toAJS.params.
Reload the browser page and view the page source.
Be aware that you will not see any changes rendered on the page just yet.
In the page source view, locate the <fieldset> element and confirm that it looks like this:
1
2<form id="parameterContainer">
  <fieldset class="hidden parameters">
    <input type="hidden" title="greeting" value="I will wind up in JavaScript!">
  </fieldset>
</form>
We see that Velocity has done the same favour for us as it did earlier in this tutorial, by substituting the value in the properties file for the $i18n.getText() reference.
After Velocity finishes rendering the page - and while the page renders in the browser - AUI will scan the page's HTML for a <fieldset> with the hidden parameters classes and add them as properties to AJS.params. In this case, the property AJS.params.greeting is now defined and has the value "I will wind up in JavaScript!".
Step 5f. Using AJS.params in JavaScript
Now we will see how to use this value in a plugin's JavaScript resources.
Return to the Velocity template and add the following immediately below the <form/> element:
1
2<p id="greeting-element"></p>
This will be where we insert our text.
Under src/main/resources, create the directory includes/js and then create a new file in that directory called i18n.js. Add the following to this file:
1
2AJS.toInit(function() {
    var element = AJS.$("#greeting-element").text(AJS.params.greeting);
});
This piece of JavaScript uses jQuery (which is included with AUI), to find the element on the page with ID greeting-element and fill it with the value of AJS.params.greeting.
Now we need to tell JIRA that our plugin requires this JavaScript resource, via a Web Resource Plugin Module. To do this, we will use the plugin module generator component of the Atlassian Plugin SDK again:
-
Open a command window and go to the plugin root folder (where the
pom.xmlis located). -
Run
atlas-create-jira-plugin-moduleSee atlas-create-jira-plugin-module for details on this command.
-
Choose Web Resource (no. 28).
-
When prompted, enter the following information to describe your plugin module:
- Enter Plugin Module Name:
Example Web Resources - Enter Resource Name:
i18n.js - Enter Resource Type: Accept the default of
download. - Enter Location:
/includes/js/i18n.js
- Enter Plugin Module Name:
-
Accept remaining default values ('N' for 'No') when prompted with:
- Add Resource Parameter
- Add Resource
- Show Advanced Setup
- Add Another Plugin Module
Check that your atlassian-plugin.xml file now contains the following:
1
2<web-resource name="Example Web Resources" i18n-name-key="example-web-resources.name" key="example-web-resources">
    <description key="example-web-resources.description">The Example Web Resources Plugin</description>
    <resource name="i18n.js" type="download" location="/includes/js/i18n.js"/>
</web-resource>
We have created a web resource module that points to our JavaScript and tells the plugin system where to make it available. We can refer to this module by name, which we will do next.
Return to the Velocity template and add the following inside the <head/> element:
1
2$webResourceManager.requireResource("com.example.tutorial.plugins.tutorial-i18n-plugin:example-web-resources")
$webResourceManager is another object included in the Velocity context by default. It allows a page to request resources - CSS, JavaScript, etc. - to be included in the page at render time. This line requests the resources under what's called the module complete key. When this page renders, our JavaScript will be included.
Shift-reload your browser page and you should see the original greeting followed by our new, second, JavaScript-injected greeting.
Recapitulation
This tutorial has shown you how to add internationalisation support to your plugin by:
- Defining a properties file.
- Getting text directly from those properties.
- Using the Atlassian Template Renderer to insert text directly into your Velocity templates.
- Using AUI's
AJS.paramsobject to get text into your JavaScript code.
Congratulations, that's it
Have a chocolate!
Rate this page: