Getting started with Open DevOps
This page will show you how to get the benefits of Open DevOps in Jira.
It explains how to connect deployment-related data to Jira using a REST API, including how to provide the data, make an API call, and see the data appear in a Jira issue.
Before you begin
If you are new to Jira Cloud development, the Getting started guide may provide concepts that will help you accomplish this tutorial.
To complete this tutorial, you'll need the following:
- An understanding of bash, REST APIs, and Open DevOps
- An Atlassian site with Jira Software Cloud
- A team-managed project
All commands in steps are executable in a Bash terminal prompt.
If you would like to let us know that you tried this tutorial,
you can do that by sharing your email
(or any other message).
The way you can do this is set environment variable EMAILID,
which will be used in API requests in following steps.
This variable is optional
and is not required for production applications.
1
2export EMAILID=
Step 1: Convert your Jira base URL into a Cloud ID
This example uses a variation of OAuth
where REST API URLs are constructed with a Cloud ID
instead of the base URL used for other forms of authentication.
Set your site domain as an environment variable, JIRA_BASE_URL,
by entering your value after the = in the command below.
Then capture your CLOUD_ID with the following command:
1
2export JIRA_BASE_URL=
export CLOUD_ID=$(\
  curl "${JIRA_BASE_URL}/_edge/tenant_info" | \
  jq --raw-output '.cloudId')
To check if you have the Cloud ID,
enter in your terminal echo $CLOUD_ID.
You should see a string,
similar to the following:
1
2c68adbe0-2b09-4add-b08e-eb5797b31bc9
Step 2: Get the access token
To make API calls, you need to create an OAuth app and get the credentials. To learn more about getting the credentials, see Integrate with self-hosted tools using OAuth. Make sure you select Deployments option in Permissions field to follow along this tutorial.
Store your CLIENT_ID
and CLIENT_SECRET
as environment variables.
Enter your value after the = in the command below:
1
2export CLIENT_ID=
export CLIENT_SECRET=
You will need an access token to authenticate
when calling the Jira Software Cloud APIs.
Capture your ACCESS_TOKEN with the following command:
1
2export ACCESS_TOKEN=$(curl --request POST 'https://api.atlassian.com/oauth/token' \
--header "From: ${EMAILID:-anonymous}" \
--header 'Content-Type: application/json' \
--data-raw "{
    \"audience\": \"api.atlassian.com\",
    \"grant_type\":\"client_credentials\",
    \"client_id\": \"$CLIENT_ID\",
    \"client_secret\": \"$CLIENT_SECRET\"
}" | jq --raw-output '.access_token')
To check if you have the access token,
enter in your terminal echo $ACCESS_TOKEN.
You should see a long string,
similar to the following:
1
2eyJhbGciOiJSUzI1NiIsInR5cCI6IkpXVCIsImtpZCI6Ik16bERNemsxTVRoRlFVRTJRa0ZGT0VGRk9URkJOREJDTVRRek5EZzJSRVpDT1VKRFJrVXdNZyJ9.eyJodHRwczovL2F0bGFzc2lhbi5jb20vb2F1dGhDbGllbnRJZCI6IndwYTR5V09MaEpGOVJDUTBYOW02RHVCZjNTNHdTVGNoIiwiaHR0cHM6Ly9hdGxhc3NpYW4uY29tL2VtYWlsRG9tYWluIjoiYXRsYXNzaWFuLmNvbSIsImh0dHBzOi8vYXRsYXNzaWFuLmNvbS9zeXN0ZW1BY2NvdW50SWQiOiI1ZjFlZTM5ZTg5MWVkYzAwMjJiM2IyZTciLCJodHRwczovL2F0bGFzc2lhbi5jb20vc3lzdGVtQWNjb3VudEVtYWlsRG9tYWluIjoiY29ubmVjdC5hdGxhc3NpYW4uY29tIiwiaHR0cHM6Ly9hdGxhc3NpYW4uY29tL3ZlcmlmaWVkIjp0cnVlLCJodHRwczovL2F0bGFzc2lhbi5jb20vZmlyc3RQYXJ0eSI6ZmFsc2UsImh0dHBzOi8vYXRsYXNzaWFuLmNvbS8zbG8iOnRydWUsImlzcyI6Imh0dHBzOi8vYXRsYXNzaWFuLWFjY291bnQtcHJvZC5wdXMyLmF1dGgwLmNvbS8iLCJzdWIiOiJhdXRoMHw1NTcwNTc6M2QwZTY0YWUtMzVkMy00OTBkLWI2ZDktZDgxYzk4MTQ3NmQwIiwiYXVkIjoiYXBpLmF0bGFzc2lhbi5jb20iLCJpYXQiOjE2MTkxMzYzNjYsImV4cCI6MTYxOTEzOTk2NiwiYXpwIjoid3BhNHlXT0xoSkY5UkNRMFg5bTZEdUJmM1M0d1NUY2giLCJzY29wZSI6InJlYWQ6bWUgb2ZmbGluZV9hY2Nlc3MifQ.p7r3_LVKp6ABVPavB52_j2To39SjIcjz5WOLrj24BCh4MgzqPclDDrgqvCEE028StX7-nFt6upupA2ltvfBxjhzL5h2nMCeHKWPlPVDfFe93w-tap9AI_G3u6IaKLSfmASCZ_nkHRmUimPYfGN67hzlsjQ0Qj1iggtUhzBhpHZi5LWxF7r6RYyz4JXE0e3SzCgVfDlr4Zjhz8wZ4l2-5jlQ-llyJbQSEWeP74Ew5MV-k5AygvTGcizBksPJrZ1X1f2nQEGUjjAyCVk75wk_32DlMmRw6P3O2aL05xtVQZau6WKUn_XL7CZQc0CDgUhalJgsGdMzdRHy5sZIiFHidNA
Access tokens are valid only for 15 min. On expiration of the token, you will have to make this request again to get a new token and then you will be able to make API calls.
When a user deletes an Oauth app, all the data that the app sent to Jira is deleted. If the app is reinstalled, this data won't be added back unless the app resends historical information to Jira.
Step 3: Make an API call
You can now make the API call using the Submit deployment data API.
At a minimum,
you will need to create or find a Jira issue
to connect the deployment data.
Replace your issue key with the example issue key EXAMPLE-1 below.
You might find it easier to paste this example into your favorite text editor
so you can change the values.
Then execute in your terminal:
1
2curl --request POST "https://api.atlassian.com/jira/deployments/0.1/cloud/${CLOUD_ID}/bulk" \
--header "From: ${EMAILID:-random-email-id}" \
--header "Authorization: Bearer ${ACCESS_TOKEN}" \
--header 'Content-Type: application/json' \
--data-raw '{
  "deployments": [
    {
      "deploymentSequenceNumber": 1,
      "updateSequenceNumber": 1,
      "associations": [
        {
          "associationType": "issueIdOrKeys",
          "values": [
            "EXAMPLE-1"
          ]
        }
      ],
      "displayName": "v2.0",
      "url": "http://example.com",
      "description": "Updating APIs to v2.0",
      "lastUpdated": "2021-04-02T23:27:25.000Z",
      "state": "successful",
      "pipeline": {
        "id": "api-update",
        "displayName": "API updates",
        "url": "http://example.com/pipeline/api-update"
      },
      "environment": {
        "id": "production",
        "displayName": "Production",
        "type": "production"
      }
    }
  ]
}'
This is the minimum payload. All of the fields in this example are required. Below is an explanation of the important body parameters so you can change them to meaningful values for you:
deploymentSequenceNumber- This number identifies a deployment.
- In the above example the value is
1, which indicates this is the first deployment in a sequence of deployments for a specific pipeline and environment. In the next deployment, the value would be2. If you decide to repeat step 3 with your new values, make sure to start incrementing this value. updateSequenceNumber- This is a number used to apply an order to the updates to a specific deployment,
as identified by the
deploymentSequenceNumber. - In context of the above example,
if you wanted to update the
successfuldeployment with afailedstate, then send another REST API request with the new state, usingdeploymentSequenceNumberof1, and anupdateSequenceNumberof2. associations- This associates the deployment with issues.
In this example, the deployment is associted with an issue of key
EXAMPLE-1. displayName- The human-readable name for the deployment. This will be shown in the UI.
url- A URL users can click to return to details of this deployment in this environment.
state- The flow of a deployment.
The happy path is
pending→in_progress→successful. There are also states for pipeline failures and error conditions. pipeline- A name of the pipeline as an automated process (usually comprised of multiple stages) for getting software from version control right through to the production environment.
environment- The environment to which the code was deployed.
The simplest transition is from
developmenttoproduction.
You should get a success response similar to the one below:
1
2{
    "acceptedDeployments": [
        {
            "pipelineId": "api-update",
            "environmentId": "production",
            "deploymentSequenceNumber": 1
        }
    ],
    "rejectedDeployments": [],
    "unknownIssueKeys": [],
    "unknownAssociations": []
}
If you come across an error, the error response explains why it failed, or check the API docs to get a more detailed descriptions about errors.
Step 4: Verify the API call
-
Navigate to your Jira Software project and select the issue that you want to connect the deployment data to (the issue key you provided in Step 3).
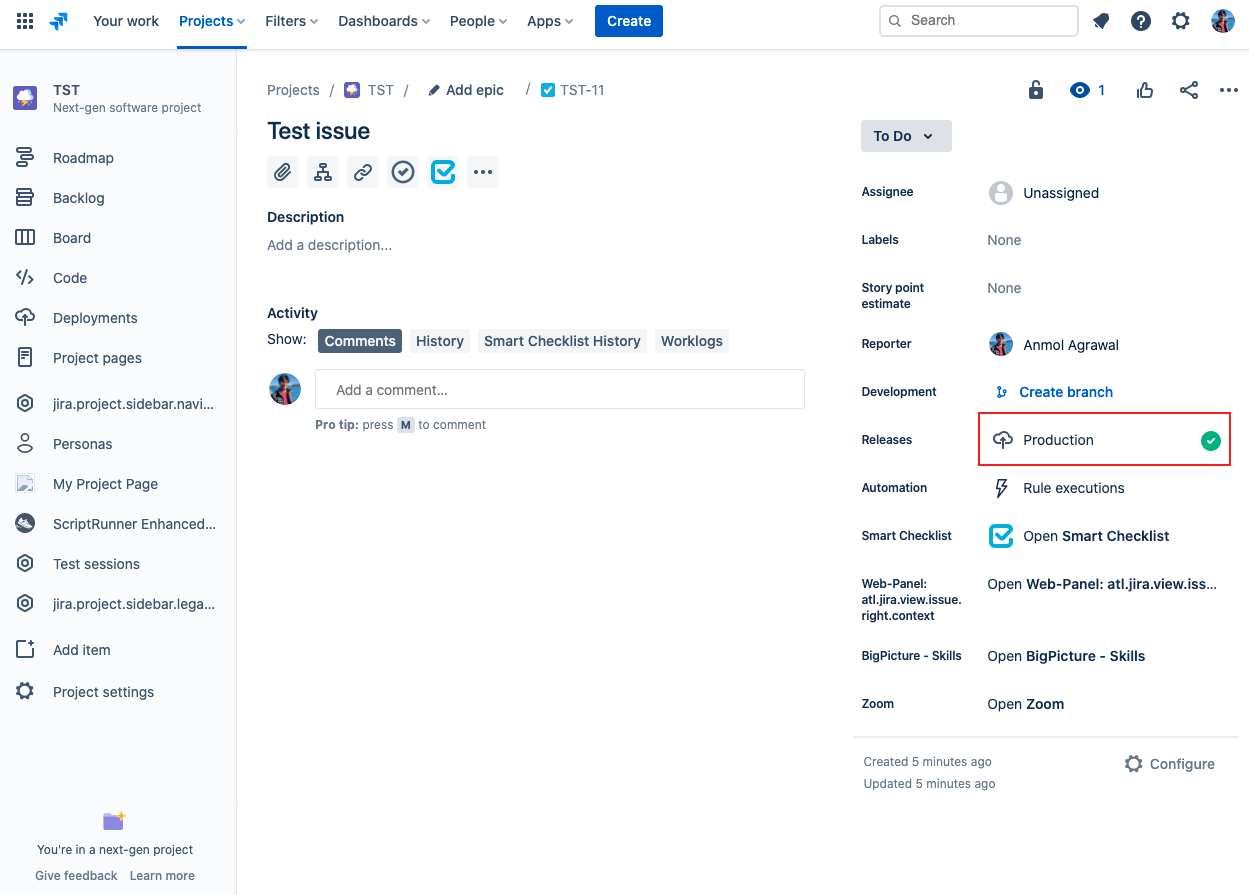
-
In the right panel, click on the value listed next to Releases.
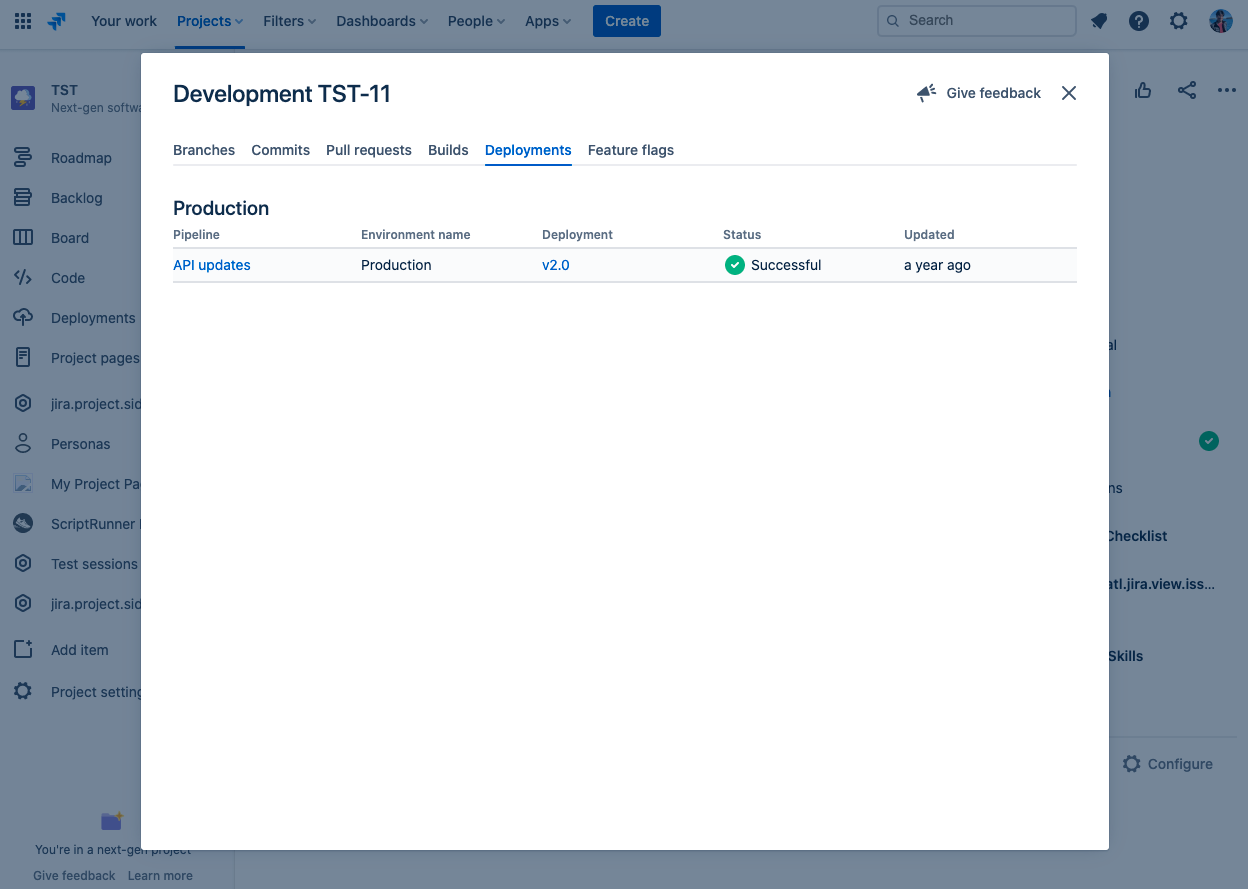
- In the modal that appears, select the Deployment tab.
You should see the details sent via the API call, as shown below:
Next steps
You're all set up to connect other types of data to your Jira Software project.
- Connect build data
- Connect development data
Rate this page: