Use OAuth 2.0 (3LO) on AGC-compatible apps
This page shows you how to configure OAuth 2.0 (3LO) (also known as "three-legged OAuth" or "authorization code grants") apps. OAuth 2.0 (3LO) allows external applications and services to access Atlassian product APIs on a user's behalf. OAuth 2.0 (3LO) apps are created and managed in the AGC developer console.
This page only applies to the implementation of OAuth 2.0 in the Atlassian Government Cloud (AGC). For information relevant to OAuth 2.0 outside of the AGC, refer to the Jira and Confluence documentation.
Overview
OAuth 2.0 (3LO) involves three parties:
- An Atlassian site (resource)
- A user (resource owner)
- An external application/service (client).
For example, a Jira or Confluence site (resource), an Atlassian user (resource owner), and Gmail (client). Underlying the authorization interactions between these three parties is an authorization server.
To the user, the authorization process looks like this:
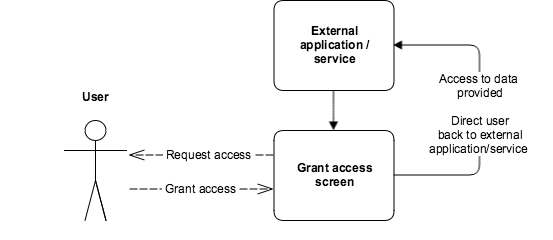
- The app directs the user to an Atlassian screen that prompts them to grant access to their data on the Atlassian site. The screen displays the access being requested in the Atlassian product.
- The user grants (or denies) access to their data on the Atlassian site, via the screen.
- The user is directed back to the external service. If the user granted access, the external service can now access data (within the specified scopes) from the Atlassian site on the user's behalf.
Underlying this process are a number of interactions between the external service, the app, and the authorization server. The full process is described in more detail below.
Note, this process assumes that the external service has registered an app with Atlassian that can use OAuth 2.0 (3LO).
- The user, in the external service, uses a feature that requires data from an Atlassian product.
- The external service seeks authorization to access the product's APIs, within the specified scopes, on behalf of the user.
- The user is directed to the Atlassian account login screen, if they are not already logged in, and prompted to log in.
- The user is directed to the authorization URL for the authorization server. This displays a screen that prompts the user to grant access to their data.
- If the user grants access, the user is directed to the callback URL with an authorization code.
- The app makes a POST to the token URL for the authorization server, exchanging the authorization code for an access token.
- The access token can now be used to access the APIs for the authorized Atlassian site on behalf of the user. This can be used until the token expires or is revoked.
Before you begin
You'll need access to AGC before you can create OAuth 2.0 integrations. See Get access to AGC for instructions.
Enabling OAuth 2.0 (3LO)
Before you can implement OAuth 2.0 (3LO) for your app, you need to enable it for your app using the AGC developer console.
- Access the AGC developer console through https://developer.atlassian-us-gov-mod.com/console.
- Select your app from the list (or create one if you don't already have one).
- Select Authorization in the left menu.
- Next to OAuth 2.0 (3LO), select Configure.
- Enter the Callback URL. Set this to any URL that is accessible by the app. When you implement OAuth 2.0 (3LO) in your app (see next section), the redirect_uri must match this URL.
- Click Save changes.
Note, if you haven't already added an API to your app, you should do this now:
- Select Permissions in the left menu.
- Next to the API you want to add, select Add.
Implementing OAuth 2.0 (3LO)
Once you have enabled OAuth 2.0 (3LO) for your app, you can implement it in your app's code. There are a number of key parts to this:
- Direct the user to the authorization URL to get an authorization code
- Exchange the authorization code for an access token
- Authorize any calls to the product APIs using the access token
- Check site access for the app
1. Direct the user to the authorization URL to get an authorization code
As described in the Overview above, your app should start the authorization flow by directing the user to the authorization URL:
1
2https://auth.atlassian-us-gov-mod.com/authorize?
  audience=api.atlassian-us-gov-mod.com&
  client_id=YOUR_CLIENT_ID&
  scope=REQUESTED_SCOPE_ONE%20REQUESTED_SCOPE_TWO&
  redirect_uri=https://YOUR_APP_CALLBACK_URL&
  state=YOUR_USER_BOUND_VALUE&
  response_type=code&
  prompt=consent
Use the authorization URL in a GET request. You can get this URL by going to your app in the AGC developer console, selecting Authorization in the left menu, and selecting Configure next to OAuth 2.0 (3LO). Alternatively, you can construct the URL manually (for example, if you want to specify scopes from multiple products).
The query parameters for the authorization URL are described below:
audience: (required) Set this toapi.atlassian-us-gov-mod.com.client_id: (required) Set this to the Client ID for your app. Find this in Settings for your app in the AGC developer console.scope: (required) Set this to the desired scopes:- Separate multiple scopes with a space.
- Only choose from the scopes that you have already added to the APIs for your app in the developer console.
- You may specify scopes from multiple products.
redirect_uri: (required) Set this to the callback URL configured in Authorization for your app in the AGC developer console.state: (required for security) Set this to a value that is associated with the user you are directing to the authorization URL, for example, a hash of the user's session ID. Make sure that this is a value that cannot be guessed. You may be able to generate and validate this value automatically, if you are using an OAuth 2.0 client library or an authentication library with OAuth 2.0 support. For more information, including why this parameter is required for security, see What is the state parameter used for? below.response_type: (required) Set tocodeas you are requesting an authorization code (not a token).prompt: (required) Set toconsentso that the screen prompting the user to grant access will display.
If successful, the user will be redirected to the app's callback URL, with an authorization code provided
as a query parameter called code. This code can be exchanged for an access token, as described in step 2.
Determining the scopes required for an operation
To find out which scopes an operation requires, check the OAuth scopes required field in the relevant API documentation:
- Jira Cloud platform REST API documentation
- Jira Service Management Cloud REST API documentation
- Jira Software Cloud REST API documentation
- Confluence Cloud REST API documentation
If the operation has the statement Apps can't access this REST resource, you can't use it with OAuth 2.0 (3LO).
Note, the permissions held by the user an app is acting for always constrain the app, regardless of the app's scopes. For example, if a Jira app has the manage:jira-project scope but the user does not have the Administer Jira permission, the app can not create projects.
2. Exchange authorization code for access token
1
2curl --request POST \
  --url 'https://auth.atlassian-us-gov-mod.com/oauth/token' \
  --header 'Content-Type: application/json' \
  --data '{"grant_type": "authorization_code","client_id": "YOUR_CLIENT_ID","client_secret": "YOUR_CLIENT_SECRET","code": "YOUR_AUTHORIZATION_CODE","redirect_uri": "https://YOUR_APP_CALLBACK_URL"}'
client_id: (required) Set this to the Client ID for your app. Find this in Settings for your app in the AGC developer console.client_secret: (required) Set this to the Secret for your app. Find this in Settings for your app in the AGC developer console.code: (required) Set this to the authorization code received from the initial authorize call (described above).redirect_uri: (required) Set this to the callback URL configured for your app in the AGC developer console.
If successful, this call returns an access token similar to this:
1
2HTTP/1.1 200 OK
Content-Type: application/json

{
  "access_token": <string>,
  "expires_in": <expiry time of access_token in second>,
  "scope": <string>
}
This access token can be used to make API calls, as described below.
3. Make calls to the API using the access token
Your app now has an access token that it can use to authorize requests to the APIs for the Atlassian site. To make requests, do the following:
- Get the
cloudidfor your site. - Construct the request URL using the
cloudid. - Call the API, using the access token and request URL.
3.1 Get the cloudid for your site
Make a GET request to https://api.atlassian-us-gov-mod.com/oauth/token/accessible-resources passing the access token as a bearer token in the header of the request. For example:
1
2curl --request GET \
  --url https://api.atlassian-us-gov-mod.com/oauth/token/accessible-resources \
  --header 'Authorization: Bearer ACCESS_TOKEN' \
  --header 'Accept: application/json'
This will retrieve the sites that have scopes granted by the token (see
Check site access for the app below for details). Find your site in the response and
copy the id. This is the cloudid for your site.
Here's a few example responses:
- A Jira site:
1
2[
  {
    "id": "1324a887-45db-1bf4-1e99-ef0ff456d421",
    "name": "Site name",
    "url": "https://your-domain.atlassian-us-gov-mod.net",
    "scopes": [
      "write:jira-work",
      "read:jira-user",
      "manage:jira-configuration"
    ],
    "avatarUrl": "https:\/\/site-admin-avatar-cdn.prod.public.atl-paas.net\/avatars\/240\/flag.png"
  }
]
- A Jira Service Management site:
1
2[
  {
    "id": "1324a887-45db-1bf4-1e99-ef0ff456d421",
    "name": "Site name",
    "url": "https://your-domain.atlassian-us-gov-mod.net",
    "scopes": [
      "write:jira-work",
      "read:jira-user",
      "read:servicedesk-request"
    ],
    "avatarUrl": "https:\/\/site-admin-avatar-cdn.prod.public.atl-paas.net\/avatars\/240\/flag.png"
  }
]
- A Confluence site:
1
2[
  {
    "id": "1324a887-45db-1bf4-1e99-ef0ff456d421",
    "name": "Site name",
    "url": "https://your-domain.atlassian-us-gov-mod.net",
    "scopes": [
      "write:confluence-content",
      "read:confluence-content.all",
      "manage:confluence-configuration"
    ],
    "avatarUrl": "https:\/\/site-admin-avatar-cdn.prod.public.atl-paas.net\/avatars\/240\/flag.png"
  }
]
3.2 Construct the request URL
Requests that use OAuth 2.0 (3LO) are made via api.atlassian-us-gov-mod.com (not https://your-domain.atlassian-us-gov-mod.net).
Construct your request URL using the following structure:
- Jira apps:
https://api.atlassian-us-gov-mod.com/ex/jira/{cloudid}/{api} - Confluence apps:
https://api.atlassian-us-gov-mod.com/ex/confluence/{cloudid}/{api}
where:
{cloudid}is thecloudidfor your site that you obtained in the previous step. For example,11223344-a1b2-3b33-c444-def123456789.{api}is the base path and name of the API. For example:/rest/api/2/projectfor the project endpoint in the Jira REST API./rest/servicedeskapi/requestfor the request endpoint in the Jira Service Management REST API./rest/api/spacefor the space endpoint in the Confluence REST API.
Your request URL should look something like this (using the example cloudid and Jira API above):
https://api.atlassian-us-gov-mod.com/ex/jira/11223344-a1b2-3b33-c444-def123456789/rest/api/2/project
Note that if you are copying the examples in the API documentation, you will need to amend the example
URLs as they currently use https://your-domain.atlassian-us-gov-mod.net/{api} rather than the request URLs shown above.
3.3 Call the API
Make the API call passing the access token as a bearer token in the header of the request. This will authorize the request on the user's behalf.
1
2curl --request GET \
  --url <request URL> \
  --header 'Authorization: Bearer ACCESS_TOKEN' \
  --header 'Accept: application/json'
For example:
1
2curl --request GET \
  --url https://api.atlassian-us-gov-mod.com/ex/jira/11223344-a1b2-3b33-c444-def123456789/rest/api/2/project \
  --header 'Authorization: Bearer aBCxYz654123' \
  --header 'Accept: application/json'
4. Check site access for the app
An authorization grant is when a user consents to your app. For OAuth 2.0 (3LO) apps, the consent is valid for all sites the app is installed in, as long as the scopes used by your app's APIs don't change. A user's grant can change when either of the following occur:
- The user revokes the grant. The app cannot work anywhere after a user has revoked their consent to the app.
- The user consents to a new grant of the app. The scopes in the new grant override the scopes in the existing grant.
Therefore, since a grant can change over time, it's important that you check that the user
has granted the app the scopes it requires and that your app has correct access to a site and its APIs.
To check this, call the accessible-resources endpoint on
https://auth.atlassian-us-gov-mod.com (you used this endpoint in a previous step to get the cloudid
for your site). The endpoint is described in detail below:
Get list of resources
GET /oauth/token/accessible-resources
Request
Request parameters: None
Example:
1
2curl --header 'Authorization: Bearer <access_token>' \
  --url 'https://auth.atlassian-us-gov-mod.com/oauth/token/accessible-resources'
Response
200 OK example (Jira):
1
2[
  {
    "id": "8594f221-9797-5f78-1fa4-485e198d7cd0",
    "name": "Site name 2",
    "url": "https://your-domain2.atlassian-us-gov-mod.net",
    "scopes": [
      "write:jira-work",
      "read:jira-user"    ],
    "avatarUrl": "https:\/\/site-admin-avatar-cdn.prod.public.atl-paas.net\/avatars\/240\/koala.png"
  },
  {
    "id": "1324a887-45db-1bf4-1e99-ef0ff456d421",
    "name": "Site name 1",
    "url": "https://your-domain1.atlassian-us-gov-mod.net",
    "scopes": [
      "write:jira-work",
      "read:jira-user",
      "manage:jira-configuration"    ],
    "avatarUrl": "https:\/\/site-admin-avatar-cdn.prod.public.atl-paas.net\/avatars\/240\/flag.png"
  }
]
Each item in the response describes a container (for example, a Jira site) that your app has access to, the scopes associated with that access, and metadata such as the name and avatar URL (if any). It's important to understand that this endpoint won't tell you anything about the user's permissions, which may limit the resources that your app can access via the site's APIs.
Note, the id is not unique across containers (that is, two entries in the results can have the same
id), so you may need to infer the type of container from its scopes.
Managing your OAuth 2.0 (3LO) apps
You can securely manage all your OAuth 2.0 (3LO) and Forge apps in one place using the AGC developer console. The console lets you view information about your apps, including their environments and scopes.
Your existing OAuth 2.0 (3LO) and Forge apps are listed in the order they were created. OAuth 2.0 (3LO) apps are displayed with a 3LO lozenge.
The following details are listed:
- App name: the name of your app
- Distribution status:
- Sharing: your app can be shared via link
- Not sharing: your app can't be shared via link
- Updated on: the time and date you created your app or updated its settings
You can search for an app using the search bar above the app table.
View app details
Select any app on the My apps page to get more information about the app, including app ID, description, authorization, and permissions.
The Overview page displays the following panels:
- App details
- App ID: the identifier for your app
- Description: the description of your app
- Distribution
- Distribution status: whether your app can be used by others
- Permissions
- API scopes: which scopes are currently defined in your app
- Authorization
- Authorization type: the authorization configured for your app
Select Settings in the left menu to view your app's authentication details, or to change your app's name, description, or avatar.
View app permissions
You can view the level of access your Forge app has to an Atlassian user's account by selecting Permissions in the left menu, or selecting the Permissions panel.
The Permissions page lists the APIs included in your app.
To add or remove individual scopes for an API, select Configure, and in the list of scopes, select Add or Remove. Note that users who previously consented to the scopes will need to re-consent to the new scopes.
Delete your app
You can only delete an app if it's not installed anywhere.
- If your app is currently installed on a site, uninstall it.
- Select Settings in the left menu, and select Delete app.
Distributing your OAuth 2.0 (3LO) apps
When you create an OAuth 2.0 (3LO) app, it's private by default. This means that only you can install and use it. If you want to distribute your app to other users, you must enable sharing.
- Access the AGC developer console through https://developer.atlassian-us-gov-mod.com/console.
- Select your app from the list.
- Select Distribution in the left menu.
- Enable sharing using the toggle switch in the Enable sharing section.
- Select Authorization in the left menu, and under OAuth 2.0 (3LO), select Configure.
- Copy the Authorization URL(s) and distribute to your users.
- Users trying to install an unapproved OAuth 2.0 integration are warned that the app has not yet been reviewed by Atlassian. To get your integration reviewed and approved, follow the steps on Listing a third party integration on the Atlassian Marketplace. Note, you don't need an informative Atlassian Marketplace listing to submit your integration for approval.
You'll have to send the link to all the users you want to grant access to.
Additional resources
For more information regarding known issues and frequently asked questions relating to OAuth 2.0 (3LO), refer to the Jira and Confluence documentation.
Rate this page: