Changing a byline dynamically
| Description | Link your byline item with a content property stored in Confluence to allow for dynamic UI updates. |
| Level | Beginner |
| Estimated time | 10 minutes |
| Example | https://bitbucket.org/atlassianlabs/confluence_cloud_tutorials/src/dynamically-update-byline/ |
Prerequisites
Ensure you have worked through Creating a content byline item.
Updating our UI
We have a simple but powerful page approval system up and running. This looks like below.
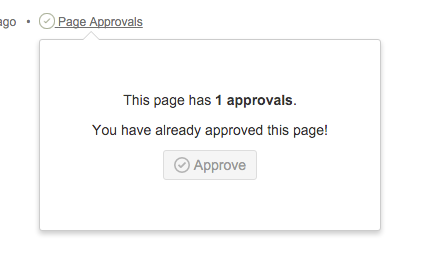
Our JavaScript code successfully updates our dialog and its UI to surface information accurate to the current state of our page, and its approvals. However, what if we would like to change the title of our byline item, or, change the icon? If we are building a small, consumable piece of content, changing these dynamically would allow for users to understand that a transition has occurred without needing to bring the dialog up.
To do this, we need to use Content Properties.
Content properties and the byline
Look at the documentation for the content byline item. You'll notice that contentPropertyKey is one of the properties that you can specify in an instance of a byline item.
Let's set this up. In your app descriptor, add the following to your contentBylineItems entry:
atlassian-connect.json
1
2"contentPropertyKey": "byline-ui"
In terms of our Connect app, we're all good to go! Next, we have to make sure that this content property exists in Confluence. Content Properties by default can only be defined under a page, or blog post.
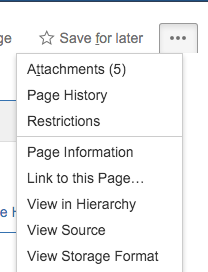
To quickly try this functionality, let's pick a random page and build a content property with key byline-ui under it. If we look at the REST endpoint for creating a content property, we see that we need an ID under which to create our content property. Let's get this information first. To do this, head to the page tools menu, and click on 'Page Information' as below.
Once this page has loaded, we can acquire our page's content ID through the URL we are redirected to. E.g. redirecting to https://<your-host-name>.net/wiki/pages/viewinfo.action?pageId=196667 would mean your page has a content ID of 196667. We now have the information we need to build our content property.
Issue a POST request to https://<your-host-name>/wiki/rest/api/content/<your-content-id>/property with the given JSON body, using curl (or import into Postman). This is an authenticated endpoint, so ensure you have generated an API token first.
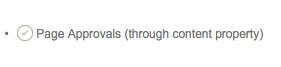
1
2$ curl --request POST \
--user '<your_email@example.com>:<api_token>' \
--header "Accept: application/json" \
--header "Content-Type: application/json" \
--url 'https://<your-host-name>/wiki/rest/api/content/<your-content-id>/property' \
--data '{
    "key":"byline-ui",
    "value": {
        "name": {
            "value": "Page Approval (through content property)"
        },
        "icon": {
            "url": "/images/approval.png"
        },
        "tooltip": {
            "value": "Approvals"
        }
     }
 }'
Awesome! Now, if we refresh the page, we should see the following:
Now, we have a powerful link between our byline item, and its UI. Let's turn this into something meaningful.
Consider when a page has been approved by a user. In order to give better feedback, let's change the icon of the byline item, as well as its text. Thankfully, we already have a content property setup from earlier! Let's add a similar property to update our UI.
Replace the <script> body with the following:
views/approvals.hbs
1
2<script>
    $(function(){
        var currUsers = JSON.parse('{{{allApprovals}}}');
        var currentApprovalNumber = {{numberApprovedBy}};
        var currUser;

        AP.user.getCurrentUser(function(user){
            currUser = user.id;
            if(currUsers.indexOf(currUser) !== -1){
                //  We already have the user,
                //  update our UI accordingly.
                console.log('User has already approved this page.');
                $('p.your-approval').text('You have already approved this page!');
                $('button#approve-page').prop('disabled', true);
            }
        });

        $('#approve-page').on('click', function(){

            //  Send request to Confluence API, and update our DOM.

            //  Add current user's approval to list.
            currUsers.push(currUser);

            // Get the correct version for our 'byline-ui' content property.
            AP.confluence.getContentProperty('byline-ui', function(bylineProp){

                var bylineVersion = 1;
                if(bylineProp && bylineProp.version && bylineProp.version.number) {
                    bylineVersion = bylineProp.version.number + 1;
                }

                // Get the correct version for our 'approvals' content property.
                AP.confluence.getContentProperty('approvals', function(approvalProp){

                    var approvalVersion = 1;
                    if(approvalProp && approvalProp.version && approvalProp.version.number) {
                        approvalVersion = approvalProp.version.number + 1;
                    }

                    //  Setup our updated JSON objects.
                    var updatedApprovals = {
                        'key':     'approvals',
                        'value':   { 'approvedBy': currUsers },
                        'version': { 'number': approvalVersion }
                    };
                    var updatedBylineTextAndIcon = {
                        'key': 'byline-ui',
                        'value': {
                            'name':    { 'value': 'Page Approved'       },
                            'icon':    { 'url':   'images/approved.png' },
                            'tooltip': { 'value': 'Page Approved'       }
                        },
                        'version': { 'number': bylineVersion }
                    };

                    //  Update approvals list.
                    AP.confluence.setContentProperty(updatedApprovals, function(){
                        // Dynamically update our dialog to have an accurate amount of approvals
                        // visible to the user.
                        $('p.your-approval').text('You have approved this page.');
                        $('b.number-approvals').text((currentApprovalNumber+1) + ' approvals');
                        $('button#approve-page').prop('disabled', true);
                    });
                    //  Update the byline item text/icon.
                    AP.confluence.setContentProperty(updatedBylineTextAndIcon, function(){
                        console.log('UI updates persisted.');
                    });

                });
            });
        });
</script>
Now, after approving a page we will see the following:
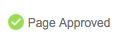
Nice! As you can see, content properties in unison with content byline items afford great capabilities to Confluence. Through dynamic updates to the UI, we ensure users are able to consume information quickly and meaningfully.
This concludes our Content Byline tutorial.
Rate this page: