Macro custom editor with Confluence Connect
| Description | Add a custom editor to your macro experience. |
| Level | 3 - INTERMEDIATE |
| Estimated time | 15 minutes |
Prerequisites
Ensure you have worked through the Getting started tutorial.
Editor magic
As we discovered in Macro Custom Editor with Confluence Connect, Confluence Connect ships with features which allows macros defined by your app to provide highly customized and focused user experiences.
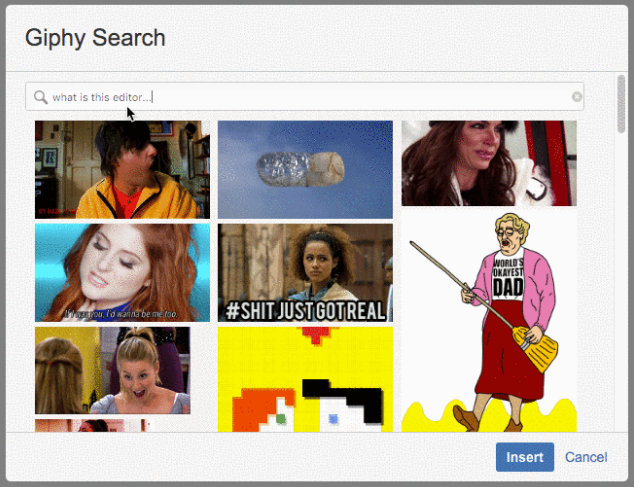
Normally when a macro is inserted into the Confluence Editor, we rely on the macro browser and editor to configure our macro and then insert it into a page. However, with Confluence Connect, this editor experience can be provided by a custom dialog completely under your control. Let's take another look at what we are looking to build.

We have already taken a look at autoconvert and how it allows for URLs to be mapped to an instance of your macro. In this tutorial, we will be looking at the custom editor experience above.
- Custom Editor: When attempting to enter a new GIPHY macro, we were presented with a custom macro editing experience.
Once again, as a developer, this allows you to provide users with a dedicated user experience. Let's go through the process of building this.
This tutorial extends the GIPHY macro we built in the Getting started tutorial. Check it out before moving on!
Searching GIPHY in style
The purpose of building a custom editor in our case is to provide users with a search screen through which they can easily browse for and choose the GIF they need. Under the hood, the custom editor capability uses a Connect dialog to render our view. This simplifies the process of building your own Confluence insert dialog - by simply specifying a width, height and URL, we have essentially replaced the default macro insert dialog!
Let's go back to our app's descriptor. We need only to define the mentioned parameters under the "editor" key of our GIPHY macro.
1
2{
  "editor": {
    "url": "/gif-picker",
    "editTitle": {
      "value": "Giphy Search"
    },
    "insertTitle": {
      "value": "Giphy Search"
    },
    "width": "640px",
    "height": "370px"
  }
}
Check out the full atlassian-connect.json descriptor here.
Now, we add a router handler for the above url: "/gif-picker". In this handler, we will render a view which we have defined. Here's an example of how to go about this with a basic gif-picker.hbs:
1
2{{!< layout}}

<div class="search-container">
    <form onsubmit="return false;" autocomplete="off">
        <input id="giphy-search-field" class="search-field" type="search" placeholder="Search">
    </form>
</div>

<div id="giphy-container"></div>

<script>
    $(function () {

        console.log("Running awesome script.");

        //  Hardcoded URL for demonstrative purposes.
        var data = {
            url: "http://giphy.com/gifs/applause-clapping-clap-aLdiZJmmx4OVW"
        };

        //  Use the Connect JS API to pass current macro parameters.
        //  Latch onto the macro editor's 'submit' event.
        AP.dialog.getButton("submit").bind(function () {
            confluence.saveMacro({
                'url': data.url
            });
            AP.confluence.closeMacroEditor();
            return true;
        });
    });
</script>
1
2app.get('/gif-picker', addon.authenticate(), function (req, res) {
    // Handle request here.
    return res.render('<your-template>', {
        // More params.
    });
});
If you'd like a full example, take a quick look at how we did this earlier Getting started tutorial!
As mentioned in the code snippet above, we use the Connect JS API to interface between our custom editor implementation and the insertion of a macro instance with certain parameters. To understand the Confluence and Dialog JS API's better, head over to the related Connect Documentation.
Our very own macro editor!
Through the extensibility provided by the app descriptor and Connect APIs, we are able to provide a custom experience with relative ease. This concludes our deep dive into the advanced capabilities provided by Confluence Connect macros.
All the best!
Rate this page: