- Admin Page
- Administration UI locations
- Background Script
- Build
- Dashboard Item
- Deployment
- Development Tool
- Devops Components
- Dialog
- Entity Property
- Feature Flag
- Global Permission
- Issue Content
- Issue Context
- Issue Field
- Issue Glance
- Issue view UI locations
- JQL Functions
- Keyboard Shortcut
- New issue view UI locations
- Operations Information
- Page
- Project Admin Tab Panel
- Project Page
- Project Permission
- Project settings UI locations
- Project sidebar
- Remote Link
- Report
- Search Request View
- Security Information
- Tab Panel
- Time Tracking Provider
- User profile menu
- Web Item
- Web Panel
- Web Section
- Webhook
- Workflow Condition
- Workflow Post Function
- Workflow Validator
Ending Connect support
You can no longer publish Connect apps on the Atlassian Marketplace. All new extensibility features will be delivered only on Forge.
Refer to this blog post for our timeline to end Connect support.
Have an existing Connect app? You can incrementally migrate it to Forge.
Project sidebar
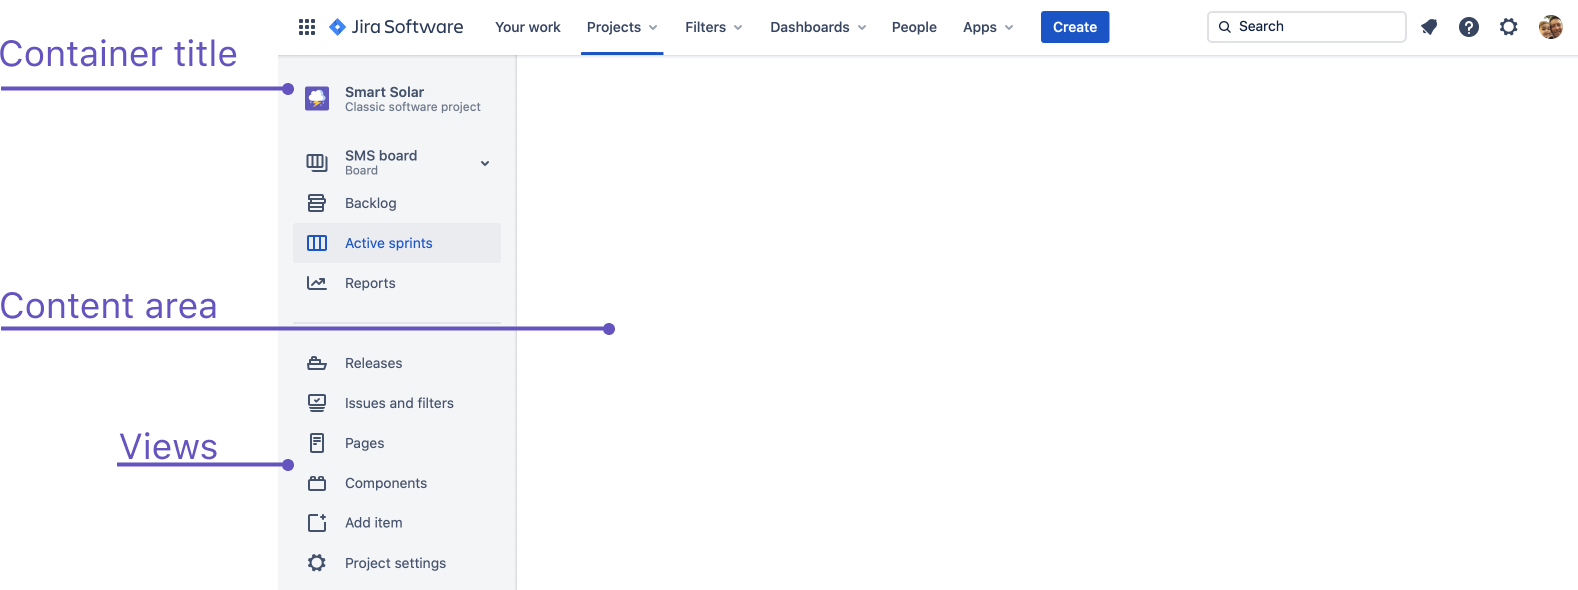
The Jira Cloud project sidebar implements the Container pattern for Atlassian product navigation. It consists of the following sections:
- Container title: In Jira Cloud this is the name of the current project
- Views: In Jira Cloud these are different ways to view issues within the project, including the issue navigator, boards, backlogs, queues, and more.
- Settings link: A link to the project settings area for that project
The project sidebar in Jira Work Management is used differently to the other Jira products. The sidebar is used to easily navigate between projects. To change views and access project settings, navigate to the project view navigation (horizontal navigation above your project's view). For more information on the project sidebar, see Manage projects, shortcuts, versions, reports and more.

Adding a link to the project sidebar
We strongly encourage apps to conform to Jira's project-centric model. This means your app should primarily present information that is relevant to the specific project in which a user is working. The goal of Jira's project-centric model is to make Jira's structure understandable to every user, by simplifying the navigation of a Jira projects.
If your app adds a view to the Jira project sidebar, it should not take the user out of the context of the current project. Rather, it should render content from your app, or a view defined by your app, that makes sense in the current project context.
Instructions
Add your link to the project sidebar as a project page. You can refer to the project page documentation for the full list of available properties, but pay special attention
to the following:
url: The URL to your app's actual page content that you want rendered in the Content area. You should always include the{project.key}context parameter in this URL so that your app can provide data with the correct project context.name: See the design guidelines below.iconUrl: The URL to your link's icon file located on your app's server. Please follow the icon guidelines below.weight: Defines the order in which app links appear in the Views area.
Sample descriptor JSON
1
2"modules": {
    "jiraProjectPages": [
        {
            "key": "your-module-key",
            "name": {
                "value": "My project page"
            },
            "url": "/helloworld.html?projectKey=${project.key}",
            "iconUrl": "/images/icon.png",
            "weight": 1
        }
    ]
}
Design guidelines
Label
- The label should unambiguously describe what the app does.
- The label should be a noun, not a verb.
- US English spelling and sentence case.
- Don't use your company, brand or product name, unless it also explicitly calls out the functionality of your app. Why? It can be confusing to new users or any user who isn't familiar with your brand, particularly when multiple apps are installed. Plus, it doesn't fit with the default menu items.
Icon
- Use an icon that aligns well with the functionality of your app
- Don't use your company brand or logo
- All icons must be designed according to the Atlassian design language for iconography
Legacy way of adding links to project sidebar
Using web items to add app links to Jira Cloud project sidebar
Step 1: Add your app's link to the sidebar
Add your link to the project sidebar as a web item. You can refer to the web item documentation for the full list of available properties, but pay special attention
to the following:
location: For the project sidebar, the location should bejira.project.sidebar.plugins.navigationurl: The URL should follow the pattern"/projects/{project.key}?selectedItem=$YOUR-APP-KEY__$WEB-PANEL-KEY"where $WEB-PANEL-KEY is the key of your app's corresponding web panel (see step 2 below)context: This should always beproductname: See the design guidelines below.
Step 2: Define your app's content
Provide your app's content as a web panel, which is referenced in the url
property in the web item from step 1. Like in step 1, you can refer to the web panel documentation for all available properties, but pay special attention to the
following:
location: The location value should follow the pattern"$YOUR-APP-KEY__$WEB-PANEL-KEY"where $WEB-PANEL-KEY is the key of your app's web panelurl: The URL to your app's actual page content that you want rendered in the content area. You should always include the{project.key}context parameter in this URL so that your app can provide data with the correct project context.
Sample descriptor JSON
1
2"modules": {
	"webItems": [
	{
		"location": "jira.project.sidebar.plugins.navigation",
		"key": "connect-provided-link-to-panel",
		"url": "/projects/{project.key}?selectedItem=com.example.myapp__connect-provided-web-panel",
		"context": "product",
		"name": {
			"value": "My Web Item"
		}
	}
	],
	"webPanels" : [
	{
		"key": "connect-provided-web-panel",
		"url": "/helloworld.html?pkey={project.key}",
		"location": "com.example.myapp__connect-provided-web-panel",
		"name": {
			"value": "My Web Panel"
		}
	}
	]
}
Rate this page: