Adding a board configuration page
This tutorial shows you how to build a board configuration page in Jira Software, by using a Jira Software module in your app. We won't go into the details of adding settings to the page, but this tutorial will provide a good starting point if you want your app to have separate configurations per board.
To create this board configuration page, you'll be creating a new web panel located in jira.agile.board.configuration, then adding code to render the web panel.
Before you begin
If you haven't built a Connect app before, read the Getting started tutorial. You'll learn the fundamentals of Connect development and build a basic Connect app that you can use with this tutorial.
Instructions
Step 1. Add a web panel with board context parameters
To create a board configuration page, you'll need to create a web panel with the label and location set to jira.agile.board.tools.
-
Edit the
atlassian-connect.jsonfile in your app project. -
Add the following code to the
modulescontext:1 2
"webPanels": [ { "key": "my-configuration-page", "url": "configuration?id={board.id}&type={board.type}", "name": { "value": "My Configuration Page" }, "location": "jira.agile.board.configuration", "weight": 1 } ] -
Save your changes.
Step 2. Add code to render the web panel
The server-side code required to render the web panel is shown below. This code is for atlassian-connect-express, the Node.js framework (with Express), but you can use a different technology stack if you wish.
-
Navigate to the routes directory in your app project and edit the
index.jsfile. -
Add the following code to the file and save it:
1 2
app.get('/configuration', function(req,res){ res.render("configuration", {id : req.query['id'], type : req.query['type'] }); });This adds the 'configuration' route to your app.
-
Navigate to the views directory in your app project and create a new
configuration.hbsfile. -
Add the following code to the
configuration.hbsfile and save it:1 2
<!DOCTYPE html> <html> <head> <link rel="stylesheet" href="//aui-cdn.atlassian.com/aui-adg/5.9.17/css/aui.min.css" media="all"> <script src="https://ac-getting-started.atlassian.net/atlassian-connect/all.js"></script> <script src="//ajax.googleapis.com/ajax/libs/jquery/1.8.3/jquery.min.js"></script> <script src="//aui-cdn.atlassian.com/aui-adg/5.9.17/js/aui.min.js"></script> </head> <body class="aui-page-focused aui-page-focused-xlarge"> <div id="page" class="ac-content"> <section id="content"> <header class="aui-page-header"> <div class="aui-page-header-inner"> <div class="aui-page-header-main"> <h2>Example board configuration page</h2> <p id="custom-message">This is an example configuration page for board ID: {{id}} with board type: {{type}}.</p> </div> </div> </header> </section> </div> </body> </html>Notice that we've used two context parameters used in the template above:
id(for board Id) andtype(for board type).
Step 3. Check that it all works
- Start up and deploy your app (
npm start) to your Jira Cloud instance, if it's not running already. - Navigate to the board configuration for any Jira Software project.
- Click the Example board configuration link. You should see a page like this:
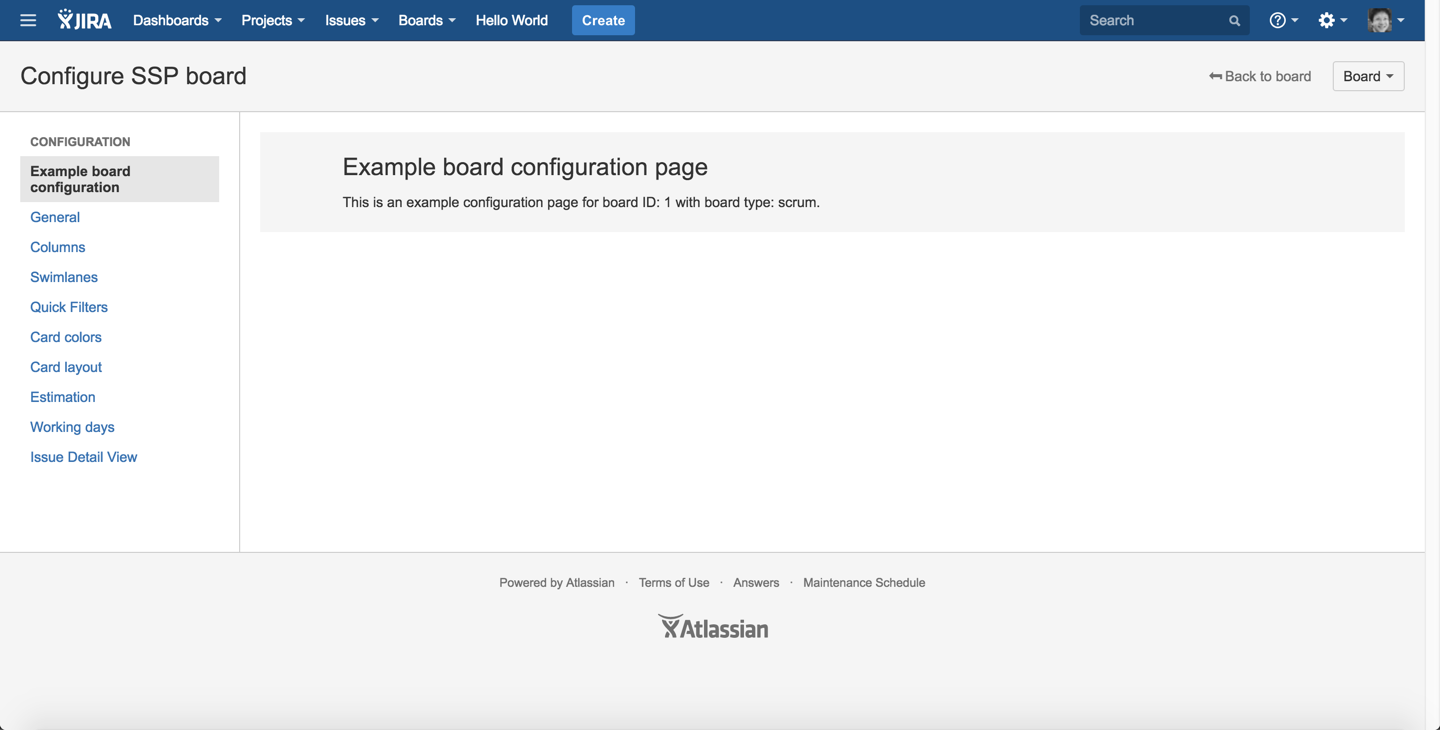
Congratulations!
Tips
- If you are looking for somewhere to store configuration information, make use of the board properties.
- Your app can define custom project or global permissions. This may be useful if you want to limit access to your app's board configuration page.
Next steps
If you've finished this tutorial, check out these other Jira Software tutorials.
Rate this page: