Integrating Jira Software Cloud with on-premises tools
Jira Software Cloud provides OAuth 2.0 credentials that you can use to integrate Jira Software Cloud with on-premises (self-hosted) tools. Currently, you can integrate with build and deployment tools, such as Jenkins; development information from tools like repository managers; and feature flag tools.
This page provides instructions on implementing OAuth 2.0 authorization and calling the builds API, deployments API, development information API, and feature flags API. It won’t provide detailed instructions on building an integration (for example, a plugin, a script, etc), as these can vary depending on what you are building. However at the end of this page, we’ve provided an example integration, the Jira Software Cloud plugin for Jenkins, including a description of how it works and links to the source code.
Overview
At a high level, this is how an integration that uses OAuth 2.0 works:
- A site admin creates OAuth 2.0 credentials (client ID and secret) in Jira Software Cloud. The site admin grants the permissions (for example, builds, deployments) for the credentials, as desired. See Integrating with self-hosted tools using OAuth for details.
- The site admin provides the credentials to the integration. For example, the credentials may be entered on a plugin screen in the on-premises tool.
- The integration uses the credentials to call the Jira Software APIs and send Jira-related data back to Jira Software Cloud.
Authorization flow
Before you build your integration, you need to understand the authorization flow. Jira Software Cloud uses the JWT Bearer token authorization grant type for OAuth 2.0 (2LO). This authorization method allows apps with the appropriate permissions to access resources and perform actions in Jira.
The authorization flow looks like this:
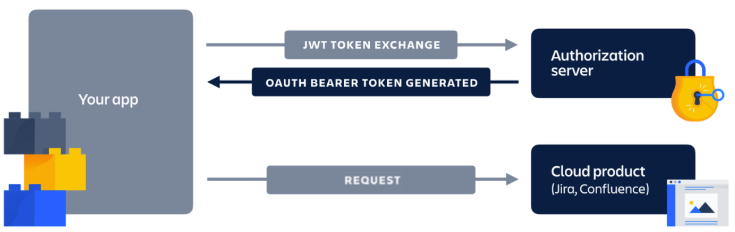
- App
POSTs the client ID and shared secret to the authorization server. - Authorization server returns an access token (also known as a JWT Bearer token).
- App uses the access token to call the product APIs.
Note that this is a system-to-system integration. This means that the credentials are not linked to the site admin that created them and that API calls are not made on behalf of the site admin.
Authorizing your integration
An access token is required to authenticate your integration when calling the Jira Software Cloud APIs. Your integration can request an access token by calling https://api.atlassian.com/oauth/token, providing the OAuth 2.0 credentials (client ID and secret) generated from Jira Software.
Here’s an example:
1
2curl --request POST \
  --url 'https://api.atlassian.com/oauth/token' \
  --header 'Content-Type: application/json' \
  --data '{
            "audience": "api.atlassian.com",
            "grant_type":"client_credentials",
            "client_id": CLIENT_ID,
            "client_secret": CLIENT_SECRET
        }'
client_id: (required) Set this to the Client ID from the OAuth credentials page in Jira Software.client_secret: (required) Set this to the Secret from the OAuth credentials page in Jira Software.
If successful, this call will return an access token. Your integration can now use this token to make API calls, as described in the next section.
About the access token
The access token expires after a period of time. The expiry time is included in the access token response. It's set to 15 minutes, but you should check the value in the response.
Write your code to anticipate that a granted token might no longer work. For example, track the expiration time and request a new token before the existing one expires (at least 30-60 seconds prior).
Making API calls
When making an API call, provide the access token as a bearer token in the header of your request. That is, Authorization: Bearer ACCESS_TOKEN.
Currently, the following APIs are supported for OAuth 2.0 authorization:
- Builds API: See documentation.
- Deployments API: See documentation.
- Development Information API: See documentation.
- Feature Flags API: See documentation.
To simplify development, we have a separate downloadable API spec.
The root URL for OAuth 2.0 operations is:
https://api.atlassian.com/jira/<entity type>/0.1/cloud/<cloud ID>/bulk
where:
<entity type>is either builds, deployments, devinfo, or featureflags<cloud ID>is retrieved by callinghttps://<your-jira-instance>.atlassian.net/_edge/tenant_info
Note that this URL is different to the URLs used in the documentation. However, you easily translate from one to the other. For example, POST /rest/builds/0.1/bulk translates to POST https://api.atlassian.com/jira/builds/0.1/cloud/<cloud ID>/bulk.
See the example below:
1
2curl --request POST \
  --url 'https://api.atlassian.com/jira/builds/0.1/cloud/CLOUD_ID/bulk' \
  --header 'Content-Type: application/json' \
  --header 'Authorization: Bearer ACCESS_TOKEN'
  --data '{
          "properties": {
            "accountId": "account-234",
            "projectId": "project-123"
          },
          "builds": [
            {
              "schemaVersion": "1.0",
              "pipelineId": "my-build-plan",
              "buildNumber": 16,
              "updateSequenceNumber": 1523494301448,
              "displayName": "My Project build #16",
              "description": "My Project build #16: Failed",
              "label": "<string>",
              "url": "<string>",
              "state": "failed",
              "lastUpdated": "2018-01-20T23:27:25.000Z",
              "issueKeys": [
                "ISSUE-123"
              ],
              "testInfo": {
                "totalNumber": 150,
                "numberPassed": 145,
                "numberFailed": 5,
                "numberSkipped": 0
              },
              "references": [
                {
                  "commit": {
                    "id": "08cd9c26b2b8d7cf6e6af6b49da8895d065c259f",
                    "repositoryUri": "https://bitbucket.org/atlassian/biij-vendor-api"
                  },
                  "ref": {
                    "name": "feature/ISSUE-123-some-work",
                    "uri": "https://bitbucket.org/atlassian/biij-vendor-api/refs/feature/ISSUE-123-some-work"
                  }
                }
              ]
            }
          ],
          "providerMetadata": {
            "product": "Bamboo 6.10.2"
          }
        }'
You should now be able to implement authenticated API calls in your integration. This is the building block for building an integration with an on-premises tool.
Jira Software Cloud plugin for Jenkins
The Jira Software Cloud plugin for Jenkins was built using OAuth 2.0 authorization, as described above. This plugin only has permission to send build and deployment information and associate that information with Jira issues. This provides a secure mechanism for Jenkins servers (behind the firewall) to send data one way to Jira Software Cloud sites, without having to open up ports in a firewall.
Atlassian has built and open-sourced a new Jenkins plugin that should be used specifically for integrating Jenkins with Jira Software Cloud. It uses new OAuth credentials (2LO), which site admins can create in the Jira Cloud site.
This OAuth credential can be scoped using permissions for additional security, so that it can only be used to send build and deployment information and associate that information with Jira issues. This gives your Jenkins server, operating behind the firewall, a mechanism to securely send data, one-way, to your Jira Cloud site without having to open up any ports in your firewall.
Viewing the source code
The source code for this plugin is in this repository: atlassian-jira-software-cloud-plugin
The main logic is in this class: JiraBuildInfoSenderImpl.java
Using the plugin
If you’d like to try using the plugin, see the How to get started instructions on the Atlassian Jira Software Cloud Plugin page.
Note, in order to send build and/or deployment information to Jira, you must add the following snippets to the Jenkinsfile:
1
2// send build information to Jira
jiraSendBuildInfo site: 'example.atlassian.net'

// send deployment information to Jira
jiraSendDeploymentInfo site: 'example.atlassian.net', environmentId: 'prod-east1', environmentName: 'prod-east1', environmentType: 'production'
Rate this page: