Extending the highlight actions panel
Applicable: | This tutorial applies to Confluence 5.4. |
Level of experience: | Intermediate. Our tutorials are classified as 'beginner', 'intermediate' and 'advanced'. This one is at 'intermediate' level, so you will need to have developed a few plugins before to follow it. |
Time estimate: | It will take you approximately 1 hour to complete this tutorial. |
The source code of the plugin used in this tutorial is hosted on Bitbucket: confluence-highlight-actions-demo-plugin
Overview
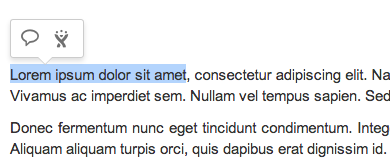
The highlight actions panel in Confluence is the panel that appears when text is selected. It contains buttons with additional actions the user can perform. By default, the user can:
- Quote the selected text in a comment.
- Create an issue in JIRA, and populate the Summary field with the selected text, if Confluence is linked to a compatible JIRA instance.
Screenshot: the highlight actions panel appears when text is selected

The highlight actions panel in Confluence is provided by the confluence-highlight-actions plugin.
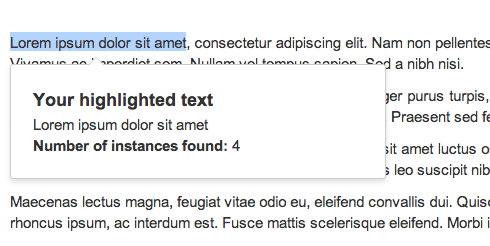
In this tutorial you will extend the highlight actions panel to add a button that shows the number of times the highlighted text appears on the page.
Step 1. Create the Plugin Project
The Atlassian Plugin SDK provides a number of atlas-create-application-plugin commands you can use to generate stub code for your plugin.
- Run the
atlas-create-confluence-plugincommand and enter the following information when prompted:- group-id:
com.atlassian.plugins.tutorial - artifact-id:
confluence-highlight-actions-demo-plugin - version:
1.0 - package: `com.atlassian.plugins.tutorial```
- group-id:
- Open the
pom.xmlfile that was generated by the previous step, and update the information in this file to match your organisation and project name. - Remove
src/main/javaand any other Java code in the generated project. This plugin will not contain any Java code.
Step 2. Create a Soy template for the highlight dialog
- In the
src/main/resources/directory, create a new directory for your plugin resources calledtemplates - Create a new Soy template -
src/main/resources/templates/highlight-demo-dialog.soy, with the following content:
1
2{namespace Confluence.HighlightDemoDialogs.Templates}

/**
 * Create Highlight Dialog content
 *
 * @param highlightText
 * @param foundNum
 */
{template .createDialogContent}
    <h3>
        {getText('highlightdemo.dialog.header.text')}
    </h3>
    <span>
        {$highlightText}
    </span>
    <br/>
    <div>
        <b>
            {getText('highlightdemo.dialog.text.foundnumber')}
        </b>
        {$foundNum}
    </div>
{/template}
The template should contain the markup you want to appear in the panel you're going to add to the Highlight dialog. In this case, we display a heading with text that has an i18n key of 'highlightdemo.dialog.header.text' followed by the highlighted text and the number of occurrences.
Step 3. Create a Javascript file to render and show the Highlight dialog
Create a JavaScript file - src/main/resources/js/highlight-actions-demo-dialog.js, with the following content:
1
2Confluence.HighlightDemoDialogs = Confluence.HighlightDemoDialogs || (function($) {

    var DIALOG_MAX_HEIGHT = 200;
    var DIALOG_WIDTH = 300;
    var highlightDemoDialog;
    var defaultDialogOptions = {
        hideDelay: null,
        width : DIALOG_WIDTH,
        maxHeight: DIALOG_MAX_HEIGHT
    };

    function showHighlightDemoDialog(selectionObject) {
        highlightDemoDialog && highlightDemoDialog.remove();
        var displayFn = function(content, trigger, showPopup) {
            $(content).html(Confluence.HighlightDemoDialogs.Templates.createDialogContent(
                {
                    highlightText: selectionObject.text,
                    foundNum: selectionObject.searchText.numMatches
                }
            ));
            showPopup();
            return false;
        };
        highlightDemoDialog = _openDialog(selectionObject, 'highlight-demo-dialog', defaultDialogOptions, displayFn);
    };

    function _openDialog(selectionObject, id, options, displayFn) {
        var $target = $("<div>");
        _appendDialogTarget(selectionObject.area.average, $target);
        var originalCallback = options.hideCallback;
        options.hideCallback = function() {
            $target.remove(); // clean up dialog target element when hiding the dialog
            originalCallback && originalCallback();
        };
        var dialog = Confluence.ScrollingInlineDialog($target, id, displayFn, options);
        dialog.show();
        return dialog;
    };

    function _appendDialogTarget(targetDimensions, $target) {
        Confluence.DocThemeUtils.appendAbsolutePositionedElement($target);
        $target.css({
            top: targetDimensions.top,
            height: targetDimensions.height,
            left: targetDimensions.left,
            width: targetDimensions.width,
            "z-index": -9999,
            position: 'absolute'
        });
    };

    return {
        showHighlightDemoDialog: showHighlightDemoDialog
    };
})(AJS.$);
Confluence.HighlightDemoDialogs does two things:
- As Confluence could be using either the General (default) theme or the Documentation theme (in Confluence 5.10 or earlier), each theme needs a different positioning mechanism, the
_appendDialogTargetfunction will useConfluence.DocThemeUtils.appendAbsolutePositionedElementto calculate the correct position of the selected text. - Render the dialog content with
selectionObject. Show and hide handlers are also provided to handle these events.
Step 4. Create a Javascript file to register button to Highlight Actions panel
Create a JavaScript file - src/main/resources/js/panel-helper.js, with the following content:
1
2AJS.toInit(function($) { var PLUGIN_KEY = "com.atlassian.plugins.tutorial.confluence-highlight-actions-demo-plugin:show-matched-text";
    Confluence && Confluence.HighlightAction && Confluence.HighlightAction.registerButtonHandler(PLUGIN_KEY, { onClick: function(selectionObject) { Confluence.HighlightDemoDialogs.showHighlightDemoDialog(selectionObject); },
        shouldDisplay: Confluence.HighlightAction.WORKING_AREA.MAINCONTENT_ONLY }); });
AJS.toInit wraps the function containing all of the logic to register our button.
Confluence.HighlightAction provides registerButtonHandler function that lets us to register our own button to Highlight Actions panel. To successfully register the button, there are 2 parameters must be provided:
PLUGIN_KEY: plugin_key is the combination of the plugin key and button web item's key.options: contains the group of event handlers needed for the button, and the important propertyshouldDisplayto configure the context in which the button should displayed when text is selected, there are 3 supported contexts:
-
MAINCONTENT_ONLY: in page main content section.COMMENT_ONLY: in comment section.-
MAINCONTENT_AND_COMMENT: in both page main content and comment sections.
WARNING: PLUGIN_KEY must follow the pattern described exactly, otherwise the button will not be shown.
Step 5. Create i18n file to provide text for the button and dialog header
Create src/main/resources/i18n.properties with the following content to supply all the text shown on the panel:
1
2page.view.selection.action-panel.show-matched-text=Show matched text in this page
highlightdemo.dialog.header.text=Your highlighted text
highlightdemo.dialog.text.foundnumber=Number of instances found:
Step 6. Register the plugin modules in the XML plugin descriptor
In the plugin XML descriptor file, src/main/resources/atlassian-plugin.xml, we need to register a web-item to add the button to the highlight panel as well as our i18n, JavaScript, Soy and CSS files. This should be done as follows:
1
2<atlassian-plugin key="${project.groupId}.${project.artifactId}" name="${project.name}" plugins-version="2">
    <plugin-info>
        <description>${project.description}</description>
        <version>${project.version}</version>
        <vendor name="${project.organization.name}" url="${project.organization.url}" />
        <param name="plugin-icon">images/pluginIcon.png</param>
        <param name="plugin-logo">images/pluginLogo.png</param>
    </plugin-info>

    <!-- add our i18n resource -->
    <resource type="i18n" name="i18n" location="i18n"/>

    <!-- add our web resources -->
    <web-resource key="confluence-highlight-actions-demo-plugin-resources" name="confluence-highlight-actions-demo-plugin Web Resources">
        <!-- transform calls to AJS.getText() inside JS files -->
        <transformation extension="js">
            <transformer key="jsI18n"/>
        </transformation>

        <!-- transform Soy templates into JS -->
        <transformation extension="soy">
            <transformer key="soyTransformer">
                <functions>com.atlassian.confluence.plugins.soy:soy-core-functions</functions>
            </transformer>
        </transformation>

        <dependency>com.atlassian.auiplugin:ajs</dependency>

        <resource type="download" name="confluence-highlight-actions-demo-plugin.css" location="/css/confluence-highlight-actions-demo-plugin.css"/>
        <resource type="download" name="highlight-actions-demo-dialog.js" location="/js/highlight-actions-demo-dialog.js"/>
        <resource type="download" name="panel-helper.js" location="/js/panel-helper.js"/>
        <resource type="download" name="highlight-demo-dialog.js" location="/templates/highlight-demo-dialog.soy"/>
        <resource type="download" name="images/" location="/images"/>

        <context>viewcontent</context>
    </web-resource>

    <!-- register a button when highlighting text -->
    <web-item key="show-matched-text" name="Show matched text in page" section="page.view.selection/action-panel" weight="30">
        <label key="page.view.selection.action-panel.show-matched-text"/>
        <styleClass>aui-iconfont-devtools-file-commented</styleClass>
    </web-item>

</atlassian-plugin>
The important parts of the plugin descriptor are:
- The web-item creates a new button in the Highlight Actions panel, which appears when user highlights text. For this simple tutorial, we used
aui-iconfont-devtools-file-commentedin thestyleClass, but this is not limited to AUI icons. - The web-resource that includes the Soy template must have the Soy transformer to work properly.
- Both web-resources define a
contextthat determines whether or not the resource is loaded on a particular Confluence page. - The i18n resource declaration references the path to the i18n file without a "properties" suffix.
Step 7. Install into Confluence
You can start an instance of Confluence with atlas-run, or build the plugin with atlas-package and install it into your existing Confluence instance.
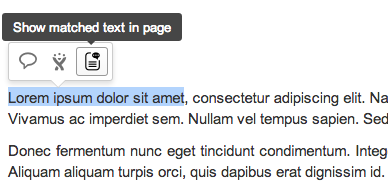
The result when the highlight actions panel is triggered should look like the screenshot below.
Screenshot: the highlight actions panel with new registers button

Screenshot: the highlight actions dialog

Troubleshooting
If the new button does not appear in the highlight actions panel, ensure you have the web-item correctly registered in atlassian-plugin.xml. Ensure you have installed the plugin in Confluence and that the plugin is enabled.
If the button is not working properly, check for JavaScript errors in the debugging console in your browser. The Firefox or the WebKit developer tools inspector may help you debug your code and track down the problem.
Rate this page: