Implementing automation actions
This guide will show you how to use automation actions, as part of the Jira Service Desk automation framework, to allow your app to take actions in remote systems. You should also read the reference documentation for automation actions: Jira Service Desk Automation Action module.
Legacy automation is turned off for new Jira Service Management customers. Customers already using Legacy automation are not affected. The long-term plan is to phase out Legacy automation. If you have any questions about Legacy automation or need support, please contact us.
The Jira Service Desk automation framework allows admins to craft their own rules to eliminate repetitive tasks. For example,
1
2WHEN an issue is created IF it contains the word "account" THEN assign it to the "Account Help" request type

WHEN an issue is about to breach a service level agreement IF it is reported by a member of the management group THEN alert the service desk team lead

WHEN a comment is added IF the issue is closed and the customer made the comment THEN re-open the ticket
The automation framework is powerful, however the rules are limited to acting on entities in Jira Service Desk.
Automation actions open up the automation framework, by allowing Cloud apps to react to changes in Jira Service Desk tickets by taking actions in remote systems.
Show me the code!
What is an automation action?
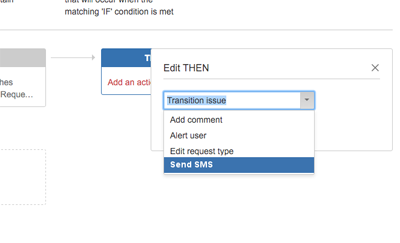
An automation action allows Connect apps to define their own THEN action in Jira Service Desk's automation feature, for example "Send SMS" (see screenshot below). When this action is triggered, a webhook request is fired from Jira Service Desk to your app (see Automation webhooks), including the configuration data supplied by the administrators.
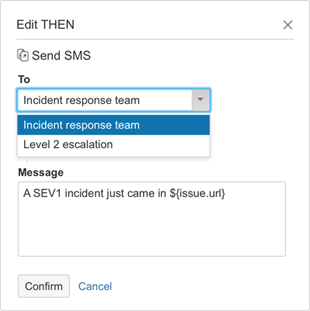
Apps need to provide a configuration UI that allows Jira Service Desk administrators to customize an action. The configuration UI is provided by supplying a URL, which will be rendered in an iframe (see screenshot below). When this dialog is saved, the app must return a JSON object that is saved with the automation rule. This is described in more detail in the following sections.
Defining the automation action configuration in an app
Apps define the automation action configuration in the app descriptor: atlassian-connect.json. An example is shown below:
1
2"modules": {
    ...,
    "automationActions": [
      {
        "key": "send-sms-automation-action",
        "name": { "value": "Send an SMS" },
        "webhook": {
            "url": "/send-sms" /* this is the webhook URL used by JSD automation when SMS rule triggers */
        },
        "configForm": {
            "url": "/config-sms.html" /* this is the URL to app supplied configuration UI -- rendered in an iframe in automation settings */
        }
      }
    ],
    ...
  }
Context parameters -- When the configForm.url is retrieved to draw the configuration UI, context parameters will automatically be passed in. For example, you could request /config-sms?projectKey=ITOPS&ruleId=abc123 (note, the ruleId parameter would only be provided if a previously saved rule is being edited).
For more information on defining the automationActions module, see Jira Service Desk Automation Action module.
Validating input and passing the action configuration back to Jira Service Desk
When the user saves the THEN action configuration form, the app needs to validate and return a JSON object representing the configuration data back to Jira Service Desk. This JSON object can only contain a simple (non-nested) object, i.e. a map of strings. Note, the JS object will be serialized using JSON.serialize, so you may want to refer to this method: JSON.stringify().
JavaScript loaded by the configuration form (e.g. config-sms.html)
1
2$(function () {
    var automation = new AP.jiraServiceDesk.Automation();

    // Retrieve configuration values previously stored by JSD to render when the form loads
    automation.getConfig(function(config) {
        if (config) {
            $("#number").val(config.number);
            $("#body").val(config.body);
        }
    });

    // Invoked by JSD after input is validated with successful outcome
    AP.events.on("jira-servicedesk-automation-action-serialize", function() {
        automation.serialize({
            number: $("#number").val(),
            body: $("#body").val()
        });
    });

    // Invoked by JSD when "Confirm" button is hit
    AP.events.on("jira-servicedesk-automation-action-validate", function() {
        var valid = true;

        if (!$("#number").val()) {
            $("#number").parent().append("<p>number can't be empty</p>");
            valid = false;
        }

        if (!$("#body").val()) {
            $("#body").parent().append("<p>body can't be empty</p>");
            valid = false;
        }

        automation.validate(valid);
    });
});
Examining the webhook payload
When the configuration UI is saved, the JSON object returned by the app above will be appended to the configuration field of a standard Jira Webhook payload shape. See the example below:
1
2{
    "timestamp": 1461049397396,
    "issue": {
        "key" : "FB-123",
        "fields" : {
            "summary" : "Your flight is delayed",
            "description" : "Please contact our customer support",
            ...
        } ,
        ...
        // More details in docs link below
    },
    "action": {
        "configuration": {
            "number" : "+61412012345",
            "body" : "A SEV1 incident just came in: https://mycompany.atlassian.net/browse/IT-412"
        }
    }
}
See Jira platform webhook documentation for more info on the issue JSON shapes.
Next steps
If you've finished this tutorial, check out more Jira Service Desk tutorials.
Rate this page: