Extending the macro property panel
Applicable: | This tutorial applies to Confluence 4.3 |
Level of experience: | This is an intermediate tutorial. You should have completed at least one beginner tutorial before working through this tutorial. See the list of developer tutorials. |
Time estimate: | It should take you approximately 1 hour to complete this tutorial. |
| Status: | LEGACY This tutorial applies to Confluence versions that have reached end of life. |
Overview of the tutorial
The macro property panel allows a user to remove or edit the currently selected macro. This tutorial will show you how to extend this to add custom buttons.
We are going to create a status light macro that will render in the editor with additional buttons in the property panel to change the current status - from 0 to 100 percent.
 to
to 
Prerequisite knowledge
To complete this tutorial, you need to know the following:
- The basics of Java development: classes, interfaces, methods, how to use the compiler, and so on.
- How to create an Atlassian plugin project using the Atlassian Plugin SDK.
- How to write a Confluence plugin that provides a macro
Plugin source
We encourage you to work through this tutorial. If you want to skip ahead or check your work when you have finished, you can find the plugin source code on Atlassian Bitbucket. Bitbucket serves a public Mercurial repository containing the tutorial's code. To clone the repository, issue the following command:
1
2hg clone https://bitbucket.org/atlassian_tutorial/confluence-status-light-macro
Alternatively, you can download the source using the get source option here: https://bitbucket.org/atlassian_tutorial/confluence-status-light-macro/overview
About these Instructions
You can use any supported combination of OS and IDE to construct this plugin. These instructions were written using Eclipse Classic Version 3.7.1 on a MacBook Pro running Mac OS X. If you are using another combination, you should use the equivalent operations for your specific environment.
Step 1. Create the plugin project
In this step, you'll use the two atlas- commands to generate stub code for your plugin and set up the stub code as an Eclipse project. The atlas- commands are part of the Atlassian Plugin SDK, and automate much of the work of plugin development for you.
-
Open a terminal and navigate to your Eclipse workspace directory.
-
Enter the following command to create a plugin skeleton:
1 2
atlas-create-confluence-pluginWhen prompted, enter the following information to identify your plugin:
group-id
com.atlassian.plugins.tutorial.confluenceartifact-id
status-lightversion
1.0-SNAPSHOTpackage
com.atlassian.plugins.tutorial.confluence -
Confirm your entries when prompted.
-
Change to the
status-lightdirectory created by the previous step. -
Run the following command:
1 2
atlas-mvn eclipse:eclipse -
Start Eclipse.
-
Select File > Import.
Eclipse starts the Import wizard. -
Filter for Existing Projects into Workspace (or expand the General folder tree).
-
Choose Next and enter the root directory of your workspace.
Your Atlassian plugin folder should appear under Projects. -
Select your plugin and choose Finish.
Eclipse imports your project.
Step 2. Review and tweak the generated stub code
It is a good idea to familiarise yourself with the stub plugin code. In this section, we'll check a version value and tweak a generated stub class. Open your plugin project in Eclipse and follow along in the next sections.
Add plugin metadata to the POM
The POM (Project Object Model definition file) is located at the root of your project and declares the project dependencies and other information.
Add some metadata about your plugin and your company or organisation.
-
Edit the
pom.xmlfile in the root folder of your plugin. -
Add your company or organisation name and your website to the
<organization>element:1 2
<organization> <name>Example Company</name> <url>http://www.example.com/</url> </organization> -
Update the
<description>element:1 2
<description>Provides a status light macro that will render in the editor with additional buttons in the property panel to change the current status.</description> -
Save the file.
Verify your Confluence version
When you generated the stub files, a default Confluence version was included in your pom.xml file. Take a moment and examine the Confluence dependency:
- Open the
pom.xmlfile. - Scroll to the bottom of the file.
- Find the
<properties>element.
This section lists the version of the Confluence and also the version of theatlas-commands you are running. - Verify that the Confluence version is the one you want.
- Save the
pom.xmlfile
Review the generated plugin descriptor
Your stub code contains a plugin descriptor file atlassian-plugin.xml. This is an XML file that identifies the plugin to the host application (Confluence) and defines the required plugin functionality. In your IDE (integrated development environment, such as Eclipse or IDEA) open the descriptor file which is located in your project under src/main/resources. You should see something like this:
1
2<atlassian-plugin key="${project.groupId}.${project.artifactId}" name="${project.name}" plugins-version="2">
    <plugin-info>
        <description>${project.description}</description>
        <version>${project.version}</version>
        <vendor name="${project.organization.name}" url="${project.organization.url}" />
    </plugin-info>

    <xhtml-macro name="status-light" class="com.atlassian.plugins.tutorial.confluence.ExampleMacro" key="my-macro">
        <parameters/>
    </xhtml-macro>
</atlassian-plugin>
Step 3. Add your plugin modules to the plugin descriptor
The plugin skeleton contains code for a Confluence macro with key 'my-macro'. We will remove this, and replace it with a new plugin module for the status light macro:
- Open the
atlassian-plugin.xmlfile. - Find the existing
<xhtml-macro>element and remove all the content contained within. - Replace with the following details:
name="status-light"
class="com.atlassian.plugins.tutorial.confluence.StatusLightMacro"
key="status-light"
description="Percentage based status lights"
category name="admin" - Add a field named parameters, where we will add 11 parameters, one representing each image we have in the project - this allows us to set a percentage as a parameter and have it render the correct image.
- We will also register as a resource the images for the macro.
- Next what we will do is copy in all of the images required for the project, for this I am using PNG images representing progress bars available from Wikimedia Commons. Place these in the
src/main/resources/imgdirectory.
The finished code should look like this:
1
2<xhtml-macro key="status-light" name="status-light"
             class="com.atlassian.confluence.plugin.StatusLightMacro">
    <description>Percentage based status lights</description>
    <category name="admin"/>
    <parameters>
        <parameter name="percentage" type="enum">
            <value name="0%"/>
            <value name="10%"/>
            <value name="20%"/>
            <value name="30%"/>
            <value name="40%"/>
            <value name="50%"/>
            <value name="60%"/>
            <value name="70%"/>
            <value name="80%"/>
            <value name="90%"/>
            <value name="100%"/>
        </parameter>
    </parameters>
</xhtml-macro>

<resource type="download" name="images/" location="img/">
    <param name="content-type" value="image/png"/>
</resource>
Step 4. Update your project and refresh your IDE
If you change your Atlassian project, Eclipse is not automatically aware of the changes. Moreover, sometimes your project dependencies require an update. We need to fix that.
-
Switch to a terminal window.
-
Change directory to the project root.
This is the directory that contains thepom.xmlfile. -
Update your project metadata with the new POM information.
1 2
atlas-mvn eclipse:eclipse -
Back in Eclipse, refresh the plugin project to pick up the changes.
Remember to do this update and refresh step each time you edit your pom.xml and whenever you modify your plugin source with an Atlassian command.
Step 5. Write the plugin code
You have already generated the stubs for your plugin modules. Now , you will write some code that will make your plugin do something. Recall that this plugin provides a status light macro that will render in the editor with additional buttons in the property panel to change the current status . To do this, you will implement three interfaces: Macro for the Macro itself and EditorImagePlaceholder and ResourceAware for rendering it in the editor.
The Macro
First, remove the example class that was created in the plugin skeleton at com.atlassian.plugins.tutorial.confluence.ExampleMacro
Also remove the test class at com.atlassian.plugins.tutorial.confluence.ExampleMacroTest
We will now create a new macro class at com.atlassian.plugins.tutorial.confluence.StatusLightMacro. The macro implements three interfaces, Macro for the Macro itself and EditorImagePlaceholder and ResourceAware for rendering itself in the editor.
1
2package com.atlassian.confluence.plugin;
import com.atlassian.confluence.content.render.xhtml.ConversionContext;
import com.atlassian.confluence.macro.DefaultImagePlaceholder;
import com.atlassian.confluence.macro.EditorImagePlaceholder;
import com.atlassian.confluence.macro.ImagePlaceholder;
import com.atlassian.confluence.macro.Macro;
import com.atlassian.confluence.macro.MacroExecutionException;
import com.atlassian.confluence.macro.ResourceAware;
import com.atlassian.confluence.pages.thumbnail.Dimensions;
import com.atlassian.confluence.setup.settings.SettingsManager;
import java.util.HashMap;
import java.util.Map;
public class StatusLightMacro implements Macro, EditorImagePlaceholder, ResourceAware
{
    private static final String PARAM_NAME = "percentage";
    private static final String RESOURCE_DIR = "/download/resources/com.atlassian.confluence.plugin.status-light/images/";
    private static final Map<String, String> fileNames = new HashMap<String, String>();
    static
    {
        fileNames.put("0%", "status_0.png");
        fileNames.put("10%", "status_1.png");
        fileNames.put("20%", "status_2.png");
        fileNames.put("30%", "status_3.png");
        fileNames.put("40%", "status_4.png");
        fileNames.put("50%", "status_5.png");
        fileNames.put("60%", "status_6.png");
        fileNames.put("70%", "status_7.png");
        fileNames.put("80%", "status_8.png");
        fileNames.put("90%", "status_9.png");
        fileNames.put("100%", "status_10.png");
    }
    private final SettingsManager settingsManager;
    public StatusLightMacro(SettingsManager settingsManager)
    {
        this.settingsManager = settingsManager;
    }
    public String getImageLocation(Map<String, String> params, ConversionContext ctx)
    {
        if (params.containsKey(PARAM_NAME))
        {
            return RESOURCE_DIR + fileNames.get(params.get(PARAM_NAME));
        }
        return RESOURCE_DIR + fileNames.get("0%");
    }
    public String execute(Map<String, String> params, String defaultParam, ConversionContext ctx) throws MacroExecutionException
    {
        return "<img src=\"" + settingsManager.getGlobalSettings().getBaseUrl() + "/" + getImageLocation(params, ctx) + "\">";
    }
    public BodyType getBodyType()
    {
        return BodyType.NONE;
    }
    public OutputType getOutputType()
    {
        return OutputType.INLINE;
    }
    public String getResourcePath()
    {
        return null;
    }
    public void setResourcePath(String s) {}
    public ImagePlaceholder getImagePlaceholder(Map<String, String> params, ConversionContext ctx)
    {
        // Each image placeholder is a 200x18 image
        return new DefaultImagePlaceholder(getImageLocation(params, ctx), new Dimensions(200, 18), false);
    }
}
Extending the property panel
So far everything has been fairly standard, we have a macro that can render itself in the editor and a bunch of images to support it.
What we are going to do now is extend the macro definition to include the definition of a some custom buttons in the property panel. Each button will be given an id and a label that will be rendered, we will do this for all 11 states of the macro. Below is the new xhtml-macro block with the property panel buttons.
1
2<xhtml-macro key="status-light" name="status-light"
             class="com.atlassian.confluence.plugin.StatusLightMacro">
    <description>Percentage based status lights</description>
    <category name="admin"/>
    <parameters>
        <parameter name="percentage" type="enum">
            <value name="0%"/>
            <value name="10%"/>
            <value name="20%"/>
            <value name="30%"/>
            <value name="40%"/>
            <value name="50%"/>
            <value name="60%"/>
            <value name="70%"/>
            <value name="80%"/>
            <value name="90%"/>
            <value name="100%"/>
        </parameter>
    </parameters>
    <property-panel>
        <button id="0" label="0%"/>
        <button id="10" label="10%"/>
        <button id="20" label="20%"/>
        <button id="30" label="30%"/>
        <button id="40" label="40%"/>
        <button id="50" label="50%"/>
        <button id="60" label="60%"/>
        <button id="70" label="70%"/>
        <button id="80" label="80%"/>
        <button id="90" label="90%"/>
        <button id="100" label="100%"/>
    </property-panel>
</xhtml-macro>
Hooking it all up with some JavaScript
We now have the buttons definitions so we need some login to back them, here we do it with some JavaScript provided by the plugin - but first of all we need to register this with the atlassian-plugin.xml file.
1
2<web-resource name="Javascript" key="editor_status-light">
    <resource type="download" name="status-light.js" location="js/status-light.js"/>
    <context>editor</context>
    <dependency>com.atlassian.confluence.tinymceplugin:editor-resources</dependency>
</web-resource>
Notice that the context is set to editor, the events we register for in this JavaScript file will not make any sense outside of the editor. We are also adding a dependency on the Confluence editor-resources, as this is required to be loaded first.
Confluence now provides a mechanism for plugin developers to hook into the events of their custom buttons on the property panel, this method is:
1
2AJS.Confluence.PropertyPanel.Macro.registerButtonHandler(id, handler)
Where id is the id you have registered your button as in the atlassin-plugin.xml file and the handler is a function callback that will be run when your button is clicked, this function gets passed the event object and the currently selected macro node. Below is a snippet of the status-light.js provided in the source:
1
2var updateMacro = function(macroNode, param) {
    var $macroDiv = AJS.$(macroNode);
    AJS.Rte.getEditor().selection.select($macroDiv[0]);
    AJS.Rte.BookmarkManager.storeBookmark();

    var macroRenderRequest = {
        contentId: Confluence.Editor.getContentId(),
        macro: {
            name: "status-light",
            params: {"percentage": param},
            defaultParameterValue: "",
            body : ""
        }
    };

    tinymce.confluence.MacroUtils.insertMacro(macroRenderRequest);
};

AJS.Confluence.PropertyPanel.Macro.registerButtonHandler("0", function(e, macroNode) {
    updateMacro(macroNode, "0%");
});
Notice that this snippet only handles the button with the id of 0, for brevity I have excluded the rest of the handlers (they change only in id and percentage values). The function defined at the top, updateMacro is used to modify the macro parameters and redraw the macro in the editor.
Step 6. Build, install and run the plugin
Follow these steps to build and install your plugin, so that you can test your code.
-
Make sure you have saved all your code changes to this point.
-
Open a terminal window and navigate to the plugin root folder (where the
pom.xmlfile is). -
Run the following command:
1 2
atlas-runThis command builds your plugin code, starts a Confluence instance, and installs your plugin in it. This may take several seconds. When the process has finished, you will see many status lines on your screen concluding with something like the following:
1 2
[INFO] Confluence started successfully in 71s at http://localhost:1990/confluence [INFO] Type CTRL-D to shutdown gracefully [INFO] Type CTRL-C to exit -
Open your browser and navigate to the local Confluence instance started by
atlas-run.
For example, the default address is http://localhost:1990/confluence for Confluence. See Plugin SDK Supported Applications and Default Ports for other applications. -
At the HOSTAPP login screen, enter a username of
adminand a password ofadmin. -
Add a page, and insert the status-light macro we have created.
-
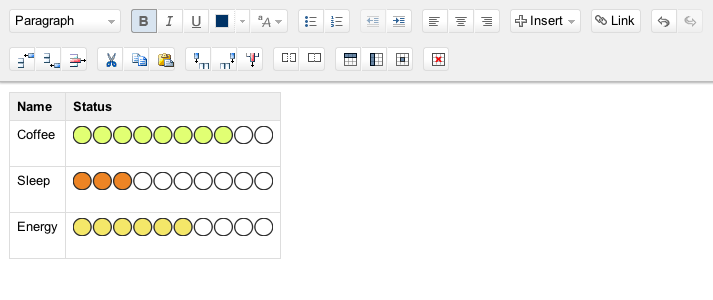
The macro will render itself as an image placeholder within the editor:
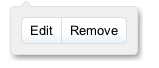
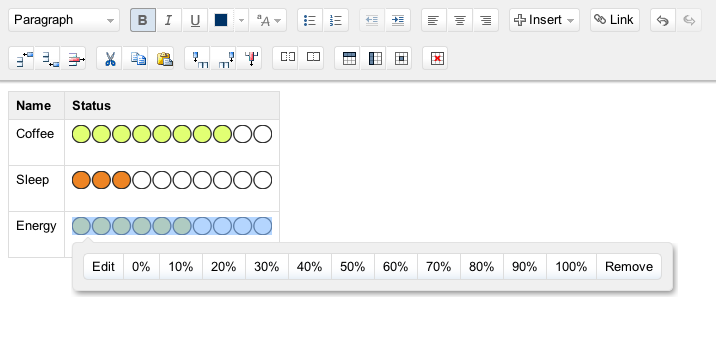
Selecting the macro will display our extended property panel:
See Preventing XSS issues with macros in Confluence 4.0 for information on how to prevent XSS issues with your macro.
Congratulations, that's it
Have a chocolate!
Rate this page: