Adding menu Items to Confluence
Applicable: | This tutorial applies to Confluence 4.3 and earlier. |
Level of experience: | Beginner. Our tutorials are classified as 'beginner', 'intermediate' and 'advanced'. This one is at 'beginner' level, so you can follow it even if you have never developed a plugin before |
Time estimate: | It will take you approximately 1 hour to complete this tutorial. |
| Status: | LEGACY This tutorial applies to Confluence versions that have reached end of life. |
Overview
This tutorial shows you how to use a Web UI module in your plugin, to insert a menu option in to the Confluence web interface. The Web UI module can also insert links, tabs and sections of links. Read more about web item plugin module.
In order to do this, you will create a very simple Confluence plugin. Your plugin will consist of the following components:
- Resources for display of the plugin UI
- Plugin descriptor to enable the plugin module in Confluence.
All these components will be contained within a single JAR file. Each component is further discussed in the examples below.
NOTE: A more sophisticated plugin would also contain Java classes encapsulating the plugin logic. In this case however, we are simply concentrating on only adding a Web UI Module to Confluence -- we'll put an existing Confluence action in place for the button to activate.
Plugin Source
We encourage you to work through this tutorial. If you want to skip ahead or check your work when you are done, you can find the plugin source code on Atlassian Bitbucket. Bitbucket serves a public Git repository containing the tutorial's code. To clone the repository, issue the following command:
1
2$ git clone https://atlassian_tutorial@bitbucket.org/atlassian_tutorial/confluence-web-item.git
Alternatively, you can download the source using the Downloads page here: https://bitbucket.org/atlassian_tutorial/confluence-web-item
Step 1. Set up the Atlassian Plugin SDK
Ensure that you have the latest version of the Atlassian Plugin SDK installed on your machine. For more information, see Set up the Atlassian Plugin SDK and build a project
Step 2. Create the Plugin Project
In this step, use the appropriate atlas-create-application-plugin command to create your plugin. For example, .. The atlas- commands are part of the Atlassian Plugin SDK, and automate much of the work of plugin development for you.
-
Open a terminal and navigate to your Eclipse workspace directory.
-
Enter the following command to create a plugin skeleton:
1 2
atlas-create-confluence-pluginWhen prompted, enter the following information to identify your plugin:
group-id
com.atlassian.tutorial
artifact-id
webitemz
-
Confirm your entries when prompted.
Step 3. Edit the atlassian-plugin.xml file
In this step, you must now register the plugin module in your plugin descriptor, atlassian-plugin.xml. In other words, add the following code to your atlassian-plugin.xml file between the <atlassian-plugin> tags, but below the <plugin-info> tag group.
1
2<web-item key="spacelogo" name="Space Logo" section="system.content.add/space"  weight="40">
    <label key="webitemz.new.item" />
    <link>/spaces/configurespacelogo.action?key=$space.key</link>
    <icon height="16" width="16">
        <link>/images/icons/logo_add_16.gif</link>
    </icon>
    <condition class="com.atlassian.confluence.plugin.descriptor.web.conditions.NotPersonalSpaceCondition"/>
</web-item>
Let's break down that XML code. In this example we are adding an item to the Tools menu in Confluence, which will open the Customise Space Logo page when it's clicked.
To do this, we've done a number of things.
Choosing a menu location for the new item
In the code above, this line involves four attributes:
1
2<web-item key="spacelogo" name="Space Logo" section="system.content.add/space"  weight="40">
- The first, key="spacelogo" is setting an internal name for the new item.
- The second, name="Space Logo" is another internal name for the new item.
- The third, section="system.content.add/space" defines the menu location for the item, in the top part of the Add Menu . See more information.
- The fourth, weight is a variable for controlling presentation, which you can leave at the default value.
Choosing a graphic to appear in the menu
In the code above, this part:
1
2<icon height="16" width="16">
    <link>/images/icons/logo_add_16.gif</link>
</icon>
Defines a small graphic icon that will appear in the menu. Height and width are for controlling presentation of the graphic, while link points to the location of the graphic file (in this case we are using a graphic that ships with Confluence).
Controlling when the web item is displayed
Examining this line of code:
1
2<condition class="com.atlassian.confluence.plugin.descriptor.web.conditions.NotPersonalSpaceCondition"/>
This causes the web item to only be displayed in spaces that are not personal spaces. It does this by using a 'web condition'. Web conditions control the display of web items; more information is available in the reference documentation for Confluence plugin development.
Defining a custom label to appear in the Menu UI
In the code above, this line: <label key="webitemz.new.item" /> defines the label for the button text that will appear in the menu.
Adding new resource files and internationalisation
We will want to specify a text label to display in our Confluence menu item. You could hard-code this information into your atlassian-plugin.xml file, but by adding it in a new resource file, we can make our plugin compatible with internationalisation. To do so, simply add a new file in the resources directory of your plugin (called message.properties) and enter one line of code into it:
1
2webitemz.new.item=Configure space logo
Additionally, we will need to reference this resource file in our atlassian-plugin.xml file. To do this, add this line of code above the <web item> code block:
1
2<resource type="i18n" name="i18n" location="message" />
This will access your message.properties file and retrieve the text for our button label. The result of this is that the text we have specified here; 'Configure space logo' appears as the title text of our new button in the Add menu.
If you would like to know more about internationalisation, see our Confluence documentation on the topic.
Step 4. Build, Install and Run the Plugin
Follow these steps to build and install your plugin, so that you can test your code. If you have not already started the application, start it now:
- Open a command window and go to the plugin root folder (where the
pom.xmlis located). - Run
atlas-run(oratlas-debugif you might want to launch the debugger in your IDE).
Go back to the browser. The updated plugin has been installed into the application, and you can test your changes.
The atlas-run command will compile the plugin project and then launch a local instance of Confluence.
Once Confluence has loaded, access the local instance with this URL:
1
2http://localhost:1990/confluence/
Login with username "admin" and password "admin, then create a page in the default space. Give it a meaningful name and click Save to create the page.
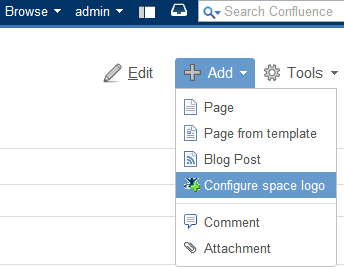
On accessing the 'Add' menu, you will be able to see the new web item that you've added inside the menu. Clicking it will launch the 'Customise Space Logo' screen.
Screenshot: The New Web Item in the Confluence Add Menu
That's all that's required to add a menu item in a Confluence plugin. To extend this project, you could build new functionality for your button to activate.
Now you are ready to move onto writing some Java code to achieve that. It's not necessary, for the purposes of this tutorial though.
If you wanted to move on to writing Java to make new functionality to go with your web item, you can create an action with the Struts module.
Congratulations, you have completed this tutorial.
Rate this page: