Posting notifications in Confluence
Applicable: | This tutorial applies to Confluence 4.3 or higher |
Level of experience: | This is an intermediate tutorial. You should have completed at least one beginner tutorial before working through this tutorial. |
Time estimate: | It should take you approximately 1 hour to complete this tutorial. |
Overview of the tutorial
This tutorial shows you how to use the Notification API in Confluence. The completed plugin will consist of a simple administration page that is used to send notifications to all users of the wiki. One typical use case is to announce a scheduled maintenance.
If you are already familiar with the Atlassian SDK and just want to learn how to use the Notification API, go straight to Step 5!
Prerequisite knowledge
To complete this tutorial, you must already understand
- The basics of Java development: classes, interfaces, methods, how to use the compiler, and so on.
- How to create an Atlassian plugin project using the Atlassian Plugin SDK.
Plugin source
We encourage you to work through this tutorial. If you want to skip ahead or check your work when you are done, you can find the plugin source code on Atlassian Bitbucket. Bitbucket serves a public Git repository containing the tutorial's code. To clone the repository, issue the following command:
1
2git clone https://bitbucket.org/atlassian_tutorial/confluence-notification
Alternatively, you can download the source using the get source option here:
https://bitbucket.org/atlassian_tutorial/confluence-notification
REPO_NAME
About these Instructions
You can use any supported combination of OS and IDE to construct this plugin. These instructions were written using IntelliJ IDEA Ultimate 11.1 on a MacBook Pro running Mac OS X. If you are using another combination, you should use the equivalent operations for your specific environment.
Step 1. Create the plugin project
In this step, you'll use the atlas-create command to generate stub code for your plugin. The atlas- commands are part of the Atlassian Plugin SDK, and automate much of the work of plugin development for you.
-
Open a terminal and navigate to your plugin directory.
-
Enter the following command to create a Confluence plugin skeleton:
1 2
atlas-create-confluence-pluginWhen prompted, enter the following information to identify your plugin:
group-id
com.example.plugins.tutorial.confluenceartifact-id
tutorial-confluence-notificationversion
1.0-SNAPSHOTpackage
com.example.plugins.tutorial.confluence.notification -
Confirm your entries when prompted.
-
Change to the
tutorial-confluence-notificationdirectory created by the previous step.
Step 2. Review and tweak the generated stub code
It is a good idea to familiarise yourself with the stub plugin code. In this section, we'll check a version value and tweak a generated stub class. Open your plugin project in your IDE and follow those steps.
Add plugin metadata to the POM
Add some metadata about your plugin and your company or organization.
-
Edit the
pom.xmlfile in the root folder of your plugin. -
Add your company or organisation name and your website to the
<organization>element:1 2
<organization> <name>Example Company</name> <url>http://www.example.com</url> </organization> -
Update the
<description>element:1 2
<description>Allow administrators to send notifications to all wiki users.</description> -
Save the file.
Verify your Confluence version
When you generated the stub files, the Confluence version you chose was added to your pom.xml file (Project Object Model definition file). This file is located at the root of your project and declares the project dependencies. Take a moment and examine the Confluence dependency:
-
Open the
pom.xmlfile. -
Scroll to the bottom of the file.
-
Find the
<properties>element.
This section lists the version of the Confluence version you selected in Step 1 and also the version of theatlas-commands you are running. -
Verify that the Confluence version is 4.3 or higher.
1 2
<properties> <confluence.version>4.3</confluence.version> <confluence.data.version>4.3</confluence.data.version> <amps.version>3.11</amps.version> </properties> -
Save the
pom.xmlfile.
Review the generated plugin descriptor
Your stub code contains a plugin descriptor file atlassian-plugin.xml. This is an XML file that identifies the plugin to the host application (Confluence) and defines the required plugin functionality. In your IDE, open the descriptor file which is located in your project under src/main/resources and you should see something like this:
1
2<atlassian-plugin key="${project.groupId}.${project.artifactId}" name="${project.artifactId}" plugins-version="2">
    <plugin-info>
        <description>${project.description}</description>
        <version>${project.version}</version>
        <vendor name="${project.organization.name}" url="${project.organization.url}" />
    </plugin-info>
</atlassian-plugin>
Step 3. Create a basic administration screen
For this tutorial, we will need a basic administration screen where the notification message to be sent to all wiki users is entered.
Since writing an administration screen is not the point of this particular tutorial, we won't go into the details here. If you are interested in the implementation details, you can:
- Check out the code for this tutorial at https://bitbucket.org/atlassian_tutorial/confluence-notification/src
- Read the "Writing an admin screen" tutorial.
This is what the administration screen used in this tutorial looks like:

Pretty simple, but it will serve the purpose!
Step 4. Creating a REST resource
Now that our administration screen is up and running, let's create a REST resource that will be called by some JavaScript on our admin page.
We will define 2 end points:
| URI | Method | Description |
|---|---|---|
| /rest/notification/latest/ | POST | Send a notification to all members of the "confluence-users" group. |
| /rest/notification/latest/ | GET | List all available notifications sent by this plugin. |
Let's start by adding the following REST-related dependencies to our pom.xml:
1
2<dependency>
    <groupId>javax.ws.rs</groupId>
    <artifactId>jsr311-api</artifactId>
    <version>1.0</version>
    <scope>provided</scope>
</dependency>
<dependency>
    <groupId>javax.xml.bind</groupId>
    <artifactId>jaxb-api</artifactId>
    <version>2.1</version>
    <scope>provided</scope>
</dependency>
<dependency>
     <groupId>com.atlassian.plugins.rest</groupId>
     <artifactId>atlassian-rest-common</artifactId>
     <version>1.0.2</version>
     <scope>provided</scope>
</dependency>
<dependency>
     <groupId>com.atlassian.sal</groupId>
     <artifactId>sal-api</artifactId>
     <version>2.6.0</version>
     <scope>provided</scope>
</dependency>
Then let's add the REST module to our atlassian-plugin.xml, note that the path to access our REST resource is "/notification" in this case.
1
2<rest name="Notification Resource"  key="notification-resource" path="/notification" version="1.0">
    <description key="notification-resource.description">The Notification Resource Plugin</description>
</rest>
And finally let's create the NotificationResource class:
1 2package com.example.plugins.tutorial.confluence.notification.resource; import java.util.concurrent.ExecutionException; import javax.ws.rs.Consumes; import javax.ws.rs.FormParam; import javax.ws.rs.GET; import javax.ws.rs.POST; import javax.ws.rs.Path; import javax.ws.rs.Produces; import javax.ws.rs.core.MediaType; import javax.ws.rs.core.Response; import com.atlassian.confluence.security.PermissionManager; import com.atlassian.confluence.user.AuthenticatedUserThreadLocal; import com.atlassian.confluence.user.UserAccessor; /** * A resource of creating and listing notifications */ @Path ("/") @Consumes ((MediaType.APPLICATION_JSON)) // prevents XSRF ! public class NotificationResource { private final UserAccessor userAccessor; private final PermissionManager permissionManager; public NotificationResource(final UserAccessor userAccessor, final PermissionManager permissionManager) { this.userAccessor = userAccessor; this.permissionManager = permissionManager; } @POST public Response createNotification(@FormParam ("title") String title, @FormParam ("message") String message) throws Exception { if (isAdmin()) { // TODO: add code to create notifications return Response.ok().build(); } else { return Response.status(Response.Status.FORBIDDEN).build(); } } @GET @Produces (MediaType.APPLICATION_JSON) public Response findAllNotifications() throws Exception{ if (isAdmin()){ // TODO add code to list past notifications sent by this plugin return Response.ok().build(); } else{ return Response.status(Response.Status.FORBIDDEN).build(); } } private boolean isAdmin(){ return permissionManager.isConfluenceAdministrator(AuthenticatedUserThreadLocal.getUser()); } }
You can now try to access your 2 REST resources using curl:
- curl --user admin:admin http://localhost:1990/confluence/rest/notification/latest/
- curl --user admin:admin -X POST http://localhost:1990/confluence/rest/notification/latest/
Step 5. Create some notifications
Ok, now that we have our REST endpoints up and running, let's add some code to the "create notification" URI. To do this, we need to add the Notification API dependency to our pom.xml:
1
2<dependency>
  <groupId>com.atlassian.mywork</groupId>
  <artifactId>mywork-api</artifactId>
  <version>1.0.2</version>
  <scope>provided</scope>
</dependency>
We also need to import the NotificationService component to atlassian-plugin.xml:
1
2<component-import key="notificationService" interface="com.atlassian.mywork.service.LocalNotificationService"/>
And we can now have it injected and use it in our Resource:
1
2/**
 * A resource of creating and listing notifications
 */
@Path ("/")
@Consumes (MediaType.APPLICATION_JSON)
@Produces (MediaType.APPLICATION_JSON)
public class NotificationResource {
    private final LocalNotificationService notificationService;
    private final UserAccessor userAccessor;
    private final PermissionManager permissionManager;

    public NotificationResource(final LocalNotificationService notificationService, final UserAccessor userAccessor, final PermissionManager permissionManager) {
        this.notificationService = notificationService;
        this.userAccessor = userAccessor;
        this.permissionManager = permissionManager;
    }
The code to create a notification is extremely simple:
1
2/**
 * Create a single notification and send it to user
 * @param user the user who will receive the notification
 * @param title the title of the notification
 * @param message the body of the notification
 * @return the created notification
 * @throws InterruptedException
 * @throws ExecutionException
 */
private Notification sendNotification(final String user, final String title, final String message) throws InterruptedException, ExecutionException{
    Notification notification = notificationService.createOrUpdate(user, new NotificationBuilder()
            .application(PLUGIN_KEY) // a unique key that identifies your plugin
            .title("Message from your beloved administrator")
            .itemTitle(title)
            .description(message)
            .groupingId("com.example.plugins.tutorial.confluence.notification") // a key to aggregate notifications
            .createNotification()).get();
    return notification;
}
Notifications are created asynchronously. notificationService.createOrUpdate returns a Future<Notification>
Now let's iterate on all users of the "confluence-users" group and send a notification to each of them:
1
2/**
 * Iterate on all users of the "confluence-users" group and send a notification to each of them
 * @param title the title of the notification to send
 * @param message the body of the notification to send
 * @throws ExecutionException
 * @throws InterruptedException
 */
private void sendNotificationToAllUsers(final String title, final String message)
        throws ExecutionException, InterruptedException {
    Pager<String> memberNames = userAccessor.getMemberNames(new DefaultGroup(UserAccessor.GROUP_CONFLUENCE_USERS));
    for (String memberName : memberNames) {
        sendNotification(memberName, title, message);
    }
Finally, let's call the last method from our createNotification URI:
1
2@POST
public Response createNotification(@FormParam ("title") String title, @FormParam ("message") String message)
        throws Exception {
    if (isAdmin()) {
        sendNotificationToAllUsers(title, message);
        return Response.ok().build();
    }
    else {
        return Response.status(Response.Status.FORBIDDEN).build();
    }
And that is all there is to it ! Let's run our plugin and create some notifications.
Step 6. Build, install and run the plugin
Follow these steps to build and install your plugin, so that you can test your code.
-
Make sure you have saved all your code changes to this point.
-
Open a terminal window and navigate to the plugin root folder (where the
pom.xmlfile is). -
Run the following command:
1 2
atlas-runThis command builds your plugin code, starts a Confluence instance, and installs your plugin. This may take several seconds. When the process is complete, you'll see many status lines on your screen concluding with something like::
1 2
[INFO] Confluence started successfully in 71s at http://localhost:1990/confluence [INFO] Type CTRL-D to shutdown gracefully [INFO] Type CTRL-C to exit -
Open your browser and navigate to the local Confluence instance started by
atlas-run.
If you used the settings in the instructions, the default port is 1990. To navigate to the local Confluence, enter http://localhost:1990/confluence//plugins/servlet/notification/admin in your browser. -
At the Confluence login, enter the username
adminand passwordadmin. -
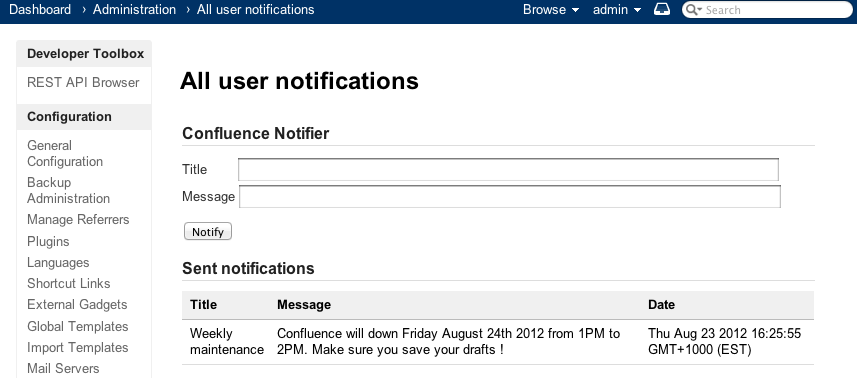
Create a notification from the admin screen (http://localhost:1990/confluence//plugins/servlet/notification/admin) and click Notify:

-
All your users will receive a new notification in their inbox!
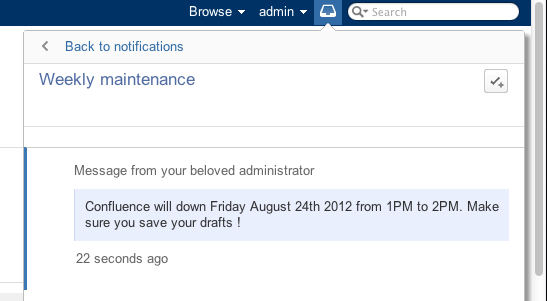
Step 7. Expand the plugin by listing past notifications on the admin screen
Now you have a basic plugin that you can use to send notifications to all your users. You can expand its functionality so that administrators can see the most recent sent notifications (so that no duplicate notification is sent by mistake for example).
Let's implement the findAllNotifications() method that we declared earlier in this tutorial.
1
2@GET
public Response findAllNotifications() throws Exception {
    if (isAdmin()) {
        // find all the notifications received by the logged in user
        final Iterable<Notification> notifications = notificationService.findAll(AuthenticatedUserThreadLocal.getUser().getName());

        // we are only interested in the notification send by our plugin
        Iterables.filter(notifications, new Predicate<Notification>() {
            @Override
            public boolean apply(@Nullable final Notification notification){

                return PLUGIN_KEY.equals(notification.getApplication());
            }
        });
        // Let's only display the last MAX_RESULT notifications
        return Response.ok(Iterables.limit(notifications, MAX_RESULT)).build();
    }
    else {
        return Response.status(Response.Status.FORBIDDEN).build();
    }
}
And now by calling this URI from our JavaScript, we can display the most recent notifications in a table on the admin page.
If you want to learn more about notifications:
- have a look at the complete Javadoc.
- read through the Notifications and Tasks REST API documentation.
- watch the AtlasCamp 2012 tutorial video "Integrating with Confluence WorkBox notifications"
Rate this page: