Unit testing plugins
Applicable: | This tutorial applies to Confluence 4.x and later. |
Level of experience: | This is an intermediate tutorial. You should have completed at least one beginner tutorial before working through this tutorial. See the list of tutorials in DAC. |
Time estimate: | It should take you approximately 1 hour to complete this tutorial. |
Overview of the Tutorial
This tutorial shows you how to write unit tests for your plugin. A unit test is a Java class that automatically tests application code, in this case, the application code being your Confluence plugin.
Why would you want to write unit tests for a plugin? Here are a few reasons:
- Unit testing can find bugs before you release your code.
- Once you have a suite of tests, you can quickly verify that changes to your plugin have not broken existing functionality.
- Unit testing helps enforce modularity in your code by promoting separation of concerns.
In this tutorial, you'll create a simple Confluence plugin, a custom macro. To illustrate unit testing, we'll add unit tests for the plugin macro. This tutorial will also cover how to run unit tests from an IDE or Maven.
The Atlassian plugin framework supports several mechanisms for unit testing your plugin.
This test uses a test spy framework called Mockito to create mock objects. Mock objects serve as a replacement for another class. Mockito generates the simulated class objects we need for the example unit tests we are going to code in this tutorial.
About these Instructions
You can use any supported combination of OS and IDE to create this plugin. These instructions were written using IntelliJ IDEA on Ubuntu Linux. If you are using another OS or IDE combination, you should use the equivalent operations for your specific environment.
This tutorial was last tested with Confluence 5.1.4.
Prerequisite Knowledge
To get the most out of this tutorial, you should already know about:
- The basics of Java development, such as classes, interfaces, methods, and so on.
- The basics of software unit testing and integration testing.
- How to create an Atlassian plugin project using the Atlassian Plugin SDK.
Also, this tutorial shows testing in the context of a Confluence macro plugin, but without going into details about how the macro plugin works. If you want to learn more about macro plugins, see Create a Confluence 'Hello World' macro.
Plugin Source
We encourage you to work through this tutorial. If you want to skip ahead or check your work when you are done, you can find the plugin source code on Atlassian Bitbucket. Bitbucket serves a public Git repository containing the tutorial's code. To clone the repository, issue the following command:
1
2git clone https://bitbucket.org/atlassian_tutorial/confluence-unittesting-plugin.git
Alternatively, you can download the source using the get source option here: bitbucket.org/atlassian_tutorial/confluence-unittesting-plugin
Step 1. Create the plugin project
In this step, you'll use the Atlassian Plugin SDK to generate the stub code for your plugin. The atlas commands, part of the Atlassian Plugin SDK, automate much of the work of plugin development for you.
-
If you have not already set up the Atlassian Plugin SDK, do that now: Set up the Atlassian Plugin SDK and Build a Project.
-
Open a terminal and navigate to the directory where you want to place your project.
-
Enter the following command to create a plugin skeleton:
1 2
atlas-create-confluence-plugin -
As prompted, enter the following information to identify your plugin:
group-id
com.atlassian.tutorial.confluence.plugin.unittestingartifact-id
confluence-unittesting-pluginversion
1.0-SNAPSHOTpackage
com.atlassian.tutorial.confluence.plugin.unittesting -
Confirm your entries when prompted.
Step 2. Create the plugin to test
The SDK gave us the scaffolding for a generic plugin. But it doesn't do much. Let's add a custom macro plugin to test. As far as macros go, it's very simple. It's not meant to show what you can do with custom macros, but simply to give us a subject for our testing.
-
Add a new file named ExampleMacro.java to the source file directory at
src/main/java/com/atlassian/tutorial/confluence/plugin/unittesting/. -
Add this code to the file:
1 2
package com.atlassian.tutorial.confluence.plugin.unittesting; import java.util.Map; import java.util.List; import com.atlassian.confluence.content.render.xhtml.ConversionContext; import com.atlassian.confluence.macro.Macro; import com.atlassian.confluence.macro.MacroExecutionException; import com.atlassian.confluence.pages.PageManager; import com.atlassian.confluence.pages.Page; import com.atlassian.confluence.spaces.SpaceManager; import com.atlassian.confluence.user.AuthenticatedUserThreadLocal; import com.atlassian.user.User; import com.opensymphony.util.TextUtils; public class ExampleMacro implements Macro { private final PageManager pageManager; private final SpaceManager spaceManager; public ExampleMacro(PageManager pageManager, SpaceManager spaceManager) { this.pageManager = pageManager; this.spaceManager = spaceManager; } @Override public String execute(Map<String, String> parameters, String body, ConversionContext context) throws MacroExecutionException { StringBuffer result = new StringBuffer(); User user = AuthenticatedUserThreadLocal.getUser(); if (user != null) { String greeting = "<p>Hello <b>" + TextUtils.htmlEncode(user.getFullName()) + "</b>.</p>"; result.append(greeting); } List<Page> list = pageManager.getRecentlyAddedPages(55, "DS"); result.append("<p>"); result.append("Some stats for <b>Demonstration Space</b>:"); result.append("<table class=\"confluenceTable\">"); result.append("<thead><tr><th class=\"confluenceTh\">Page</th><th class=\"confluenceTh\">Number of children</th></tr></thead>"); result.append("<tbody>"); for (Page page : list) { int numberOfChildren = page.getChildren().size(); String pageWithChildren = "<tr><td class=\"confluenceTd\">" + TextUtils.htmlEncode(page.getTitle()) + "</td><td class=\"confluenceTd\" style=\"text-align:right\">" + numberOfChildren + "</td></tr>"; result.append(pageWithChildren); } result.append("</tbody>"); result.append("</table>"); result.append("</p>"); String spaces = "<p>Altogether, this installation has <b>" + spaceManager.getAllSpaces().size() + "</b> spaces.</p>"; result.append(spaces); return result.toString(); } @Override public BodyType getBodyType() { return BodyType.NONE; } @Override public OutputType getOutputType() { return OutputType.BLOCK; } } -
Open the plugin descriptor for your project,
src/main/resources/atlassian-plugin.xml. -
Add the following module declaration as a child of the
atlassian-pluginelement:1 2
<xhtml-macro name="confluence-unittesting-plugin" class="com.atlassian.tutorial.confluence.plugin.unittesting.ExampleMacro" key="my-macro"> <parameters/> </xhtml-macro> -
Start your Confluence instance and test your plugin. To start Confluence, run this SDK command from the project root directory:
1 2
atlas-run -
Once Confluence starts up, log in using the default user name and password, admin/admin.
-
Create a new page and try adding a macro. Look for a macro named Confluence unittesting plugin in the macro browser and make sure you can add it to a page. To find it quickly, you can start typing its name in the search field to filter for it, "unittesting".
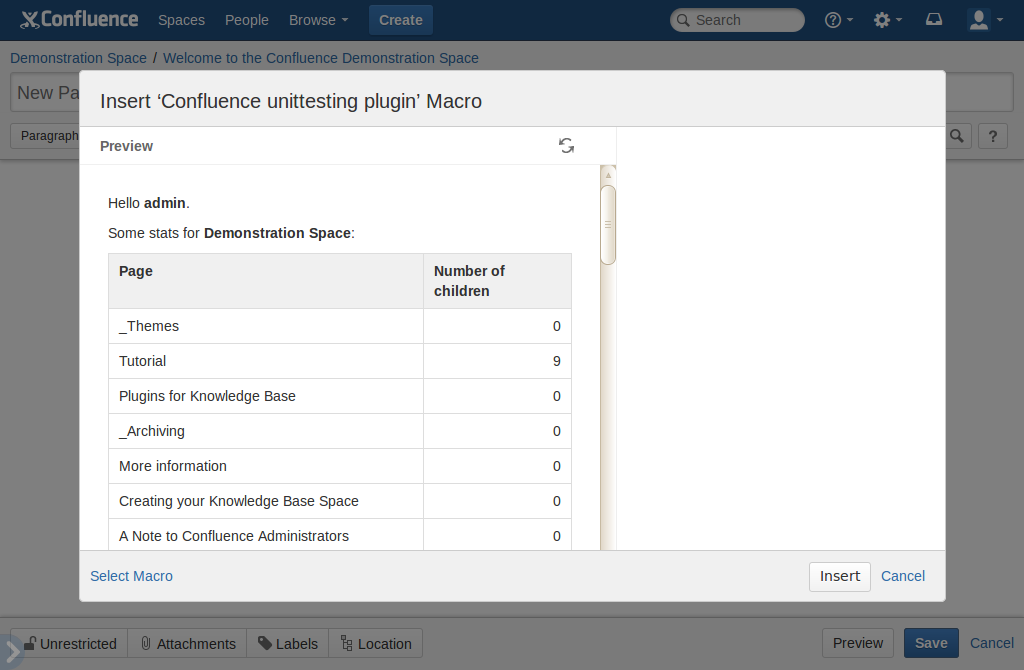
This macro lists the pages created in the last 55 days in the Demonstration Space (space key: DS). The DS space is built into our dev Confluence instance. Since this is a new Confluence installation, that would be all of them. If for some reason you don't have the DS space, the macro won't work.
Now let's build a test for the plugin.
Step 3. Add a Mockito dependency to the POM
As described in the overview, our test will rely on Mockito. Therefore, we need to add a dependency to the POM file (pom.xml) for Mockito. The POM is at the root of your project directory. Open the file and add the following dependency as a child of the dependencies element.
1
2<dependencies>
    ...
        <dependency>
            <groupId>org.mockito</groupId>
            <artifactId>mockito-all</artifactId>
            <version>1.9.0</version>
            <scope>test</scope>
         </dependency>
</dependencies>
After you save the POM changes, you need to refresh your project in the IDE to import the dependencies. How to do this varies from IDE to IDE, but in IDEA, you will be prompted to import the changes.
Step 4. Create the test class
Along with the Java code stub for the plugin, the SDK generates integration and unit tests to go with it. For example, it created this unit test:
src/test/java/ut/com/atlassian/tutorial/confluence/plugin/unittesting/MyComponentUnitTest.java
This test checks the component name of the MyComponent class. As long as the name doesn't change, the test passes.
Let's create a new test class that tests our macro. We'll start simple, and build on it as we go.
Create a new file named ExampleMacroTest.java in the unit test directory, src/test/java/ut/com/atlassian/tutorial/confluence/plugin/unittesting/
Add the test skeleton to the file:
1
2package ut.com.atlassian.tutorial.confluence.plugin.unittesting;

import com.atlassian.tutorial.confluence.plugin.unittesting.ExampleMacro;
import com.atlassian.confluence.content.render.xhtml.ConversionContext;
import com.atlassian.confluence.pages.Page;
import com.atlassian.confluence.pages.PageManager;
import com.atlassian.confluence.spaces.SpaceManager;
import com.atlassian.confluence.user.AuthenticatedUserThreadLocal;
import com.atlassian.user.impl.DefaultUser;
import junit.framework.TestCase;
import org.junit.Test;
import org.junit.Before;
import org.junit.runner.RunWith;
import org.mockito.MockitoAnnotations.Mock;
import org.mockito.runners.MockitoJUnitRunner;
import org.mockito.runners.MockitoJUnitRunner;
import static org.mockito.Mockito.when;
import java.util.Arrays;
import java.util.HashMap;

/**
 * Testing {@link com.atlassian.tutorial.confluence.plugin.unittesting.ExampleMacro}
 */
@RunWith (MockitoJUnitRunner.class)
public class ExampleMacroTest extends TestCase
{
    @Mock
    private PageManager pageManager;
    @Mock
    private SpaceManager spaceManager;
    @Mock
    private ConversionContext conversionContext;
    @Test
    public void testOutputIncludesRecentPages() throws Exception
    {
      // Test code will go here
    }
}
This shows the basic ingredients of a unit test written with JUnit:
-
- We've added all the import statements we'll need later. Along with other imports, we're importing our plugin package,
ExampleMacro. This lets the test invoke its functions and check results. - Notice the import of the Mockito packages. They give us the ability to create mock objects to use in place of the Confluence classes for testing. We'll talk more about Mockito mock objects below.
- The class name is the same as the class we're testing appended with
Test. - Each test method (line 34) is annotated with
@testand has thepublic voidsignature. We only have one for now, but will add a second one later.
- We've added all the import statements we'll need later. Along with other imports, we're importing our plugin package,
Add the code for the test method, testOutputIncludesRecentPages():
1
2// create test page
Page page = new Page();
page.setTitle("Page title");
// set up stub method to return our test page
when(pageManager.getRecentlyAddedPages(55, "DS")).thenReturn(Arrays.asList(page));
// create the macro
ExampleMacro exampleMacro = new ExampleMacro(pageManager, spaceManager);
// verify that the output contains the page title
String output = exampleMacro.execute(new HashMap(), "", conversionContext);
assertTrue("Output should contain page title but was: " + output,
      output.contains(page.getTitle()));
The method tests the output of the macro to make sure it includes recent pages. Notice the code comments in our test method. They describe each line of the test. Other points to note are:
- First we create a test Page object. This represents a Confluence page. It's configured with the minimum details necessary for testing: just a page title.
- Next we create an instance of the
ExampleMacroclass, and then execute it and capture the output. - We then use
assertTrue()to verify that the output includes the title of our test page. This is where the testing actually happens. If the assertion passes, we can be sure that this aspect of the behaviour of our macro is correct.
JUnit provides a variety of assertion methods to all subclasses of TestCase. The three most common are assertEquals, assertTrue and assertFalse. These methods check the condition implied by their name and throw a particular kind of exception if the condition is not true. JUnit checks whether that exception is thrown and marks the test as failed if it is.
As shown in our test class, Mockito mock objects are initialised using the MockitoJUnitRunner class.
1
2@RunWith (MockitoJUnitRunner.class)
This initializes the objects we want mocked (those annotated with @Mock). We can then have the tests create mock instances of the PageManager, SpaceManager and ConverstionContext interfaces by applying the @Mock annotations, as follows:
1
2@Mock
private PageManager pageManager;
@Mock
private SpaceManager spaceManager;
@Mock
private ConversionContext conversionContext;
With a Mockito mock, by default, any method call on the object will do nothing and return the default value for the method's return type. So a method on the interface that returns a String will do nothing and return null, if the method is not customised by the test. In most cases, you would customize the class for some meaningful return values.
You can grant additional behavior to mock objects by stubbing a method with Mockito.when(). The following line creates a stub method call on the pageManager mock object. When the pageManager.getRecentlyAddedPages() is called (with exactly the same arguments as before, 30: 55, "DS") the Mockito stub returns a list with our test page in it.
1
2// set up stub method to return our test page
when(pageManager.getRecentlyAddedPages(55, "DS")).thenReturn(Arrays.asList(page));
As a reminder, 55 represents the number of previous days for which to return added pages, and DS is the space key for the default Confluence Demonstration Space.
The parameters to our stub method are hard-coded here because the same parameters are also hard-coded in the example implementation code. If we wanted to return the same list regardless of the parameter values, we could use Mockito.anyInt() and Mockito.anyString() instead:
1
2when(pageManager.getRecentlyAddedPages(anyInt(), anyString())).thenReturn(Arrays.asList(page));
See the Mockito documentation for more examples of how to use stubbing and verification with Mockito.
Step 5. Run the tests
Now try running the tests. You can run them from the command line or from an IDE.
From the command line
To run the project tests at the command line, you can use the SDK commands, atlas-mvn test or atlas-unit-test, from the project root directory. You should see test results in the output like the following, somewhere near the middle of the build output:
1
2-------------------------------------------------------
 T E S T S
-------------------------------------------------------
Running ut.com.atlassian.tutorial.confluence.plugin.unittesting.MyComponentUnitTest
Tests run: 1, Failures: 0, Errors: 0, Skipped: 0, Time elapsed: 0.034 sec
Running ut.com.atlassian.tutorial.confluence.plugin.unittesting.ExampleMacroTest
Tests run: 1, Failures: 0, Errors: 0, Skipped: 0, Time elapsed: 0.363 sec

Results :

Tests run: 2, Failures: 0, Errors: 0, Skipped: 0
We have two passing tests: the one the SDK gave us and the one we added. If a test fails, the SDK aborts the subsequent build step. Other SDK commands, such as atlas-install-plugin or atlas-release, behave similarly. This behavior allows you to deploy a plugin with the SDK with confidence that the installation or release will succeed only when tests pass.
From an IDE
In Eclipse and IDEA, you can right-click on the name of your test class in your source file and select Run As > JUnit Test or just Run TestExampleMacro. This runs the test case and gives you a panel with information about the tests, as shown below.

If you have trouble running the tests, make sure you copied the code correctly. In particular, make sure that:
- the test class extends
junit.framework.TestCase - the test method starts with 'test' and is
public void - you have included the static import for
org.mockito.Mockito.*.
Let's add another test to our existing test class.
Step 6. Add another test
When you add a second test to a test class, as we soon will to ours, it usually makes sense to optimize your code a bit. For example, you might pull some shared code out of a single test into common fields or methods so that both tests can use it. We'll do that in a bit, pulling out common fields and a setUp() and tearDown() method. But first, take a look at the new test with common code still included, for clarity.
1
2@Test
    public void testOutputIncludesCurrentUser() throws Exception
    {
        // create test user
        DefaultUser user = new DefaultUser("test");
        user.setFullName("Test User");
        // create the macro
        ExampleMacro exampleMacro = new ExampleMacro(pageManager, spaceManager);
        // set current user to test user
        AuthenticatedUserThreadLocal.setUser(user);
        try
        {
            // verify that the output contains the current user
            String output = exampleMacro.execute(new HashMap(), "", conversionContext);
            assertTrue("Output should contain current user but was: " + output,
                    output.contains(user.getFullName()));
        }
        finally
        {
            // reset current user
            AuthenticatedUserThreadLocal.setUser(null);
        }
    }
The crux of this test code is the assertion in lines 67-69. It verifies that the current user is included in the output if it is set. In Confluence, the current user is stored in AuthenticatedUserThreadLocal, so we create a test user and set it there before the test executes (line 61). In the finally block, we set the current user back to null so any subsequent tests won't be affected by us changing the state of AuthenticatedUserThreadLocal.
Here's the complete test class with the second test added and after shared code refactoring:
1
2package ut.com.atlassian.tutorial.confluence.plugin.unittesting;

import com.atlassian.tutorial.confluence.plugin.unittesting.ExampleMacro;
import com.atlassian.confluence.content.render.xhtml.ConversionContext;
import com.atlassian.confluence.pages.Page;
import com.atlassian.confluence.pages.PageManager;
import com.atlassian.confluence.spaces.SpaceManager;
import com.atlassian.confluence.user.AuthenticatedUserThreadLocal;
import com.atlassian.user.impl.DefaultUser;
import junit.framework.TestCase;
import org.junit.Test;
import org.junit.Before;
import org.junit.runner.RunWith;
import org.mockito.MockitoAnnotations.Mock;
import org.mockito.runners.MockitoJUnitRunner;
import java.util.Arrays;
import java.util.HashMap;
import org.mockito.runners.MockitoJUnitRunner;
import static org.mockito.Mockito.when;

/**
 * Testing {@link com.atlassian.tutorial.confluence.plugin.unittesting.ExampleMacro}
 */
@RunWith (MockitoJUnitRunner.class)
public class ExampleMacroTest extends TestCase
{
    @Mock
    private PageManager pageManager;
    @Mock
    private SpaceManager spaceManager;
    @Mock
    private ConversionContext conversionContext;
    private ExampleMacro exampleMacro;
    @Before
    public void setUp() throws Exception
    {
        super.setUp();
        exampleMacro = new ExampleMacro(pageManager, spaceManager);
    }
    @Test
    public void testOutputIncludesRecentPages() throws Exception
    {
        // create test page
        Page page = new Page();
        page.setTitle("Page title");
        // set up stub method to return our test page
        when(pageManager.getRecentlyAddedPages(55, "DS")).thenReturn(Arrays.asList(page));
        // verify that the output contains the page title
        String output = exampleMacro.execute(new HashMap(), "", conversionContext);
        assertTrue("Output should contain page title but was: " + output,
                output.contains(page.getTitle()));
    }
    @Test
    public void testOutputIncludesCurrentUser() throws Exception
    {
        // create test user
        DefaultUser user = new DefaultUser("test");
        user.setFullName("Test User");
        // set current user to test user
        AuthenticatedUserThreadLocal.setUser(user);
        try
        {
            // verify that the output contains the current user
            String output = exampleMacro.execute(new HashMap(), "", conversionContext);
            assertTrue("Output should contain current user but was: " + output,
                    output.contains(user.getFullName()));
        }
        finally
        {
            // reset current user
            AuthenticatedUserThreadLocal.setUser(null);
        }
    }
}
Note a few more points about our second test:
- JUnit test fixtures: With JUnit, any
public voidmethod annotated with@Beforeis run prior to each test, and anypublic voidmethod annotated with@Afteris run after each test. This gives us a place to put common initialisation and cleanup code. In oursetUp()method, which is annotated with@Before, we're initializing theexampleMacroobject. This is an instance of the custom macro we're testing. Note that thesetUp()method callssuper.setUp()first: not strictly necessary, but a good practice in case we later decide to change the parent class of our test. - Try and catch blocks: The new
testOutputIncludesCurrentUsertest includes a try-finally block. This ensures that the tests are as independent from each other as possible. Because the test sets the current user by changing a shared object,AuthenticatedUserThreadLocal, it is also the responsibility of this test to set it back to the default value afterwards. We use afinallyblock to ensure that the user thread-local is always reset, even if the test itself fails (lines 70-74).
The primary reason to ensure the independence of tests is because JUnit tests can be run in any order. In fact, the order varies across different Java versions. If your tests are not independent from each other, and they run them in a different order on a CI server, you may see unusual build failures which are difficult to debug locally.
The other reason to keep your tests independent of each other is to do with failure: if one test fails, you want to avoid cascading that failure through the remainder of the tests.
Step 7. Run the tests again
Run the tests again to make sure they all pass. As before, you can use your IDE or atlas-unit-test. Successful output from atlas-unit-test should look like:
1
2-------------------------------------------------------
 T E S T S
-------------------------------------------------------
Running ut.com.atlassian.tutorial.confluence.plugin.unittesting.MyComponentUnitTest
Tests run: 1, Failures: 0, Errors: 0, Skipped: 0, Time elapsed: 0.034 sec
Running ut.com.atlassian.tutorial.confluence.plugin.unittesting.ExampleMacroTest
Tests run: 2, Failures: 0, Errors: 0, Skipped: 0, Time elapsed: 0.363 sec
Results :
Tests run: 3, Failures: 0, Errors: 0, Skipped: 0
Where to next?
From here, you may wish to read:
Rate this page: