Writing a macro using JSON
Applicable: | This tutorial applies to Confluence 4.x and later |
Level of experience: | This is an intermediate tutorial. You should have completed at least one beginner tutorial before working through this tutorial. See the list of tutorials in DAC. |
Time estimate: | It should take you approximately 1 hour to complete this tutorial. |
Overview of the tutorial
In this tutorial, you create a Confluence macro that prints out the days of the week starting on a given date. If a user supplies a date as a macro parameter, the macro prints the days of the week starting on that date. Otherwise, it shows the the days of the week starting with the current date.
While the calendar itself isn't very useful, it will demonstrate how to use the Confluence JSON APIs from the plugin Java code. Our calendar will be composed by JSON data.
About these Instructions
You can use any supported combination of OS and IDE to construct this plugin. These instructions were written using IDEA on Mac OS X. If you are using another combination, you should use the equivalent operations for your specific environment.
This tutorial was last tested with Confluence 5.1.4.
Required knowledge
To get the most out of this tutorial, you should be familiar with:
- The basics of Java development: classes, interfaces, methods, how to use the compiler, and so on.
- How to create an Atlassian plugin project using the Atlassian Plugin SDK.
- How to use and administer Atlassian Confluence.
Also, while this tutorial demonstrates how to work with JSON data in a plugin, it does not discuss JSON itself. For more information on JSON, see http://www.json.org/.
Plugin source
We encourage you to work through this tutorial. If you want to skip ahead or check your work when you have finished, you can find the plugin source code on Atlassian Bitbucket. Bitbucket serves a public Git repository containing the tutorial's code. To clone the repository, issue the following command:
1
2hg clone https://bitbucket.org/atlassian_tutorial/writing-a-macro-using-json
Alternatively, you can download the source as a ZIP archive by choosing download here: bitbucket.org/atlassian_tutorial/writing-a-macro-using-json
Step 1. Create the plugin project
In this step, you'll use the Atlassian Plugin SDK to generate the scaffolding for your plugin project. The Atlassian Plugin SDK automates much of the work of plugin development for you.
-
If you have not already set up the Atlassian Plugin SDK, do that now: Set up the Atlassian Plugin SDK and Build a Project.
-
Open a terminal and navigate to your Eclipse workspace directory.
-
Enter the following command to create the project files for the plugin:
1 2
atlas-create-confluence-plugin -
As prompted, enter the following project parameters:
group-id
com.example.plugins.tutorial.confluenceartifact-id
examplemacroversion
1.0-SNAPSHOTpackage
com.example.plugins.tutorial.confluence
-
Confirm your entries when prompted.
Step 2. Review the POM
The SDK generated a project directory with most of the artifacts our plugin needs, including a POM (Project Object Model) file. The POM describes your project and declares your plugin build dependencies. It's a good idea to open and review the POM after generating a new project. Let's do that now, making a few changes to the generated content as we go.
-
Change to the
examplemacrodirectory created by the SDK in the previous step and open the filepom.xml. -
Add your company or organisation name and your website to the
organizationelement:1 2
<organization> <name>Example Company</name> <url>http://www.example.com/</url> </organization> -
Update the
descriptionelement:1 2
<description>This plugin illustrates how to use JSON in a macro.</description> -
Save the file.
Step 3. Tweak the plugin descriptor
Next we'll make a few changes to the plugin descriptor file. Among other things, the descriptor tells Confluence what UI elements the macro wants to extend or implement. In the Atlassian plugin framework, a unit of functionality is encapsulated by a module. For our plugin, we'll modify the Web Resource module that the SDK gave us and add a type of Macro Module, xhtml-macro:
-
Open the plugin descriptor file,
atlassian-plugin.xml, for editing. It is located in thesrc/main/resourcesdirectory of your project home.
Notice that the SDK added a few module for our plugin already. For one, it added aweb-resourceelement with a few resources that plugins typically require. We won't use all of them, but we will use one or two and add another. -
Add the following resource element to the
web-resourceelement in the descriptor:1 2
<resource type="velocity" name="template" location="/templates/examplemacro.vm"/>This is the Velocity template that we'll create in a bit.
-
Add the following as a child of
atlassian-plugin:1 2
<xhtml-macro name="examplemacro" class="com.example.plugins.tutorial.confluence.ExampleMacro" key="my-macro"> <parameters> <parameter name="date" type="string"></parameter> </parameters> <description>Inserts a calendar for the week into the current page</description> </xhtml-macro>This is the module declaration for our macro. Notice that it's going to take a single parameter,
date. -
Save your changes.
Step 4. Add presentation resources
Our macro generates its presentation through a JavaScript and a Velocity resource. The SDK gave us a default JavaScript file we can use. The Velocity template we'll have to add. Do that now:
-
Navigate to the resources directory,
src/main/resources, and create a new directory there namedtemplates. -
In the
templatesdirectory you just created, create a file namedexamplemacro.vmand add the following content to the file:1 2
#requireResource("confluence.web.resources:jquery") #requireResource("com.example.plugins.tutorial.confluence.examplemacro:examplemacro-resources") <div class="exampleMacro"> <fieldset class="parameters hidden"> <input type="hidden" class="dayDates" value="$dayDateJson"> </fieldset> </div>Notice that our Velocity template consists of resource statements and a
divwith a singlefieldsetelement. The element contains a hiddeninputelement, to which we assign the output of our macro'sexecutemethod (that is, the URL-encoded, serialized JSON object string). TherequireResourcestatements include the JavaScript file we'll create for this macroand the jQuery JavaScript framework. -
Open the properties file in the
resourcesdirectory,examplemacro.properties, and add the following properties to the file:1 2
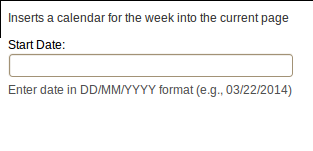
com.example.plugins.tutorial.confluence.examplemacro.examplemacro.param.date.label=Start Date: com.example.plugins.tutorial.confluence.examplemacro.examplemacro.param.date.desc=Enter date in DD/MM/YYYY format (e.g., 03/22/2014)These will provide the label and description for the parameter in the macro browser, as shown here:
-
Open
src/main/resources/js/examplemacro.jsand add the following content:1 2
jQuery(function ($) { var initExampleMacro = function () { $(".exampleMacro").each(function() { var dayDates = $(this).find("input.dayDates").val(); var json; // determine if the browser has native JSON parser support & create JSON object if (typeof (JSON) !== 'undefined' && typeof (JSON.parse) === 'function') { json = JSON.parse(decodeURIComponent(dayDates).replace(/\+/g, '\u00a0')); } else { json = eval('(' + decodeURIComponent(dayDates).replace(/\+/g, '\u00a0') + ')'); } // create table var html = "<table border=\"1\"><tr><th>DAY</th><th>DATE</th></tr>"; for (var i=0; i<7; i++) { html = html + "<tr><td>" + json.daysdates[i].day + "</td><td>" + json.daysdates[i].date + "</td></tr>"; } html = html + "</table>"; $(this).html(html); }); }; $(document).ready(function() { initExampleMacro(); }); });
In most cases, a plugin would generate HTML in a Velocity template rather than in JavaScript as we've done here. However, we've included HTML in the JavaScript code just to keep our plugin simple, with the emphasis being on how to access values from JSON objects.
Our JavaScript code:
- Retrieves the URL-encoded, serialized JSON string from the hidden
inputelement. - Creates a JSON object from that string using jQuery.parseJSON, replacing any spaces with non-breaking spaces in the process.
- Creates HTML for a table with a row for each of the seven dates and two columns for the dates and days, populating each cell with the relevant values from the JSON object
- Inserts the HTML into the page.
Of course, our JavaScript and Velocity presentation resources don't have much to work with yet, as we still haven't coded the macro logic. You'll start on that next.
Step 5. Create the macro class
Let's add the Java class that implements our macro logic. We'll start simple, creating a macro that just generates placeholder text for now.
-
Create a file named
ExampleMacro.java. in thesrc/main/java/com/example/plugins/tutorial/confluencedirectory. -
Add the following skeleton code:
1 2
package com.example.plugins.tutorial.confluence; import java.util.Map; import java.util.List; import com.atlassian.confluence.content.render.xhtml.ConversionContext; import com.atlassian.confluence.macro.Macro; import com.atlassian.confluence.macro.MacroExecutionException; import com.atlassian.confluence.pages.PageManager; import com.atlassian.confluence.pages.Page; import com.atlassian.confluence.spaces.SpaceManager; import com.atlassian.confluence.user.AuthenticatedUserThreadLocal; import com.atlassian.user.User; import com.opensymphony.util.TextUtils; import java.text.DateFormat; import java.text.ParseException; import java.text.SimpleDateFormat; import java.util.Calendar; import java.util.Date; import com.atlassian.confluence.json.json.JsonArray; import com.atlassian.confluence.json.json.JsonObject; import com.atlassian.confluence.renderer.radeox.macros.MacroUtils; import com.atlassian.confluence.util.GeneralUtil; import com.atlassian.confluence.util.velocity.VelocityUtils; import org.apache.velocity.VelocityContext; public class ExampleMacro implements Macro { private final PageManager pageManager; private final SpaceManager spaceManager; public ExampleMacro(PageManager pageManager, SpaceManager spaceManager) { this.pageManager = pageManager; this.spaceManager = spaceManager; } DateFormat dateFormat = new SimpleDateFormat("dd/MM/yyyy"); DateFormat dayFormat = new SimpleDateFormat("EEEE"); private static final String DAY_DATE_JSON = "dayDateJson"; private static final String TEMPLATE = "templates/examplemacro.vm"; @Override public BodyType getBodyType() { return BodyType.NONE; } @Override public OutputType getOutputType() { return OutputType.BLOCK; } @Override public String execute(Map<String, String> params, String body, ConversionContext conversionContext) throws MacroExecutionException { // TODO: A lot more will go here return "Only a test"; } }When a macro is invoked, Confluence calls its
execute()method, so that's where we'll need to do the heavy lifting for our macro. Confluence passes parameters as strings in theparamsargument toexecute. As implied by our variable declarations, our parameter will be a date. The class specifies the body type ofNONEand an output typeBLOCKfor our macro. This tells Confluence what kind of content it should expect our macro to generate.
Step 6. Start up Confluence
We're not done yet, but let's start up Confluence and see what our macro does so far:
-
Make sure you have saved all your code changes to this point.
-
In a terminal window, navigate to the plugin root folder (where the
pom.xmlfile is). -
Run the following command:
1 2
atlas-runThis command builds your plugin code, starts a Confluence instance, and installs your plugin. This may take a minute or two. When it's done, you will see many status lines on your screen concluding with something like this:
1 2
[INFO] HOSTAPP started successfully in 71s at http://localhost:1990/confluence [INFO] Type CTRL-D to shutdown gracefully [INFO] Type CTRL-C to exit -
Open your browser and open Confluence at the address indicated in the output.
-
At the login screen, enter the default credentials for an administrator user,
admin/admin. -
Create a new page in the Demonstration Space by clicking the Create button from the header.
-
In the edit page screen, click Insert > Other Macros.
-
Browsing to the macro in the Select Macro dialog. You can do so quickly by typing the first few letters of the macro name, such as Exa.

-
Select the macro and insert it into your page.
As you saw in the preview pane and on the page after saving your changes, so far the macro generates our placeholder text, "Only a test". We'll make it do more next.
You can keep Confluence running at this point, QuickReload will automatically redeploy any changes you build.
Step 7. Make your macro do more
Let's add the logic for generating our JSON-based calendar. We'll take this task piece by piece, so that we can examine and discuss each part of the code as we go.
-
Open
ExampleMacro.javafor editing once again. -
Replace the body of the
execute()method with this:1 2
@Override public String execute(Map<String, String> params, String body, ConversionContext conversionContext) throws MacroExecutionException { Date startDate = getStartDateFromParams(params); JsonObject dayDateJsonObject = new JsonObject(); JsonArray dayDateJsonArray = new JsonArray(); for (int i=0; i < 7; i++) { Calendar cal = Calendar.getInstance(); cal.setTime(startDate); cal.add(Calendar.DATE, i ); Date date = cal.getTime(); String day = dayFormat.format(date); dayDateJsonArray.add(nextDayDateJsonObject(day, date)); } dayDateJsonObject.setProperty("daysdates", dayDateJsonArray); // TODO: Not done yet return "Only a test"; }Our new
execute()method now:-
Initializes the
startDateobject by calling a new method,getStartDateFromParams(), passing it theparamsargument. It will be the job ofgetStartDateFromParams()to determine the start date and return it as a string into aDateobject. -
Instantiates a
JsonObjectandJsonArrayinstance. -
Populates the array by taking the parameter as the starting date and looping seven times, each time incrementing the date by one. On each loop, the date is formatted by name and date, with the results stored in the JSON array (with the help of a method we'll create in a bit).
-
It sets the array as a
daysdatesproperty of the JSON object.
-
-
Add the
getStartDateFromParams()method called fromexecute()to theExampleMacroclass:1 2
private Date getStartDateFromParams(Map params) throws MacroExecutionException { Date startDate = new Date(); if (params.size() > 1) { try { startDate = dateFormat.parse((String) params.get("date")); } catch (ParseException e) { throw new MacroExecutionException("Unable to parse date"); } } return startDate; }The
paramsargument always contains aRAW_PARAMS_KEYkey containing the raw parameter string, so we'll only parse parameters whenparams.sizeis greater than 1. Also note that if the user doesn't provide a date, thestartDateis initialized to the current date, which serves as our default. -
Add the other method we added to
execute(),nextDayDateJsonObject()to theExampleMacroclass:1 2
private JsonObject nextDayDateJsonObject(String day, Date date) { JsonObject nextDayDateJsonObject = new JsonObject(); nextDayDateJsonObject.setProperty("date",date); nextDayDateJsonObject.setProperty("day", day); return nextDayDateJsonObject; }This method simply populates a JSON object with the day and date for each cycle of the
execute()loop. -
So far, we stored the days and dates information as a JSON object. We still need to output the results. Replace the existing return statement (
return "Only a test";) with these lines:1 2
VelocityContext contextMap = new VelocityContext(MacroUtils.defaultVelocityContext()); contextMap.put(DAY_DATE_JSON, GeneralUtil.urlEncode(dayDateJsonObject.serialize())); return VelocityUtils.getRenderedTemplate(TEMPLATE, contextMap);
Notice our new return value. More realistically, you'd likely want to make your JSON available via REST, but REST is a topic for its own tutorial. To keep this simple, our plugin uses a Velocity template to render output as markup.
Notice the call to contextMap.put(). This function:
- Serializes the
dayDateJsonObjectJSON object into a string. - URL encodes it.
- Puts it into a
contextMap.
This is then rendered into a String containing markup according to the Velocity template we already created.
Step 8. Check your code
You macro plugin class is now complete. To review, our execute() method now:
- Creates a JSON object containing two name/value pairs (one for the date and one for the day). This is what
nextDayDateJsonObjectdoes. - Calls
nextDayDateJsonObjectin the for loop ofexecuteso that a JSON object is created for each of the seven dates. - Adds each of these objects to a JSON array named
dayDateJsonArray. - Adds the JSON array filled with all seven JSON objects, as the value to the only property of another JSON object,
dayDateJsonObject.
The end result being a single JSON object, dayDateJsonObject, that contains an array of seven JSON objects, each of which is a set of day and date name/value pairs.
You can check your completed class against the following:
Expand to view entire Java class Expand source
1
2package com.example.plugins.tutorial.confluence;

import java.util.Map;
import java.util.List;

import com.atlassian.confluence.content.render.xhtml.ConversionContext;
import com.atlassian.confluence.macro.Macro;
import com.atlassian.confluence.macro.MacroExecutionException;
import com.atlassian.confluence.pages.PageManager;
import com.atlassian.confluence.pages.Page;
import com.atlassian.confluence.spaces.SpaceManager;
import com.atlassian.confluence.user.AuthenticatedUserThreadLocal;
import com.atlassian.user.User;
import com.opensymphony.util.TextUtils;

import java.text.DateFormat;
import java.text.ParseException;
import java.text.SimpleDateFormat;
import java.util.Calendar;
import java.util.Date;
import com.atlassian.confluence.json.json.JsonArray;
import com.atlassian.confluence.json.json.JsonObject;
import com.atlassian.confluence.renderer.radeox.macros.MacroUtils;
import com.atlassian.confluence.util.GeneralUtil;
import com.atlassian.confluence.util.velocity.VelocityUtils;
import org.apache.velocity.VelocityContext;

public class ExampleMacro implements Macro
{
  private final PageManager pageManager;
  private final SpaceManager spaceManager;

  public ExampleMacro(PageManager pageManager, SpaceManager spaceManager)
  {
    this.pageManager = pageManager;
    this.spaceManager = spaceManager;
  }

  DateFormat dateFormat = new SimpleDateFormat("dd/MM/yyyy");
  DateFormat dayFormat = new SimpleDateFormat("EEEE");
  private static final String DAY_DATE_JSON = "dayDateJson";
  private static final String TEMPLATE = "templates/examplemacro.vm";

  @Override
  public BodyType getBodyType()
  {
    return BodyType.NONE;
  }

  @Override
  public OutputType getOutputType()
  {
    return OutputType.BLOCK;
  }

  @Override
  public String execute(Map<String, String> params, String body, ConversionContext conversionContext)
                                                                       throws MacroExecutionException
  {
    Date startDate = getStartDateFromParams(params);
    JsonObject dayDateJsonObject = new JsonObject();
    JsonArray dayDateJsonArray = new JsonArray();

    for (int i=0; i < 7; i++)
    {
      Calendar cal = Calendar.getInstance();
      cal.setTime(startDate);
      cal.add(Calendar.DATE, i );
      Date date = cal.getTime();
      String day = dayFormat.format(date);
      dayDateJsonArray.add(nextDayDateJsonObject(day, date));
    }

    dayDateJsonObject.setProperty("daysdates", dayDateJsonArray);
    VelocityContext contextMap = new VelocityContext(MacroUtils.defaultVelocityContext());
    contextMap.put(DAY_DATE_JSON, GeneralUtil.urlEncode(dayDateJsonObject.serialize()));
    return VelocityUtils.getRenderedTemplate(TEMPLATE, contextMap);
  }

  private Date getStartDateFromParams(Map params) throws MacroExecutionException
  {
    Date startDate = new Date();
    if (params.size() > 1)
    {
      try
      {
      startDate = dateFormat.parse((String) params.get("date"));
      }
      catch (ParseException e)
      {
        throw new MacroExecutionException("Unable to parse date");
      }
    }
    return startDate;
  }

  private JsonObject nextDayDateJsonObject(String day, Date date)
  {
    JsonObject nextDayDateJsonObject = new JsonObject();
    nextDayDateJsonObject.setProperty("date",date);
    nextDayDateJsonObject.setProperty("day", day);
    return nextDayDateJsonObject;
  }
}
We're ready to try the macro again.
Step 9. Test the completed macro
To see your new macro in action:
- Make sure you have saved all your file changes.
- Rebuild your plugin and QuickReload will automatically reinstall it.
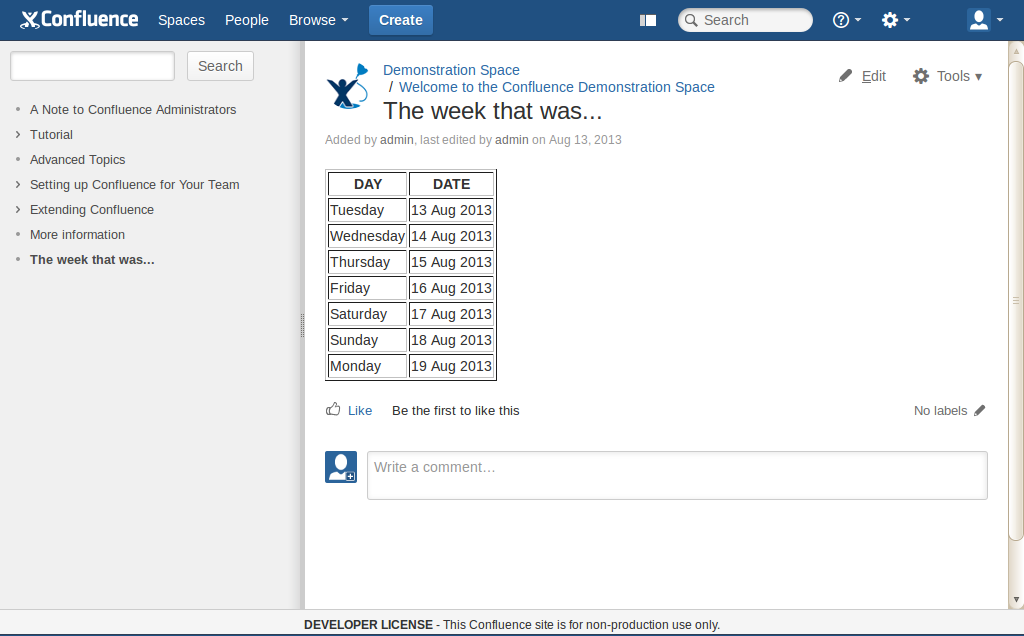
- Back in the Confluence browser window, try adding your macro again. This time, you should get the default calendar in the preview pane.
- Enter a date in the Date field using the dd/mm/yyyy format, such as 22/09/2014 for September 22, 2014.
- Click Insert.
- Click Save to view your macro output.
Congratulations, that's it
Have a chocolate!
Rate this page: