Creating a general page
This tutorial shows you how to set up a general page to display content.
By the end of this tutorial, you will:
- create a new app
- add the
generalPagesmodule to your app - create a route handler that makes the macro functional
- build a view to display the content
Before you begin
Ensure you have installed all the tools you need for Confluence Connect app development by Getting set up with Atlassian Connect Express (ACE):
- Get a cloud development site.
- Enable development mode in your site.
- Install ACE.
Create a new app
The first step is to use atlas-connect to create the app framework: a directory called
page-tutorial that contains all the basic components of a Connect app along with a generalPages module, route handler, and view.
- From the command line, go into a directory where you'd like to work, and type:
1 2
atlas-connect new page-tutorial - Select Confluence in the menu.
- When the command finishes, go into the
page-tutorialdirectory and runnpm installto install any dependencies for the app. - Add the
credentials.jsonfile that gives your app permission to work with your Confluence Cloud development site. Copy the one you created during the Getting started tutorial. You can replace or delete the existingcredentials.json.samplefile.
Take a look around the page-tutorial directory, which already contains basic versions of the
following components:
- a module in the
atlassian-connect.jsonfile - a route handler in the
routesdirectory - a view in the
viewsdirectory
Run the app
Use the command below to start the app on your local machine and initiate the installation to your Confluence Cloud development instance.
1
2$ npm start
Hello World
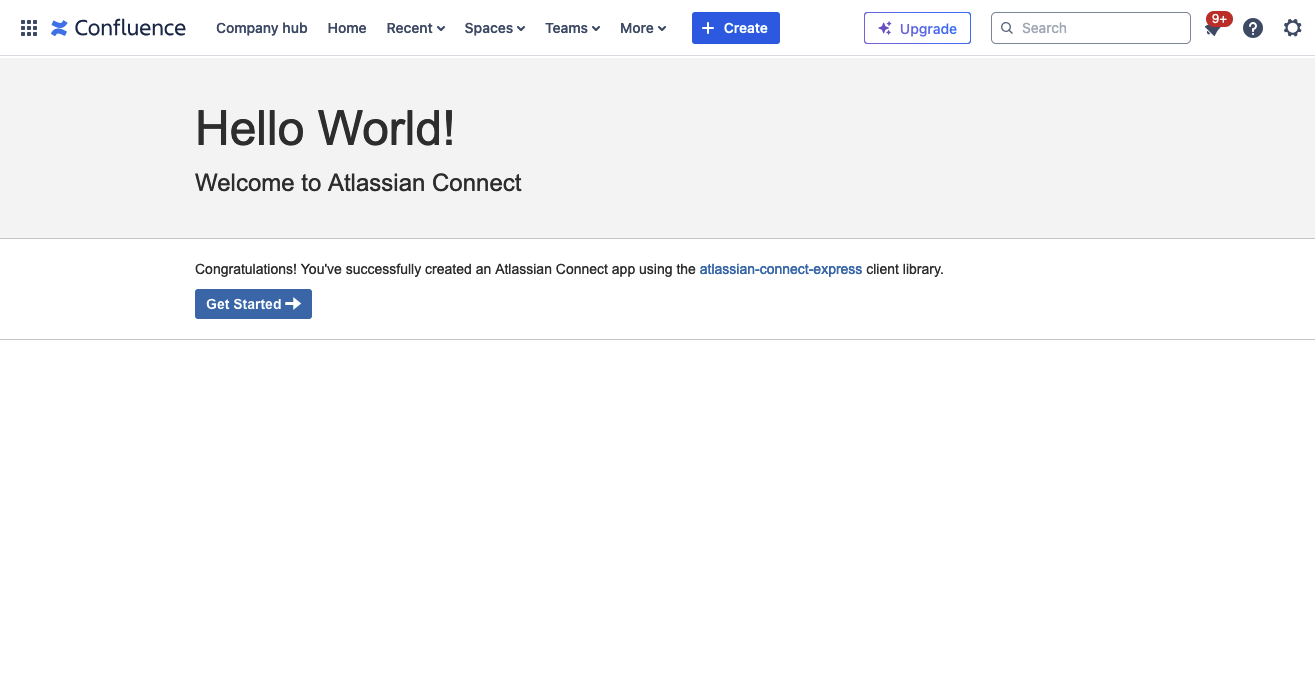
Nearly done! Navigate to your Confluence instance, and click on 'Hello World' under Apps. You should be greeted with this:

Now let's take a look at the components that make the app work.
The page module
The app descriptor atlassian-connect.json contains the
generalPages module that displays the app content.
1
2{
    "key": "my-app",
    "name": "My app",
    "description": "My very first app",
    "vendor": {
        "name": "Angry Nerds",
        "url": "https://www.atlassian.com/angrynerds"
    },
    "baseUrl": "{{localBaseUrl}}",
    "links": {
        "self": "{{localBaseUrl}}/atlassian-connect.json",
        "homepage": "{{localBaseUrl}}/atlassian-connect.json"
    },
    "authentication": {
        "type": "jwt"
    },
    "lifecycle": {
        // atlassian-connect-express expects this route to be configured to manage the installation handshake
        "installed": "/installed"
    },
    "scopes": [
        "READ"
    ],
    "modules": {
        "generalPages": [
            // Jira - Add a Hello World menu item to the navigation bar
            {
                "key": "hello-world-page-jira",
                "location": "system.top.navigation.bar",
                "name": {
                    "value": "Hello World"
                },
                "url": "/hello-world",
                "conditions": [{
                    "condition": "user_is_logged_in"
                }]
            },
            // Confluence - Add a Hello World menu item to the navigation bar
            {
                "key": "hello-world-page-confluence",
                "location": "system.header/left",
                "name": {
                    "value": "Hello World"
                },
                "url": "/hello-world",
                "conditions": [{
                    "condition": "user_is_logged_in"
                }]
            }
        ]
    },
    "apiMigrations": {
        "gdpr": true
    }
}
Take a look at these parameters, which control the behavior of the generalPages module
in the descriptor.
- key: This value determines the URL that's loaded when someone clicks the app:
<site-url>/wiki/plugins/servlet/ac/my-app/hello-world-page-confluence. It is also a key that identifies the module and should be unique to the app, meaning that no other app uses this key. - location: Tells the host product where to put the link to this general page. In this case, we are targeting the system navigation area under Apps. You can find other locations with the Extension Point Finder for Confluence.
- name: Specifies the displayed text for the link to the page.
- url: Tells our app which route handles the HTTP request when a user accesses the page.
- conditions: Specifies the conditions under which a user can access the page. For more on the topic, see Conditions.
The route handler
A route handler is the code that runs when your module's endpoint is called. Take a look at the
following code from routes/index.js:
1
2``` javascript
// This is an example route that's used by the default "generalPage" module.
// Verify that the incoming request is authenticated with Atlassian Connect
app.get('/hello-world', addon.authenticate(), function (req, res) {
        // Rendering a template is easy; the `render()` method takes two params: name of template
        // and a json object to pass the context in
        res.render('hello-world', {
            title: 'Atlassian Connect'
        });
    }
);
```
This code renders the hello-world view, passing it a title.
The view
The view for the page is contained in the file views/hello-world.hbs:
1
2``` xml
{{!< layout}}
<header class="aui-page-header">
  <div class="aui-page-header-inner">
    <div class="aui-page-header-main intro-header">
      <h1>Hello World!</h1>
      <p class="subtitle">Welcome to {{title}}</p>
    </div>
  </div>
</header>
<div class="aui-page-panel main-panel">
  <div class="aui-page-panel-inner">
    <section class="aui-page-panel-item">
      <div class="aui-group">
        <div class="aui-item">
          <p>
            Congratulations. You've successfully created an Atlassian Connect app using the
            <a href="https://bitbucket.org/atlassian/atlassian-connect-express/src/master/README.md#markdown-header-atlassian-connect-express-nodejs-package-for-express-based-atlassian-add-ons" target="_parent">atlassian-connect-express</a>
            client library.
          </p>
          <p>
            <a class="aui-button aui-button-primary" href="https://bitbucket.org/atlassian/atlassian-connect-express/src/master/README.md#markdown-header-atlassian-connect-express-nodejs-package-for-express-based-atlassian-add-ons" target="_parent">
              Get Started
              <span class="aui-icon aui-icon-small aui-iconfont-devtools-arrow-right">Arrow right</span>
            </a>
          </p>
        </div>
      </div>
    </section>
  </div>
</div>
```
The {{!< layout}} Express Handlebars layout declaration tells the view to use default code from layout.hbs, including JavaScript that is useful in views that you can build in Connect. The {{title}} displays the title passed in by the route handler.
The AUI Sandbox
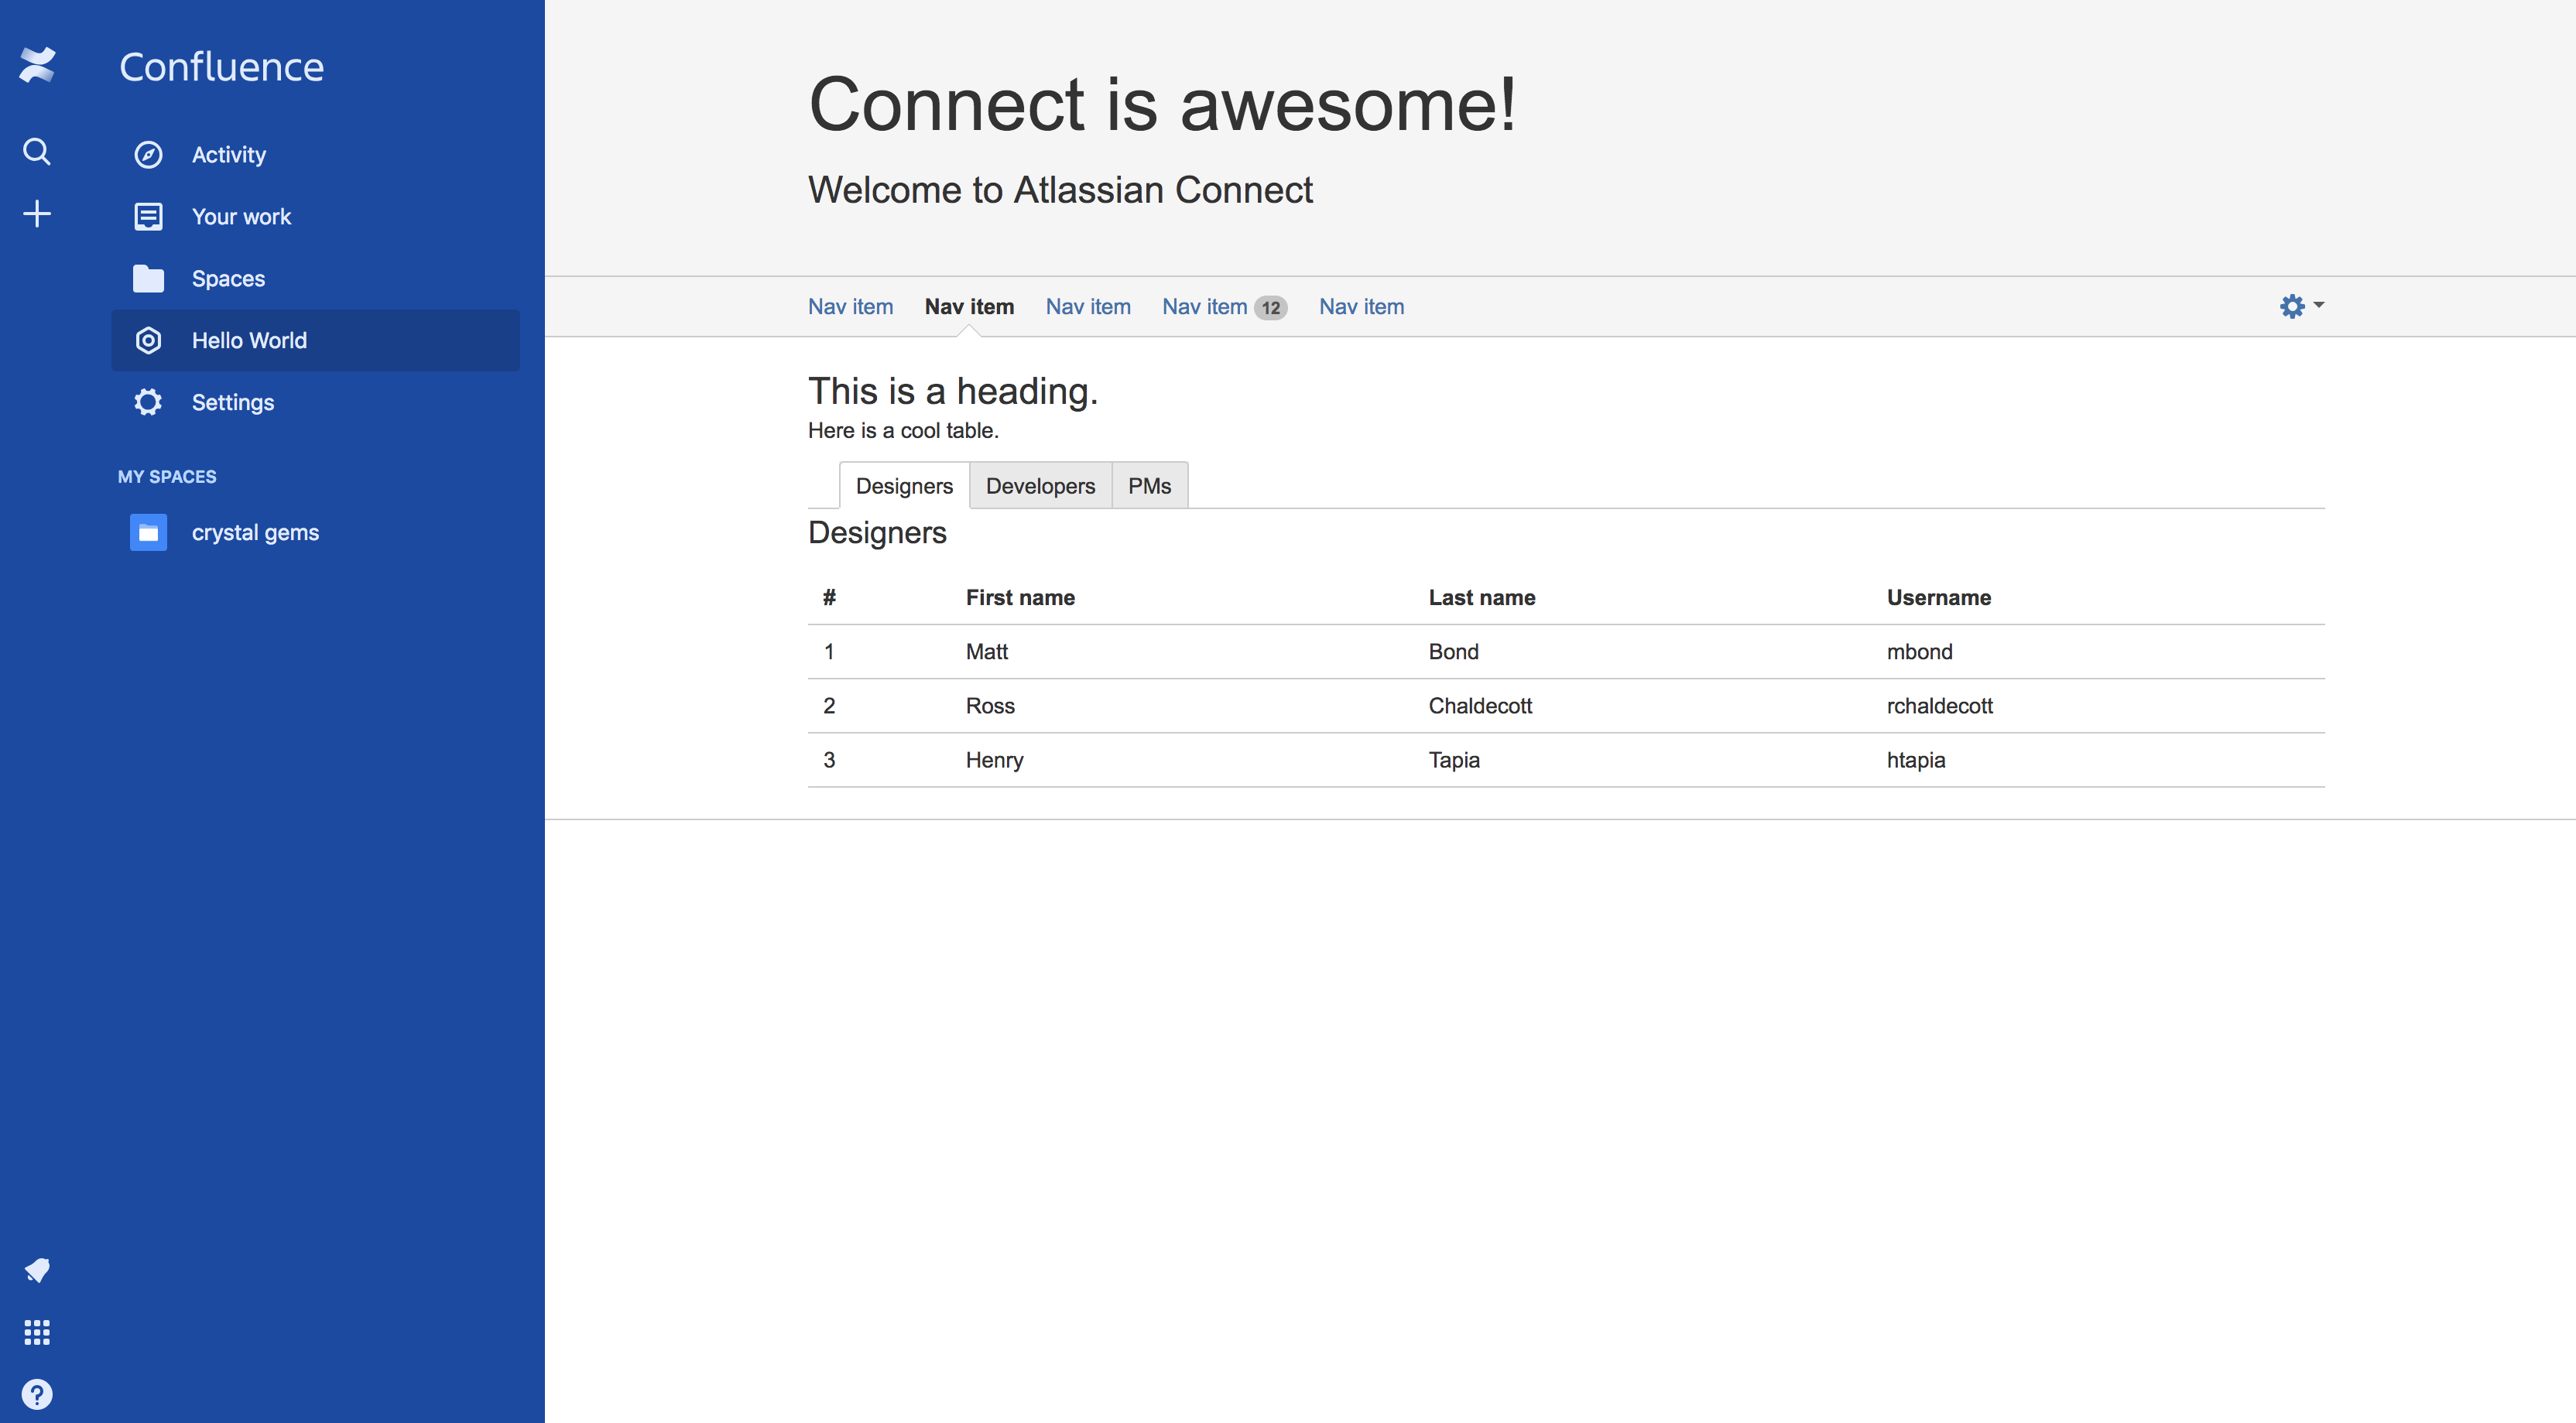
Next up, try editing your app so that it looks a little different – maybe like this:

You can use the AUI Sandbox to create layouts for views. Here's what the source looks like!
views/hello-world.hbs
1
2{{!< layout}}
<header class="aui-page-header">

  <div class="aui-page-header-inner">
    <div class="aui-page-header-main intro-header">
      <h1>Connect is awesome!</h1>

      <p class="subtitle">Welcome to {{title}}</p>
    </div>
  </div>
</header>

<nav class="aui-navgroup aui-navgroup-horizontal">
    <div class="aui-navgroup-inner">
        <div class="aui-navgroup-primary">
            <ul class="aui-nav">
                <li><a href="#">Nav item</a></li>
                <li class="aui-nav-selected"><a href="#">Nav item</a></li>
                <li><a href="#">Nav item</a></li>
                <li><a href="#">Nav item <span class="aui-badge">12</span></a></li>
                <li><a href="#">Nav item</a></li>
            </ul>
        </div><!-- .aui-navgroup-primary -->
        <div class="aui-navgroup-secondary">
            <ul class="aui-nav">
                <li><a href="#hnavsettingsDropdown" class="aui-dropdown2-trigger" aria-owns="hnavsettings-dropdown" aria-haspopup="true"><span class="aui-icon aui-icon-small aui-iconfont-configure">Configure</span> <span class="aui-icon-dropdown"></span></a></li>
            </ul>
        </div><!-- .aui-navgroup-secondary -->
    </div><!-- .aui-navgroup-inner -->
</nav>

<div class="aui-page-panel">
    <div class="aui-page-panel-inner">
        <section class="aui-page-panel-content">
            <h2>This is a heading.</h2>
            <div class="aui-item">
                <p>
                    Here is a cool table.
                </p>
                <div class="aui-tabs horizontal-tabs" id="tabs-example1">
                    <ul class="tabs-menu">
                        <li class="menu-item active-tab">
                            <a href="#tabs-example-first"><strong>Designers</strong></a>
                        </li>
                        <li class="menu-item">
                            <a href="#tabs-example-second"><strong>Developers</strong></a>
                        </li>
                        <li class="menu-item">
                            <a href="#tabs-example-third"><strong>PMs</strong></a>
                        </li>
                    </ul>
                    <div class="tabs-pane active-pane" id="tabs-example-first">
                        <h3>Designers</h3>
                        <table class="aui">
                            <thead>
                            <tr>
                                <th id="basic-number">#</th>
                                <th id="basic-fname">First name</th>
                                <th id="basic-lname">Last name</th>
                                <th id="basic-username">Username</th>
                            </tr>
                            </thead>
                            <tbody>
                            <tr>
                                <td headers="basic-number">1</td>
                                <td headers="basic-fname">Matt</td>
                                <td headers="basic-lname">Bond</td>
                                <td headers="basic-username">mbond</td>
                            </tr>
                            <tr>
                                <td headers="basic-number">2</td>
                                <td headers="basic-fname">Ross</td>
                                <td headers="basic-lname">Chaldecott</td>
                                <td headers="basic-username">rchaldecott</td>
                            </tr>
                            <tr>
                                <td headers="basic-number">3</td>
                                <td headers="basic-fname">Henry</td>
                                <td headers="basic-lname">Tapia</td>
                                <td headers="basic-username">htapia</td>
                            </tr>
                            </tbody>
                        </table>
                    </div>
                    <div class="tabs-pane" id="tabs-example-second">
                        <h3>Developers</h3>
                        <table class="aui">
                            <thead>
                            <tr>
                                <th id="basic-number">#</th>
                                <th id="basic-fname">First name</th>
                                <th id="basic-lname">Last name</th>
                                <th id="basic-username">Username</th>
                            </tr>
                            </thead>
                            <tbody>
                            <tr>
                                <td headers="basic-number">4</td>
                                <td headers="basic-fname">Seb</td>
                                <td headers="basic-lname">Ruiz</td>
                                <td headers="basic-username">sruiz</td>
                            </tr>
                            <tr>
                                <td headers="basic-number">7</td>
                                <td headers="basic-fname">Sean</td>
                                <td headers="basic-lname">Curtis</td>
                                <td headers="basic-username">scurtis</td>
                            </tr>
                            <tr>
                                <td headers="basic-number">8</td>
                                <td headers="basic-fname">Matthew</td>
                                <td headers="basic-lname">Watson</td>
                                <td headers="basic-username">mwatson</td>
                            </tr>
                            </tbody>
                        </table>
                    </div>
                    <div class="tabs-pane" id="tabs-example-third">
                        <h3>Product management</h3>
                        <table class="aui">
                            <thead>
                            <tr>
                                <th id="basic-number">#</th>
                                <th id="basic-fname">First name</th>
                                <th id="basic-lname">Last name</th>
                                <th id="basic-username">Username</th>
                            </tr>
                            </thead>
                            <tbody>
                            <tr>
                                <td headers="basic-number">5</td>
                                <td headers="basic-fname">Jens</td>
                                <td headers="basic-lname">Schumacher</td>
                                <td headers="basic-username">jschumacher</td>
                            </tr>
                            <tr>
                                <td headers="basic-number">6</td>
                                <td headers="basic-fname">Sten</td>
                                <td headers="basic-lname">Pittet</td>
                                <td headers="basic-username">spittet</td>
                            </tr>
                            <tr>
                                <td headers="basic-number">9</td>
                                <td headers="basic-fname">James</td>
                                <td headers="basic-lname">Dumay</td>
                                <td headers="basic-username">jdumay</td>
                            </tr>
                            </tbody>
                        </table>
                    </div>
                </div><!-- .aui-tabs -->

            </div>
        </section>
    </div>
</div>

<div class="aui-dropdown2 aui-style-default" id="hnavsettings-dropdown" data-dropdown2-alignment="right">
    <ul>
        <li><a href="#" class="">Nav dropdown item</a></li>
        <li><a href="#" class="active">Nav dropdown item</a></li>
        <li><a href="#">Nav dropdown item</a></li>
    </ul>
</div>
Conclusion
As you can see, pages provide a powerful mechanism to display customized content in Confluence. For more information on the other kinds of modules and entities you can specify in your app descriptor, check out the Confluence Cloud Module guide.
Now, we're ready to move onto something even more exciting. Check out how to add macros to the Confluence editor in Creating a dynamic content macro.
Rate this page: