Adding a custom content type
| Description | Set up a new a new custom content type |
| Level | Intermediate |
| Estimated time | 10 minutes |
| Example | https://bitbucket.org/atlassianlabs/confluence_cloud_tutorials/src/custom-content/ |
Custom content types are available in Forge.
This guide is for Connect apps. Resources for custom content in Forge can be found in the Forge manifest modules Confluence custom content reference.
Prerequisites
Ensure you have installed all the tools you need for Confluence Connect app development, and running Confluence by going through the getting started guide.
Information in Confluence
Confluence comes packaged with a powerful information hierarchy. Through the option of using Spaces, Pages, Attachments and Comments by default, simple entities can be used to garner an information architecture tailored to your needs. But, what if you wanted to introduce a new type of content? Say, for example, you wanted to provide a service that allowed users to create diagrams. Wouldn't it be ideal to surface this content as a seemingly native content type?
Enter, custom content!
Custom content allows you to introduce content types which integrate tightly with Confluence features like search and navigation, in addition to having the API capabilities of default Confluence content. In this tutorial, we'll be going through the process of setting up two simple custom content types, with one contained within the other.
Customer management
Let's introduce a content type called 'Customers' contained inside Spaces. The aim of introducing this content will be to make it easier for us to keep track of customer information in Confluence.
First, the custom content module needs to be added to our app descriptor. Our complete descriptor (so far) is as follows; notice the new 'Customer' custom content type to the modules array:
atlassian-connect.json
1
2{
  "key": "custom-content-tutorial",
  "name": "Custom content tutorial",
  "description": "Custom content tutorial",
  "vendor": {
      "name": "Angry Nerds",
      "url": "https://www.atlassian.com/angrynerds"
  },
  "baseUrl": "{{localBaseUrl}}",
  "links": {
      "self": "{{localBaseUrl}}/atlassian-connect.json",
      "homepage": "{{localBaseUrl}}/atlassian-connect.json"
  },
  "authentication": {
      "type": "jwt"
  },
  "lifecycle": {
      "installed": "/installed"
  },
  "scopes": ["READ", "WRITE"],
  "modules": {
    "generalPages": [
      {
          "key": "customersViewer",
          "location": "",
          "name": {
              "value": "Customers View"
          },
          "url": "/view-customer?contentId={content.id}",
          "conditions": [
            {
              "condition": "user_is_logged_in"
            }
          ]
      },
      {
          "key": "customerList",
          "location": "",
          "name": {
              "value": "Customers List"
          },
          "url": "/list-customers?spaceKey={space.key}",
          "conditions": [
            {
              "condition": "user_is_logged_in"
            }
          ]
      }
    ],
    "customContent": [
      {
        "key": "customer",
        "name": {
          "value": "Customers"
        },
        "apiSupport": {
          "supportedContainerTypes": [
            "space"
          ]
        },
        "uiSupport": {
          "listViewComponent": {
            "moduleKey": "customerList"
          },
          "contentViewComponent": {
            "moduleKey": "customersViewer"
          },
          "icons": {
            "item": {
              "url": "/images/customers.png"
            }
          }
        }
      }
    ]
  },
  "apiMigrations": {
      "gdpr": true,
      "context-qsh": true
  }
}
What do all these values in our customContent module mean? Let's take a look:
-
key: One of the most important things to keep in mind while building a new Confluence content type, is that Confluence understands our content type is namedac:<your-add-on-key>:<your-custom-content-key>. So, in this case, assuming our app has a key ofmy-app, we've declared a content type namedac:my-app:customer.We will reference this key in subsequent lessons.
-
apiSupport: Here, we create the associations with existing content types in Confluence. This way, the Confluence API knows what our custom content types need to declare when being created, read, updated, or deleted. In our example, a customer is associated with a Confluence Space.Use
supportedContainerTypesto specify the content types our custom type can be created under. In a later lesson, we will see howsupportedChildTypesis used. -
uiSupport: Here, our app defines the three UI components we need to integrate our custom content type into Confluence.-
listViewComponent: ThemoduleKeyreferences another module in your descriptor. It must be a generalPage. In our example, this is thecustomerListmodule, which we will implement in a later lesson. Since our module type is contained within Spaces, Confluence will (by default) expose a link to this module in a Space's sidebar, like so: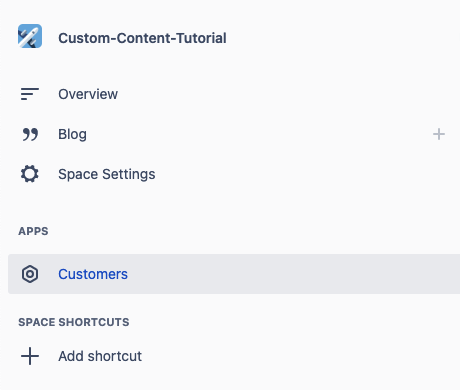
-
contentViewComponent: This component is used for rendering a single piece of custom content inside Confluence lists, such as search results. LikelistViewComponent, we reference another module in the same descriptor, and it must be a generalPage. -
icons: The default icon for the sidebar link to ourlistViewComponent. Ideally provide an icon at least 24x24 pixels.
-
We also added some generalPages modules:
-
We added
customerList, which is referenced as thelistViewComponentof Customer content. When a user clicks on 'Customers', the request is directed to /list-customers. A context parameterspace.keyrefers to the Space's key. -
We also added
customersViewer, which is referenced as thecontentViewComponentof Customer content. When a user wants to view a particular customer, the request is directed to /view-customer. The context parametercontent.idrefers to the custom content's ID (in this case, the Customer ID). -
The
conditionsproperty ensures a page is visible only when the user is logged in. You can learn more about these conditions here.
Awesome! You've just registered your first Confluence custom content type. Let's keep the momentum going and power through to the next lesson.
Rate this page: