Working with custom content
| Description | Setup and create instances of a new Customer content type. |
| Level | Intermediate |
| Estimated time | 15 minutes |
| Example | https://bitbucket.org/atlassianlabs/confluence_cloud_tutorials/src/custom-content/ |
Custom content types are available in Forge.
This guide is for Connect apps. Resources for custom content in Forge can be found in the Forge manifest modules Confluence custom content reference.
Prerequisites
Ensure you have worked through Lesson 1 - A New Content Type in the Custom content series.
The missing link
Okay, so now that we have our Customer content type, and generalPages which will soon visualize this content, how do we form the link between the Content API and our UI? Let's quickly understand this before jumping into creating some instances of our content type. To acquire the data we need, we can use one of two approaches (or even both):
-
The Backendy Approach: With this approach, you can do a server-side call to the Confluence REST API, and collect all content of the type you are interested in. Typically, this will look something like this:
1 2
// Setup a HTTP client with all under-the-hood authentication and validation handled by ACE. var httpClient = addon.httpClient(req); httpClient.get({ url: '/rest/api/content', qs: { type: 'ac:custom-content-tutorial:customer', space: { key: '<your-space-key>' } }, }, function(err, res, body){ // Handle response data here... });This method provides you the ability to do any server-side data manipulation, by leveraging any custom architecture or services you may be using in your backend.
-
The Frontendy Approach: But, it's understandable that you may not need all this. If, instead of a backend service, you intend on sending this API data through a custom front-end stack (for example using React, Webpack, ES6), you can easily use the Connect Request JS API to make authenticated calls to Confluence. This would typically look like this:
1 2
AP.request({ url: '/rest/api/content', data: { type: 'ac:custom-content-tutorial:customer', space: { key: '<your-space-key>' } }, success: (data) => { console.log(data); }, error: (err) => { console.log(err); } });
We can use the same backend or frontend protocol for all HTTP requests within our app service.
Displaying all Customers
In previous lesson, we created a generalPage for this with key customerList that routes to /list-customers. Let's implement that page now:
-
Firstly, we add /list-customers to our routes:
routes/index.js
1 2
app.get('/list-customers', addon.authenticate(), function (req, res) { var spaceKey = req.query['spaceKey'] res.render('list-customers', { spaceKey: spaceKey }); } ); -
Next up, we define the view to get all Customers and display them:
views/list-customers.hbs
1 2
{{!< layout}} <div id="customers-list" style="margin-top: 50px;"></div> <script> $(function(){ AP.request({ url: "/rest/api/content/", data: { "type": 'ac:custom-content-tutorial:customer', "spaceKey": "{{spaceKey}}", "expand": "children" }, success: function(response){ let customers = JSON.parse(response).results; customers.forEach(customer => { AP.request({ url: `/rest/api/content/${customer.id}/property/customer-data`, success: (jsonData) => { jsonData = JSON.parse(jsonData); $("#customers-list").append(`<div id='${jsonData.id}' style='width: 200px; height: 213px; text-align: center'> <img onclick='window.top.location="${jsonData._links.base}/display/{{spaceKey}}/customcontent/${customer.id}"' src="${jsonData.value.logo}" alt="Logo" width="128" height="128"> <h5 class='company-name'>${jsonData.value.companyName}</h5> <div class='description'> ${jsonData.value.description} </div> <a href='${jsonData.value.website}'>${jsonData.value.website}</a> </div>`) } }); }); }, error: function (err) { console.log("err - ", err) } }); }) </script>Let's see what's happening here:
-
We first added the HTML div with ID
customers-listwhere all the Customer details will be displayed. -
Then, we made a GET request to /rest/api/content/ to fetch details for our custom content type under the current Space. We have a parameter called
expand, which specifies additional data to fetch. We specify the valuechildrento retrieve all the Customers (ie. the "children") within the Space (the "parent"). However, this returns only the Customer IDs. We need a way to store and fetch the actual details of each Customer.We will store the details of the Customers in a content property, named
customer-data. So, we fetch this content property for each Customer by making GET requests, one request per Customer, to /rest/api/content/<customer-id>/property/customer-data. This data is then rendered onto the page.
-
Now that we know to use content properties to store and fetch data for our custom content, let's see how to create new Customers.
Creating a customer
Let's set up a basic dialog that looks like this:
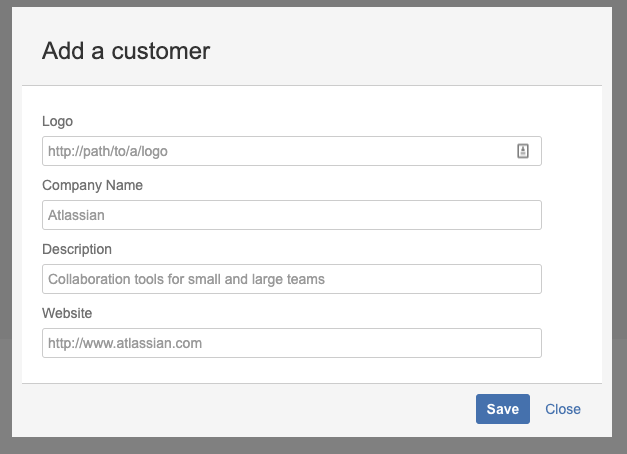
To achieve this, we need to do four things:
-
Setup a dialog module in our descriptor. This is done by adding the following to
modules:atlassian-connect.json
1 2
"dialogs": [ { "key": "newCustomer", "url": "/add-new-customer?spaceKey={space.key}", "options": { "height": "420px", "width": "600px", "header": { "value": "Add a customer" } } } ]Once we have set this dialog up, we can trigger it to appear from anywhere within our app. The important thing to note is the dialog's
keyattribute:newCustomer. We passspaceKeyas a URL parameter because it is required to create custom content later on. -
Adding a UI trigger to our list page. Specifically, we create a button that, when clicked, calls the Dialog JS API and asks Confluence to render our dialog. Add the following to the end of the file:
views/list-customers.hbs
1 2
<button id="add-customer">Add a Customer</button> <script> $('#add-customer').on('click', function(){ AP.dialog.create({ key: 'newCustomer', chrome: false }) }); </script>Notice how we reference the dialog using the
keyattribute from step 1. -
When the "Add a Customer" button is clicked, the dialog box opens up and requests /add-new-customer as defined in step 1. Let's add that route:
routes/index.js
1 2
app.get('/add-new-customer', addon.authenticate(), function (req, res) { var spaceKey = req.query['spaceKey'] res.render('new-customer', { spaceKey: spaceKey }); }); -
Create a new file with the dialog's view:
views/new-customer.hbs
1 2
{{!< layout}} <div> <header class="aui-dialog2-header"> <h2 class="aui-dialog2-header-main" id="static-dialog--heading">Add a customer</h2> </header> <div class="aui-dialog2-content"> <form id="add-customer-dialog" class="aui top-label new-customer-dialog"> <div class="field-group top-label"> <label for="logo">Logo</label> <input class="text long-field" type="text" id="logo" name="logo" placeholder="http://path/to/a/logo" /> </div> <div class="field-group top-label"> <label for="companyName">Company Name</label> <input class="text long-field" type="text" id="companyName" name="companyName" placeholder="Atlassian" /> </div> <div class="field-group top-label"> <label for="description">Description</label> <input class="text long-field" type="text" id="description" name="description" placeholder="Collaboration tools for small and large teams" /> </div> <div class="field-group top-label"> <label for="website">Website</label> <input class="text long-field" type="website" id="website" name="website" placeholder="http://www.atlassian.com" /> </div> </form> </div> <footer class="aui-dialog2-footer"> <div class="aui-dialog2-footer-actions"> <button id="dialog-save-button" class="aui-button aui-button-primary">Save</button> <button id="dialog-close-button" class="aui-button aui-button-link">Close</button> </div> </footer> </div>
To check out more markup and UI components, check out the AUI documentation.
The last step involved in creating our customer entity, is issuing a POST request to Confluence. To do this, we use the awesome AP Request library again, and send our form data through. Before doing this, let's understand the ways in which we can store the information we have acquired from our form submission.
Storage representation
Confluence stores the XML markup of each piece of content in a native 'Storage Format'. This is sanitized HTML, which is used more for storing bodies of information or content. Typically, the content stored in Pages and Comments is in this format. It stores 'prose-like' content.
Content properties
If we are acquiring input which is not prose-like, but rather a set of key-value pairs, we can use content properties. These are JSON objects stored against a piece of content. In our case, this would be the better approach. We capture this information under the 'metadata' key.
Awesome, now we know what our data needs to be stored as. In order to POST a new content entity, we use the /rest/api/content endpoint. The following code generates the data in the proper format for our endpoint. Add it to the end of the file:
views/new-customer.hbs
1
2<script>
$(function(){
    $('#dialog-save-button').on('click', function(){
      var jsonData = {
          "type": "ac:custom-content-tutorial:customer",
          "space": {
              "key": "{{spaceKey}}"
          },
          "title": $("#companyName").val(),
          "body": {
              "storage": {
              "value": "",
              "representation": "storage"
              }
          },
          "metadata": {
              "properties": {
                "customer-data": {
                    "key": "customer-data",
                    "value": {
                        "logo": $("#logo").val(),
                        "companyName": $("#companyName").val(),
                        "description": $("#description").val(),
                        "website": $("#website").val()
                    }
                }
              }
          }
      }
    })
})
</script>
Notice how you specify content properties for a piece of custom content in metadata.properties. When we created the list-customers view earlier, we expected Customer data to be stored in the content property named customer-data.
We still have to take care of how jsonData is passed from dialog to page. This is handled by Events. Events are used to pass data between modules.
When the user clicks "Save", we want to close the dialog and emit an event with the form data:
views/new-customer.hbs
1
2// Add this inside the #dialog-save-button click handler, after
// defining `jsonData`
AP.events.emitPublic('customerDataEvent', jsonData);
AP.dialog.close();
When the page module receives the event, it makes the POST request needed to create our new Customer:
views/list-customer.hbs
1
2<script>
AP.events.onPublic('customerDataEvent', function(args){
  AP.request({
      url: '/rest/api/content',
      type: 'POST',
      contentType: 'application/json',
      data: JSON.stringify(args),
      success: function(customer){
          customer = JSON.parse(customer);
          console.log("Customer saved to Confluence", customer);
      },
      error: function(err){
          console.log("content error - ", err);
      }
  });
});
</script>
You should see the following in your developer tools:

You can now visualize the content hub using GET /rest/api/content, searching for the type ac:custom-content-tutorial:customer. Here's an example of what you can do with these capabilities:
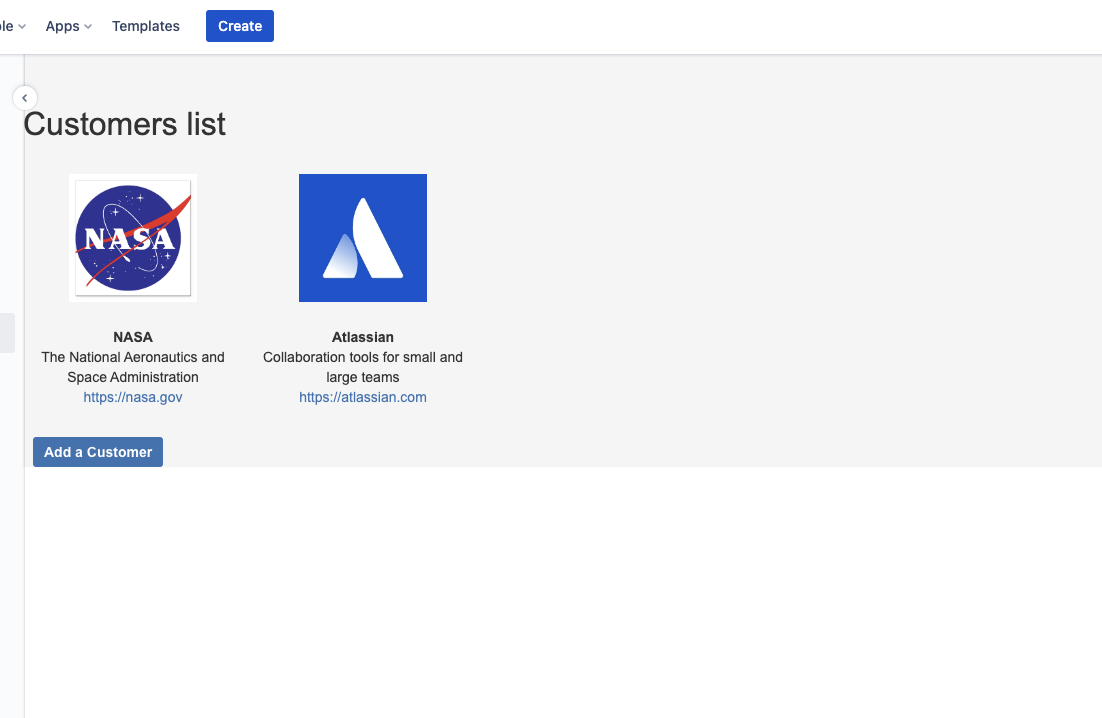
Again, the ability to handle the view for singular and all customers can be implemented in your app through the use of context parameters. Here, we are viewing the content 'hub' landing page.
Now, before we start building 'notes', let's take a look at how we can make our Customer custom content types searchable! Head over to Searching custom content!
Rate this page: