Working with custom content children
| Description | Setup and create instances of a new Note content type, contained within 'Customers'. |
| Level | Intermediate |
| Estimated time | 20 minutes |
| Example | https://bitbucket.org/atlassianlabs/confluence_cloud_tutorials/src/custom-content/ |
Custom content types are available in Forge.
This guide is for Connect apps. Resources for custom content in Forge can be found in the Forge manifest modules Confluence custom content reference.
Prerequisites
Ensure you have worked through Searching custom content.
Another custom content type
We will now declare another custom content type in our descriptor, just like we did with customers. Let's call them 'notes'.
atlassian-connect.json
1
2"customContent": [
  // Add this under the "Customer" type
  {
    "key": "note",
    "name": {
      "value": "Notes"
    },
    "apiSupport": {
      "supportedContainerTypes": ["ac:custom-content-tutorial:customer"],
      "indexing": {
            "enabled": true
          },
      "supportedSpacePermissions": ["read", "create", "delete"]
    },
    "uiSupport": {
      "contentViewComponent": {
        "moduleKey": "customersViewer"
      },
      "listViewComponent": {
        "moduleKey": "notesViewer"
        },
      "icons": {
        "item": {
          "url": "/images/notes.png"
        }
      }
    },
  }
]
We also add more information to our customer custom content type, as follows:
atlassian-connect.json
1
2"customContent": [
  {
    "key": "customer",
    //  More options above here...
    "apiSupport": {
      "supportedContainerTypes": ["space"],
      "supportedChildTypes" : ["ac:custom-content-tutorial:note"]
    }
  }
]
We have introduced a new key here, namely, supportedChildTypes. This establishes a heirarchy where a 'Note' can be contained within a 'Customer', and that a 'Note' is a supported child type of a 'Customer'.
Just like in Working with custom content, we will create a note from a dialog box. Let's add another dialog module to our descriptor.
atlassian-connect.json
1
2"dialogs": [
  // Add this under the new customer dialog
  {
    "url": "/add-new-note?spaceKey={space.key}&contentId={content.id}",
    "options": {
      "height": "420px",
      "width": "600px",
      "header": {
          "value": "Add a note"
      },
      "key": "newNote",
    }
  }
]
Here, we see space key and content ID as the URL parameters. These are just a few of the context variables that Confluence supports. We need these to make an API request to create notes.
Once we have added the above, we need to create a route for /add-new-note to render the dialog box.
routes/index.js
1
2app.get('/add-new-note', addon.authenticate(), function (req, res) {
    var contentId = req.query['contentId'];
    var spaceKey = req.query['spaceKey']
    res.render('new-note',{
        contentId: contentId,
        spaceKey: spaceKey
    });
});
In terms of understanding the backend code needed, we are all done! Let's quickly look at how to create a note and retrieve all notes under a customer.
Noteworthy content
Using AP.request, we perform the following:
views/new-note.hbs
1
2{{!< layout}}

<div>
  <div class="aui-dialog2-content">
    <form id="add-note-dialog" class="aui top-label new-note-dialog">
      <div class="field-group top-label">
        <input class="text long-field" type="text" id="note" name="note" placeholder="Add your note here" />
      </div>
      <button id="dialog-save-button" class="aui-button aui-button-primary">Save</button>
      <button id="dialog-close-button" class="aui-button aui-button-link">Close</button>
    </form>
  </div>
</div>

<script>
$(function(){
    $("#dialog-save-button").on("click", function(){
      var jsonData = {
          "type": "ac:custom-content-tutorial:note",
          "space": {
              "key": "{{spaceKey}}"
          },
          "container": {
            "type": "ac:custom-content-tutorial:customer",
            "id": "{{contentId}}"
          },
          "title": " ",
          "body": {
              "storage": {
                "value": $("#note").val(),
                "representation": "storage"
              }
          }
      }

      AP.events.emitPublic('noteDataEvent', jsonData);
      AP.dialog.close()
    })

    $("#dialog-close-button").on("click", function(){
      AP.dialog.close()
    })
})
</script>
views/view-customer.hbs
1
2<script>
AP.events.onPublic('noteDataEvent', function(args){
    AP.request({
        url: '/rest/api/content',
        type: 'POST',
        contentType: 'application/json',
        data: JSON.stringify(args),
        success: function(note){
            note = JSON.parse(note);
            console.log("Note saved to Confluence", note);
        },
        error: function(err){
            console.log("content error - ", err);
        }
    });
});
</script>
Let's pretend our customer has an id of 156831. To see our note as a child of our customer, we issue a GET request to the /rest/api/content/156831/child/ac:my-app:note endpoint. We should receive a response like this:
1
2{
  "results": [
    {
      "id": "1605728",
      "title": "Hello, World",
      // More properties...
    }
  ],
  // More below here...
}
And, voila! A connection has been established between the customer, and the note underneath them. As you can see, this affords great possibilities to app developers in the Confluence Ecosystem. Custom content well and truly provides a fully-integrated content solution.
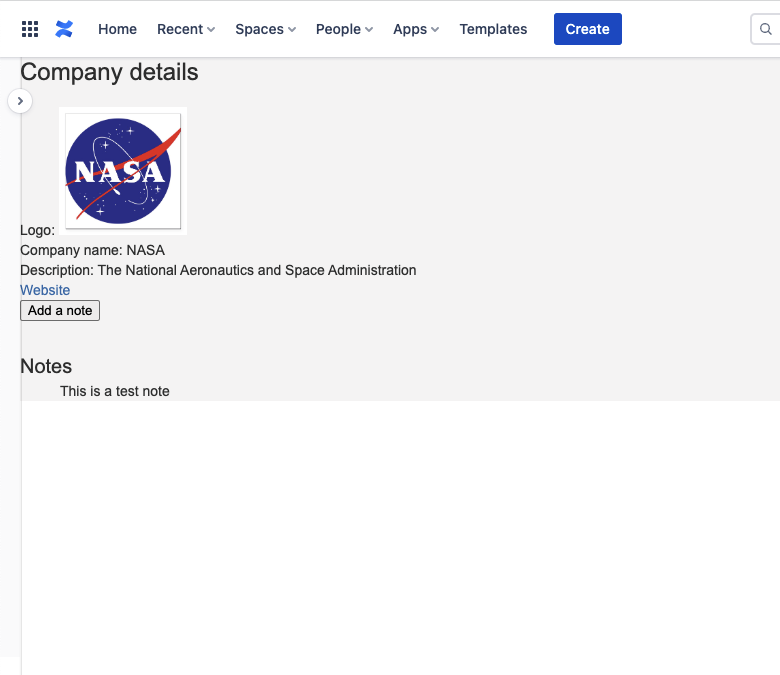
To wrap up, we now have all the essentials we need to build the UI we want in Confluence! Here's another snapshot of what 'notes' could look like in Confluence:
This concludes our deep-dive into the capabilities of Custom content in Confluence Connect.
Happy dev-ing!
Rate this page: