Confluence blueprints
Introduction to blueprints
Confluence blueprints allows users to create new pages based on predefined content. Using the Create dialog, you can view the blueprints available in an installation.
As plugin developers, you can hook into the Create dialog to add your own blueprints. With Confluence 5.3 and higher, you can also write Space blueprints to provide users a way to create new spaces.
Basic blueprints can simply help create new pages with predefined content from a template, which can be static or dynamic. Blueprints don't limit you to just predefining content and it is really up to your imagination. To assist users in creating certain types of documents, you can take user input in a dialog wizard and prepopulate content, settings, or just develop templates with placeholder text (only visible in the editor).
To build a simple blueprint plugin, see the Write a simple Confluence blueprint plugin tutorial.
You can easily write blueprints using the atlas-create-confluence-plugin-module command part of Atlassian SDK in 4.2.
Example source
If you want to see some example code, the Hello blueprint contains a space blueprint. The source code is available on Atlassian Bitbucket: https://bitbucket.org/atlassian/hello-blueprint.
To clone the repository, run the following command:
1
2git clone https://bitbucket.org/atlassian/hello-blueprint.git
Hello Blueprint was last tested with Confluence 5.10.1 and Atlassian SDK 6.2.6.
Blueprint concepts
This section introduces you to the concepts you need to know to develop a Confluence blueprint. It contains the following topics:
- Plugin module types used in blueprints.
- Content templates.
- Placeholders/Instructional text.
- Index pages.
- Internationalization, translation, and blueprints.
- Testing your Confluence blueprint.
Plugin module types used in blueprints
Confluence blueprints are built with the following plugin module types.
Module
|
Purpose
|
|---|---|
Identifies the blueprint and binds it to a Create dialog option. | |
Describes the templates available with your plugin. You must have one of these; you can have multiple if your plugin includes multiple templates. | |
Adds the option for your blueprint to the Create dialog. You must specify a section of The icon resource should be 200 x 150 pixel PNG icon resource representing the blueprint icon. | |
| Define a dialog wizard for users to input data during page creation |
The following code illustrates the minimum required for a Confluence blueprint to appear in the Create dialog:
atlassian-plugin.xml
1
2<resource type="i18n" name="i18n" location="i18n"/>

<content-template key="myplugin-template">
  <resource name="template" type="download" location="xml/basic.xml"/>
</content-template>

<web-item key="blueprint-item" i18n-name-key="my.plugin.title" section="system.create.dialog/content">
    <description key="my.plugin.description"/>
    <resource name="icon" type="download" location="images/my-blueprint-icon.png"/>
    <param name="blueprintKey" value="myplugin-blueprint"/>
</web-item>

<blueprint key="myplugin-blueprint" index-key="myplugin-index">
   <content-template ref="myplugin-template"/>
</blueprint>
Note that this assumes that you have an i18n.properties file and basic.xml file in your plugin resources directory.
Content templates
Each blueprint depends on a template with predefined content, which we refer to as content templates. Any markup that
can go into a Confluence page can go in your template. The template content itself must be in an XML file defined in the
content-template element. The file can contain any valid Confluence storage format markup. The template file can live anywhere in your plugin project,
by convention, you should place it in a subdirectory of the src/main/resources folder. For example, you might
create a src/main/resources/templates/basic.xml file with the following content:
1
2<p>Hello, reader.</p>
You must be a space admin to design your content template.
Do the following:
- Create and save the page in Confluence.
- Go to Tools > View Storage Format.
- Copy and paste the storage format into your XML file.
This is particularly useful if you want to use macros or page layouts in your template.
Placeholders/Instructional text
Content templates can provide instructional text to the user, which is a placeholder only visible in the editor. After users click the placeholder to start typing the placeholder text is replaced.
The purpose of such text is to guide the user in the information that the template requires. You can also use
instructional text to trigger a @mention prompt for user selection.
In the following example, we have two placeholders:
- Static text (replaced by internationalization).
- Placeholder that triggers a
@mentionprompt when clicked.
1
2<table>
  <tbody>
    <tr>
      <th>User</th>
      <th colspan="1">Phone</th>
    </tr>
    <tr>
      <td><ac:placeholder ac:type="mention">usermention</ac:placeholder></td>
      <td><ac:placeholder><at:i18n at:key="my.key"/></ac:placeholder></td>
    </tr>
  </tbody>
</table>
The user will see this in the editor:

Index pages
Each blueprint type has an index page automatically created for each space. An index page is like a summary page
which lists all the blueprints of that type in that space. It essentially relies on Confluence labels to be applied
to the pages created via blueprints, which is specified by the index-key attribute on the blueprint module.
Index pages are created when the first blueprint of that type is created for a space, for example, when the first Meeting Note blueprint page is created in a space, the Meeting Notes index page is also created. A shortcut to the index page is also created by default in the Space sidebar.
By default, the index page for blueprints includes a button to create the blueprint and a table listing out the blueprints of that type in the space.
To customize and override this default, specify an index-template-key attribute on the blueprint module and
reference a content template in your plugin. For example:
1
2<blueprint key="myplugin-blueprint"
           index-key="myplugin-index"
           index-template-key="myplugin-index-template"/>
    <content-template ref="myplugin-template"/>
</blueprint>

<content-template key="myplugin-index-template" i18n-name-key="myplugin.templates.index.name">
    <resource name="template" type="download" location="xml/index.xml"/>
</content-template>
Note that by default index page titles are the same as the blueprint name (that appears in the Create dialog).
To override the title, specify an attribute i18n-index-title-key in the blueprint element.
Internationalization, translation, and blueprints
You specify the internationalized plugin name and description with the i18n keys.
These keys appear in the component modules that you use to define your blueprint. Specify these keys in the src/main/resources/i18n.properties file.
1
2my.plugin.title=My Blueprint Plugin Title
my.plugin.description=This is a description of my plugin
myplugin.templates.content.name=My Blueprint Content Template
myplugin.templates.index.name=My Blueprint Index Template
You must reference this file in your atlassian-plugin.xml descriptor using:
1
2<resource type="i18n" name="i18n" location="i18n"/>
If you generated your plugin with an atlas-create-product-plugin command, the generation creates this file
and the necessary references in the atlassian-plugin.xml file.
In your blueprint templates, you can use at:i18n elements for translation strings.
The key refers to a key in your plugin i18n .properties file.
1
2<p><at:i18n at:key="my.blueprints.string" /></p>
Translations of blueprint templates occur when the blueprint is created by a user. However, if the user customizes the blueprint template, it is translated in the globally configured language and then subsequent creations of that blueprint are bound to that language.
Testing your Confluence blueprint
After you install a blueprint plugin into Confluence, you can test it using the following steps:
- Open Confluence in your browser.
- Click the Create button.
Confluence displays the Create dialog.
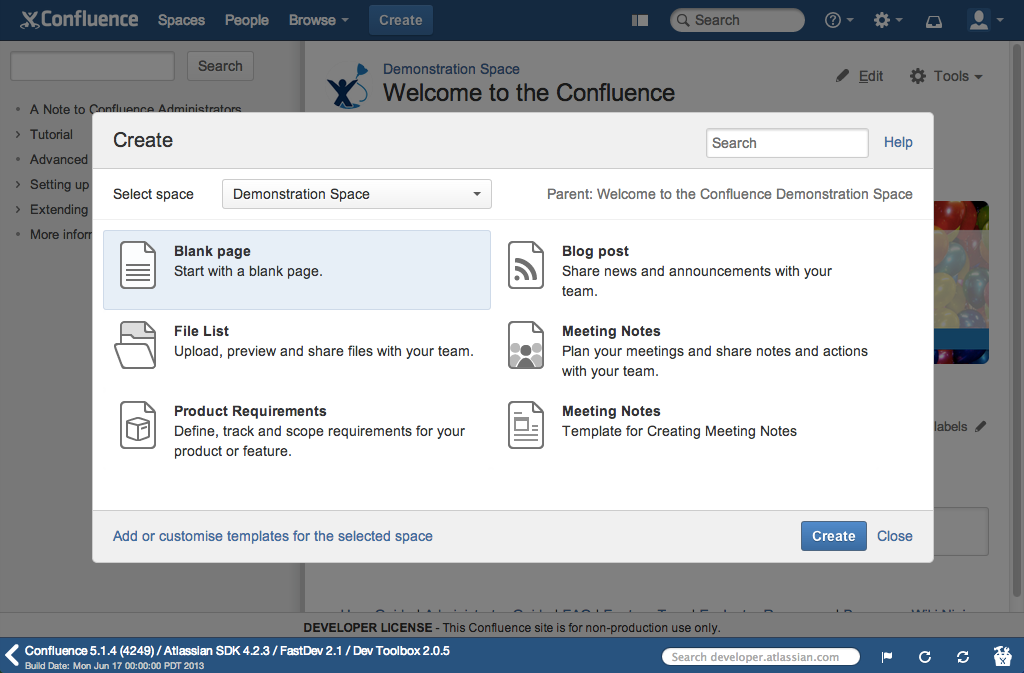
- Find your new blueprint in the dialog and select it.
Selecting this item and clicking next takes you to the Editor screen, preloaded with your template. - Save the new page to view it. An index page is created for you, with a shortcut to it in the Space sidebar.
- Go to the index page and make sure your newly created page appears there.
- To customize your blueprint as a space admin, in the sidebar go to Space Tools > Content Tools > Templates.
Rate this page: