Write an advanced blueprint plugin
Applicable: | This tutorial applies to Confluence 5.9.1 and higher. |
Level of experience: | Advanced. |
In this tutorial, you’ll learn how to create an advanced blueprint plugin for your Confluence instance. Developing for Confluence Cloud? Learn how to create a blueprint for Confluence Cloud.
Overview of the tutorial
If you successfully completed intermediate tutorial you should have a blueprint that is populated using a single-page wizard and some instructional text. In this tutorial, you will create a blueprint that populates its template with data. You can also include an event listener in your blueprint. Event listeners are useful for reacting to user actions in a blueprint plugin. This tutorial shows you a simple event listener.
Before you begin
To complete this tutorial, you should:
- Successfully complete Write an intermediate blueprint plugin tutorial first.
Plugin source
If you want to skip ahead or check your work when you finish, you can find the plugin source code on Atlassian Bitbucket. Alternatively, you can download the source as a ZIP archive. To clone the repository, run the following command:
1
2git clone https://bitbucket.org/atlassian_tutorial/confluence-eventlistener-blueprint.git
About these Instructions
You can use any supported combination of operating system and IDE to create this plugin. These instructions were written using Intellij IDEA 2017.2 on macOS Sierra. If you are using another operating system or IDE combination, you should use the equivalent operations for your specific environment. This tutorial was last tested with Confluence 6.7.0 using the Atlassian SDK 6.3.10.
Step 1. Choose between templates
A plugin may have multiple blueprints and a blueprint may reference multiple templates. For example, you might have a reports blueprint to allow users to choose between creating two types of reports. Each report has a corresponding template.
In this step, you'll add another template to the plugin code you created in the Write an intermediate blueprint plugin. If you don't have that intermediate code, you can download the source as a ZIP archive of the project to start with. To add a second template, do the following:
-
Create a
templates/mytemplate2.xmlfile and add the following content:1 2
<h3><strong>Name</strong>: <at:var at:name="vName" /></h3> <h3><strong>Date</strong>: <ac:placeholder>Enter today's date here</ac:placeholder></h3>This second template has a different look and feel.
-
Close and save the
mytemplate2.xmlfile. -
Add a
content-templatemodule in theatlassian-plugin.xmlfile.1 2
<!-- Second Template for Blueprint --> <content-template key="simplebp-template2" i18n-name-key="my.blueprint.title2"> <resource name="template" type="download" location="/templates/mytemplate2.xml" /> </content-template> -
In the
blueprintcontent module, remove thecontent-template-keyattribute and replace it with twocontent-templaterefs.1 2
<!-- Blueprint --> <blueprint key="my-blueprint" index-key="my-index" i18n-name-key="my.blueprint.name"> <content-template ref="simplebp-template" /> <content-template ref="simplebp-template2" /> <dialog-wizard key="simplebp-wizard"> <dialog-page id="page1Id" template-key="MyPlugin.Blueprints.Simple.page1Form" title-key="my.blueprint.wizard.page1.title" description-header-key="my.blueprint.wizard.page1.desc.header" description-content-key="my.blueprint.wizard.page1.desc.content" last="true"/> </dialog-wizard> </blueprint> -
Save and close the
atlassian-plugin.xmlfile. -
In the
simplebp.propertiesfile, add themy.blueprint.title2value and editmy.blueprint.titlevalue.1 2
my.blueprint.title=First Template my.blueprint.title2=Second Template -
Add the
my.blueprint.form.label.templatekeyvalue.1 2
my.blueprint.form.label.templatekey=Choose a templateThis value is used in the Soy template in the next step. When you are done the file looks similar to the following:
1 2
my.blueprint.title=First Template my.blueprint.title2=Second Template my.create-link.title=My Sample Template my.create-link.description=Create a new SimpleBB template my.blueprint.form.label.title.vName=Name my.blueprint.form.label.templatekey=Choose a template my.blueprint.wizard.page1.title=Simplebp WIZARD my.blueprint.wizard.page1.desc.header=About this blueprint my.blueprint.wizard.page1.desc.content=Use this blueprint to create a table with your name and email. -
Save and close the
simplebp.propertiesfile.
Step 2. Update the Javascript to handle two templates
By default, the blueprint page is created from the first template. Of course, you will want to offer users the choice between your templates. You can set a special property called contentTemplateKey in the wizardData. This is the key of the template to render. You can set this property through a JavaScript hook or implicitly by having a form field with the name contentTemplateKey. This latter method works because pageData automatically loads form field values. When the user submits the wizard, Confluence populates wizardData with all the pageData values.
In this step, you create a select field to allow users to choose a template.
-
Open the soy/simplebp.soy template.
-
Add a second field group below the first that contains a
selectinput.1 2
<div class="field-group"> <label for="template-key">{getText('my.blueprint.form.label.templatekey')}</label> <select id="template-key" class="select" name="contentTemplateKey"> <option value="simplebp-template">{getText('my.blueprint.title')}</option> <option value="simplebp-template2">{getText('my.blueprint.title2')}</option> </select> </div>Each option in the
selectis a template whose value corresponds to acontent-templatekey. When the form is submitted, thewizardData.contentTemplateKeycontains the selection value.
When you are done, the Soy template looks like the following:1 2
/** * A form that accepts a person's name */ {template .page1Form} <form action="#" method="post" class="aui"> <fieldset> <div class="field-group"> <label for="myname">{getText('my.blueprint.form.label.title.vName')}</label> <input id="myname" class="text" type="text" name="vName"> </div> <div class="field-group"> <label for="template-key">{getText('my.blueprint.form.label.templatekey')}</label> <select id="template-key" class="select" name="contentTemplateKey"> <option value="simplebp-template">{getText('my.blueprint.title')}</option> <option value="simplebp-template2">{getText('my.blueprint.title2')}</option> </select> </div> </fieldset> </form> {/template} -
Save and close the
simplebp.soyfile. -
Build your plugin with the
atlas-runcommand. -
Log in and click the Create button.
-
After clicking My Sample Template you'll see the following:

Step 3. Add a "Let's get started" page
You may want to kick off your blueprint with a "Let's get started" page. This page allows you to explain what the blueprint is and how to use it. Adding a "Let's get started" page requires you to define the page content in your Soy template and a reference to your blueprint.
-
In the resource/soy/simplebp.soy file, add a new template description.
1 2
/** * Let's-get-started page for the Create dialog */ {template .letsGetStarted} <h2>{getText('my.blueprint.letsgetstarted.title')}</h2> <p>{getText('my.blueprint.letsgetstarted.content')}</p> {/template}Here is full file, including earlier example.
1 2
{namespace MyPlugin.Blueprints.Simple} /** * A form that accepts a person's name */ {template .page1Form} <form action="#" method="post" class="aui"> <fieldset> <div class="field-group"> <label for="myname">{getText('my.blueprint.form.label.title.vName')}</label> <input id="myname" class="text" type="text" name="vName"> </div> <div class="field-group"> <label for="template-key">{getText('my.blueprint.form.label.templatekey')}</label> <select id="template-key" class="select" name="contentTemplateKey"> <option value="simplebp-template">{getText('my.blueprint.title')}</option> <option value="simplebp-template2">{getText('my.blueprint.title2')}</option> </select> </div> </fieldset> </form> {/template} /** * Let's-get-started page for the Create dialog. */ {template .letsGetStarted} <h2>{getText('my.blueprint.letsgetstarted.title')}</h2> <p>{getText('my.blueprint.letsgetstarted.content')}</p> {/template} -
Save and close the
simplebp.soyfile. -
In the
simplebp.propertiesfile, add strings for the title and content.1 2
my.blueprint.letsgetstarted.title=About this blueprint my.blueprint.letsgetstarted.content=You can choose between two reports. One uses a table; one does not.The following code snippet shows the full file, including earlier example.
1 2
my.blueprint.title=First Template my.blueprint.title2=Second Template my.create-link.title=My Sample Template my.create-link.description=Create a new SimpleBB template my.blueprint.form.label.title.vName=Name my.blueprint.form.label.templatekey=Choose a template my.blueprint.wizard.page1.title=Simplebp WIZARD my.blueprint.wizard.page1.desc.header=About this blueprint my.blueprint.wizard.page1.desc.content=Use this blueprint to create a table with your name and email. my.blueprint.letsgetstarted.title=About this blueprint my.blueprint.letsgetstarted.content=You can choose between two reports. One uses a table; one does not. -
Save and close the
simplebp.propertiesfile. -
In the
atlassian-plugin.xmlfile, add ahow-to-use-templateattribute to yourblueprintmodule.1 2
<blueprint key="my-blueprint" index-key="my-index" i18n-name-key="my.blueprint.name" how-to-use-template="MyPlugin.Blueprints.Simple.letsGetStarted" > <content-template ref="simplebp-template" /> <content-template ref="simplebp-template2" /> <dialog-wizard key="simplebp-wizard"> <dialog-page id="page1Id" template-key="MyPlugin.Blueprints.Simple.page1Form" title-key="my.blueprint.wizard.page1.title" description-header-key="my.blueprint.wizard.page1.desc.header" description-content-key="my.blueprint.wizard.page1.desc.content" last="true"/> </dialog-wizard> </blueprint>Here is an example of full file, including the previous attribute.
1 2
<atlassian-plugin key="${atlassian.plugin.key}" name="${project.name}" plugins-version="2"> <plugin-info> <description>${project.description}</description> <version>${project.version}</version> <vendor name="${project.organization.name}" url="${project.organization.url}" /> <param name="plugin-icon">images/pluginIcon.png</param> <param name="plugin-logo">images/pluginLogo.png</param> </plugin-info> <!-- add our i18n resource --> <resource type="i18n" name="i18n" location="simplebp" /> <!-- add our web resources --> <web-resource key="simplebp-resources" name="simplebp Web Resources"> <dependency>com.atlassian.auiplugin:ajs</dependency> <dependency>com.atlassian.confluence.plugins.confluence-create-content-plugin:resources</dependency> <transformation extension="soy"> <transformer key="soyTransformer"> <functions>com.atlassian.confluence.plugins.soy:soy-core-functions </functions> </transformer> </transformation> <resource type="download" name="simplebp.css" location="/css/simplebp.css" /> <resource type="download" name="simplebp.js" location="/js/simplebp.js" /> <resource type="download" name="simplebp.soy.js" location="/soy/simplebp.soy" /> <resource type="download" name="images/" location="/images" /> <context>create-content</context> </web-resource> <!-- Blueprint --> <blueprint key="my-blueprint" index-key="my-index" i18n-name-key="my.blueprint.name" how-to-use-template="MyPlugin.Blueprints.Simple.letsGetStarted" > <content-template ref="simplebp-template" /> <content-template ref="simplebp-template2" /> <dialog-wizard key="simplebp-wizard"> <dialog-page id="page1Id" template-key="MyPlugin.Blueprints.Simple.page1Form" title-key="my.blueprint.wizard.page1.title" description-header-key="my.blueprint.wizard.page1.desc.header" description-content-key="my.blueprint.wizard.page1.desc.content" last="true"/> </dialog-wizard> </blueprint> <!-- Add to the Create Menu --> <web-item key="create-by-sample-template" i18n-name-key="my.create-link.title" section="system.create.dialog/content"> <description key="my.create-link.description" /> <resource name="icon" type="download" location="/images/myblueprint.png" /> <param name="blueprintKey" value="my-blueprint" /> </web-item> <!-- Template for Blueprint --> <content-template key="simplebp-template" i18n-name-key="my.blueprint.title"> <resource name="template" type="download" location="/templates/mytemplate.xml" /> <!-- <context-provider --> <!-- class="com.example.plugins.tutorial.confluence.simplebp.MyContextProvider" /> --> </content-template> <!-- Second Template for Blueprint --> <content-template key="simplebp-template2" i18n-name-key="my.blueprint.title2"> <resource name="template" type="download" location="/templates/mytemplate2.xml" /> </content-template> </atlassian-plugin> -
Save and close the
atlassian-plugin.xmlfile. -
Rebuild your plugin using
atlas-packagefrom the command line, QuickReload automatically reloads your plugin for you. -
Now, when you click Create, the first page is your Let's get started page.
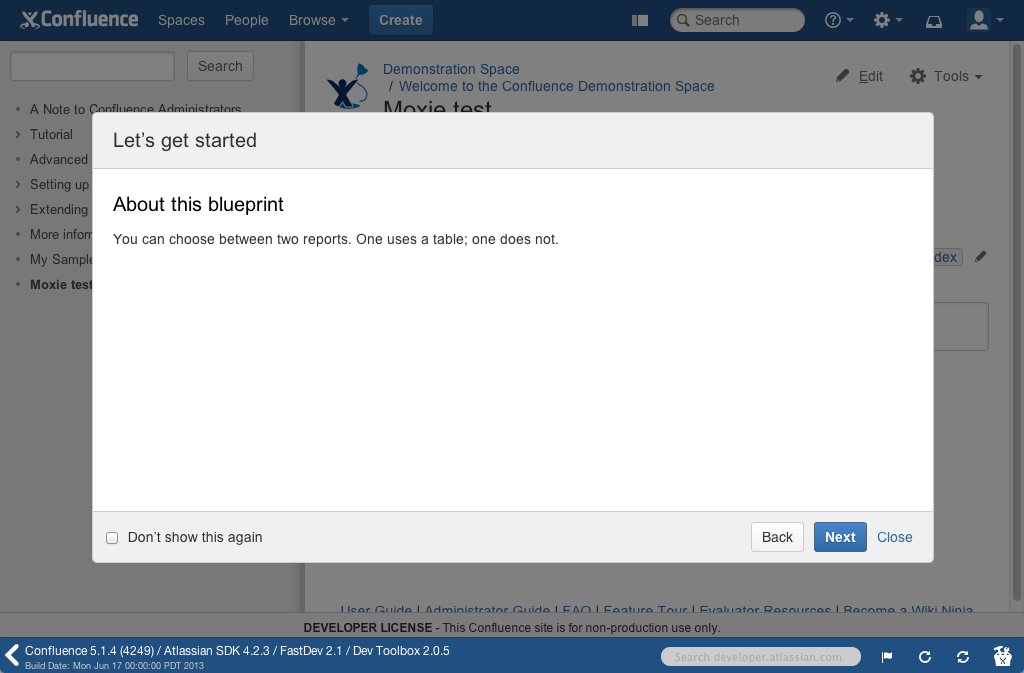
Users can choose to not see this page the next time they choose your blueprint.
Step 4. Add an event listener
You may want to take some action after the blueprint is created. You can listen for the BlueprintPageCreateEvent by implementing a listener class in your plugin.
In this step, you will implement an annotation-based listener that sends an event to the console when a plugin is created.
- Create a
com/example/plugins/tutorials/confluence/simplebp/MyBlueprintListener.javafile.
1
2package com.example.plugins.tutorial.confluence.simplebp;

import com.atlassian.confluence.plugins.createcontent.api.events.BlueprintPageCreateEvent;

@Named
public class MyBlueprintListener {

}
- Add imports for the
EventPublisher, EventPublisher, andModuleCompleteKey.
1
2import com.atlassian.event.api.EventListener;
import com.atlassian.event.api.EventPublisher;
import com.atlassian.plugin.ModuleCompleteKey;
import org.springframework.beans.factory.DisposableBean;
import org.springframework.beans.factory.InitializingBean;
import com.atlassian.plugin.spring.scanner.annotation.imports.ConfluenceImport;
import javax.inject.Inject;
import javax.inject.Named;
You'll inject the EventPublisher into your class and use the EventListener to handle the event. The ModuleCompleteKey helps the listener to recognize the appropriate events.
- Import the logger files:
1
2import org.slf4j.Logger;
import org.slf4j.LoggerFactory;
-
Declare
MY_BLUEPRINT_KEYas an instance ofModuleCompleteKeyand get an instance of the logger.1 2
private static final ModuleCompleteKey MY_BLUEPRINT_KEY = new ModuleCompleteKey("com.example.plugins.tutorial.confluence.simplebp.simplebp", "my-blueprint"); private static final Logger log = LoggerFactory.getLogger(MyBlueprintListener.class); -
Create a constructor that injects the
EventPublisherand sets its value to the private field:
1
2@ConfluenceImport
private EventPublisher eventPublisher;

@Inject
public MyBlueprintListener(EventPublisher eventPublisher) {
        this.eventPublisher = eventPublisher;
}
1 2<div class="sc-bsVVwV dTQzHb"><section class="sc-cmUJln dLaSMq"><div class="sc-ccXozh fGTBxl"><style data-emotion="css snhnyn">.css-snhnyn{display:inline-block;-webkit-flex-shrink:0;-ms-flex-negative:0;flex-shrink:0;line-height:1;}.css-snhnyn >svg{overflow:hidden;pointer-events:none;max-width:100%;max-height:100%;color:var(--icon-primary-color);fill:var(--icon-secondary-color);vertical-align:bottom;}.css-snhnyn >svg stop{stop-color:currentColor;}@media screen and (forced-colors: active){.css-snhnyn >svg{-webkit-filter:grayscale(1);filter:grayscale(1);--icon-primary-color:CanvasText;--icon-secondary-color:Canvas;}}</style><span aria-hidden="true" style="--icon-primary-color:#0747A6;--icon-secondary-color:#DEEBFF" class="css-snhnyn"><svg width="24" height="24" viewBox="0 0 24 24" role="presentation"><g fill-rule="evenodd"><path d="M2 12c0 5.523 4.477 10 10 10s10-4.477 10-10S17.523 2 12 2 2 6.477 2 12z" fill="currentColor"/><rect fill="inherit" x="11" y="10" width="2" height="7" rx="1"/><circle fill="inherit" cx="12" cy="8" r="1"/></g></svg></span></div><div class="sc-gYtlsd hAGtdX"><div class="sc-cLxPOX dZUhsH">
Note that we use standard JSR annotations @Named and @Inject to inject EventPublisher, you can use Spring annotation @org.springframework.stereotype.Component and @Autowired but then you need to add Spring dependencies. Also, we use @ConfluenceImport to mark it as OSGi component we want to import
1 2</div></div></section></div>
To start listening to Confluence events we need to register our class with EventPublisher. To make this, we will implement InitializingBean, and DisposableBean interfaces
1
2public class MyBlueprintListener implements InitializingBean, DisposableBean
    ```
    Implement `afterPropertiesSet()` and `destroy` methods :

    ``` java
    @Override
    public void afterPropertiesSet() throws Exception {
       eventPublisher.register(this);
    }

    @Override
    public void destroy() throws Exception {
       eventPublisher.unregister(this);
    }
-
To catch create blueprint page events, add an
onBlueprintCreateEvent()method.
You should use the@EventListenerannotation to indicate this method is called for a specific event type.1 2
@EventListener public void onBlueprintCreateEvent(BlueprintPageCreateEvent event) { String moduleCompleteKey = event.getBlueprint().getModuleCompleteKey(); if (MY_BLUEPRINT_KEY.getCompleteKey().equals(moduleCompleteKey)) { //take some action log.warn("WARN: Created a blueprint."); } }This method checks if the event comes from this plugin and, if it does, logs a WARN event. Typically, you would log an INFO event if any. However, in this sample, you just want to see the event log to the console.
-
Save and close the
MyBlueprintListener.javafile. -
Rebuild your plugin using
atlas-packagefrom the command line, QuickReload automatically reloads your plugin for you.
Now, after you click Create and save your new page, you'll see output similar to the following in your console:
1
2[INFO] [talledLocalContainer]  -- referer: http://localhost:1990/confluence/plugins/createcontent/createpage.action | url: /confluence/plugins/createcontent/docreatepage.action | userName: admin | action: docreatepage
[INFO] [talledLocalContainer] 2013-07-29 14:36:11,993 WARN [http-1990-6] [tutorial.confluence.simplebp.MyBlueprintListener] onBlueprintCreateEvent WARN: Created a blueprint.
[INFO] [talledLocalContainer]  -- referer: http://localhost:1990/confluence/plugins/createcontent/createpage.action | url: /confluence/plugins/createcontent/docreatepage.action | userName: admin | action: docreatepage
Rate this page: