General navigation UI locations
Available: | Jira 4.2 and later -- the following locations are available: |
Changed: | In Jira 4.0 -- the method of defining web items and web sections for the |
Top Navigation Bar Location
Jira 4.0 and later versions.
The system.top.navigation.bar location defines web sections and items in Jira's top navigation bar, which are accessible from all Jira areas (except Jira's administration area/mode).

You can add new drop-down menus each with their own web sections and web items to this navigation bar, or add new items to Jira's existing drop-down menus.
Adding Custom Drop-down Menus, Sections and Items
Adding a new drop-down menu with its own sections and items to the top navigation bar can be broken down into three module definition steps.
To add a new drop-down menu with its own sections and items:
-
Define a
<web-item>module for the drop-down menu itself- This web item module must include:
- A
sectionattribute with the value"system.top.navigation.bar". - A child
<link>element with alinkIdattribute and a unique value"linkId_for_my_dropdown_menu".
- A
- For example:
1 2
<web-item ... section="system.top.navigation.bar" ...> ... <link linkId="linkId_for_my_dropdown_menu" ...> ... </link> ... </web-item>- To make this drop-down menu accessible via a keyboard shortcut, add an i18n resource (as a property in any of your plugin's language resource files - for e.g. i18n.properties) whose property key is '
menu.accesskey.' followed immediately by the value of thelinkIDattribute defined in your web item module above. For example (following on from above):
menu.accesskey.linkId_for_my_dropdown_menu
The value of this property is the actual keyboard shortcut you want to use to access this drop-down menu (along with the browser's modifier/access keys). E.g.
1 2
# This property allows the 'linkId_for_my_dropdown_menu' drop-down menu to open when the user presses a combination of their browser's modifier keys + 'z': menu.accesskey.linkId_for_my_dropdown_menu=zAvoid choosing a keyboard shortcut that is already built in to Jira. For details on Jira's existing keyboard shortcuts, refer to Using Keyboard Shortcuts in the Jira User's Guide.
- This web item module must include:
-
Define one or more
<web-section>modules for this drop-down menu.-
Each of these web section modules must include:
- A
keyattribute with a unique value. - A
locationattribute whose value is that of thelinkIdattribute's value specified in the web item module for the drop-down menu (see Define a <web-item> module for the drop-down menu itself.).
- A
-
For example:
1 2
<web-section key="first_section_of_my_dropdown_menu" ... location="linkId_for_my_dropdown_menu" ...> ... </web-section>
-
-
Define a
<web-item>module for each item that appears in one of these web sections in this drop-down menu.-
Each of these web item modules must include a
sectionattribute whose value is:- The
linkIdattribute's value specified in the web item module for the drop-down menu (see Define a <web-item> module for the drop-down menu itself.), followed immediately by - A slash symbol
/, followed immediately by - The
keyattribute's value specified in the relevant web section module (see Define one or more <web-section> modules for this drop-down menu.).
- The
-
For example:
1 2
<web-item ... section="linkId_for_my_dropdown_menu/first_section_of_my_dropdown_menu" ...> ... </web-item>
-
Adding Items to Existing Drop-down Menus
Based on the process Adding Custom Drop-down Menus, Sections and Items, you can add your own item to an existing drop-down menu by defining a <web-item> module whose section attribute's value is:
- The
linkIdattribute's value specified in the web item module for the drop-down menu (defined in the Jira source code), followed immediately by - A slash symbol
/, followed immediately by - The
keyattribute's value specified in the relevant web section module (again found in the Jira source code).
For example, if you wanted to add a web item to the 'Dashboard' drop-down menu, the following diagram shows what values you would use for the section attribute of this web item, based on the web section of the drop-down menu.

Source File
To find the values of Jira's existing web items and sections for the system.top.navigation.bar location, view the following file in Jira's source archive:
<source-installation-directory>/jira-project/jira-components/jira-core/src/main/resources/system-top-navigation-plugin.xml
Customising the Positions of Menus, Items and Sections
To customise the position of your own web items or sections throughout Jira's top navigation bar, add a weight attribute to your <web-item> or <web-section> and adjust its value with respect to Jira's existing web items or sections.
- For web items that define the drop-down menu itself (see Define a <web-item> module for the drop-down menu itself.), lower weight values result in menus appearing closer to the left of the user interface.
- For web items and sections defined within a drop-down menu (see Define one or more <web-section> modules for this drop-down menu. and Define a <web-item> module for each item that appears in one of these web sections in this drop-down menu. above), lower weight values result in these items/sections appearing higher up the drop-down menu.
Former Top Navigation Bar Location
Versions of Jira prior to 4.0.
The system.top.navigation.bar location specifies up to 2 optional URL prefixes (in web items with section="system.top.navigation.bar"), which are used to determine whether or not the link is selected.
This is done by adding a param element with names: selected and selected2. See Web Item Plugin Module for details on how to add these elements.

User Name Drop-down Location
Jira 4.0 and later versions.
The system.user.options location defines web sections and items in Jira's user name drop-down menu, which is accessible from all Jira screens.
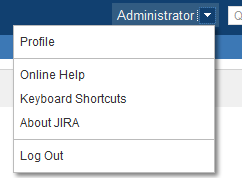
You can add new web items to existing web sections in the user name drop-down menu (see below), or add new sections to this menu along with new items.
Adding New Items to Existing Web Sections
To add your own web item to an existing web section of Jira's user name drop-down location, your web item must include a section attribute with the value "system.user.options/section_name", where section_name is the section of the user name drop-down menu to which the web item will be added.
For example, to add a web item module that defines a new item in the 'jira-help' section, your web item module would contain:
1
2<web-item ... section="system.user.options/jira-help" ...>
    ...
</web-item>
Existing Web Sections of the User Name Drop-down Location

Adding Custom Sections and Items
To add your own section to the user name drop-down menu, define a web section that includes a location attribute with the value "system.user.options".
For example, your web section module would contain:
1
2<web-section key="my-custom-user-name-dropdown-section" ... location="system.user.options" ...>
    ...
</web-section>
Adding new web items to your own sections is similar to the method Adding New Items to Existing Web Sections for adding new web items to existing web sections. However, specify the value of your web section's key attribute in the value of your web item's section attribute (preceded by the location). Hence, following on from the previous example, your web item would contain:
1
2<web-item ... section="system.user.options/my-custom-user-name-dropdown-section" ...>
    ...
</web-item>
Customising the Positions of Items and Sections
To customise the position of your own web items or sections in this location, add a weight attribute to your <web-item> or <web-section> and adjust its value with respect to Jira's existing web items or sections. Lower weight values result in these items/sections appearing higher up the user name drop-down menu.
Source File
To find the values of Jira's existing web items and sections for the system.user.options location, view the following file in Jira's source archive:
<source-installation-directory>/jira-project/jira-components/jira-core/src/main/resources/webfragment/system-user-nav-bar-sections.xml
Navigation Bar User Options Location
Versions of Jira prior to 4.0 only.
The system.user.navigation.bar location, defines web items or sections for user options at the top-right of Jira's navigation bar.
This location was replaced by the User Name Drop-down location in Jira 4.0+ (above).
Custom web items must be added to either the 'links' or 'views' web sections of this location in Jira:
linksweb section -- allows its links to be plain or pop-up links.- To make a link to be a pop-up link, set a
paramelement with nameisPopupLinkas true. Additional parameters can be set to dynamically set the height (windowHeight), width (windowWidth) and whether to have scrollbars (scrollbars) for the pop-up.
- To make a link to be a pop-up link, set a
viewsweb section -- displays all its links as icons and requires theiconelement.
See Web Item Plugin Module for details on how to add these elements.

Tools Drop-down on User Profile Location
The system.user.profile.links location defines web items of the 'Tools' drop-down menu on a Jira user's user profile page.
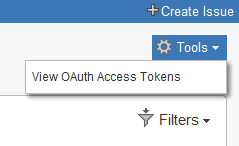
This location has only one section (operations) to which custom web items can be added.
Adding Custom Items
To add your own web item to the Tools drop-down location, your web item must include a section attribute with the value "system.user.profile.links/operations".
For example, to add a web item module that defines a new project operation link on a project configuration page, your web item module would contain:
1
2<web-item ... section="system.user.profile.links/operations" ...>
    ...
</web-item>
It is not possible to add your own web sections to the system.user.profile.links location.
Customising the Positions of Items
To customise the position of your own web items in this location, add a weight attribute to your <web-item> and adjust its value with respect to Jira's existing web items. Lower weight values result in these items appearing higher up the drop-down menu.
Source File
To find the values of Jira's existing web items for the system.user.profile.links location, view the following file in Jira's source archive:
<source-installation-directory>/jira-project/jira-components/jira-core/src/main/resources/webfragment/system-user-profile-links.xml
Preset Issue Filters Drop-down on Project Summary Location
In Jira 4.0 and later, the system.preset.filters location defines web items of the 'Filters' drop-down menu on the project summary page of a Jira project.
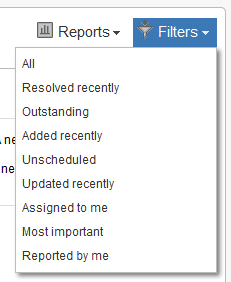
In versions of Jira prior to 4.0, the system.preset.filters location defines links on the Project portlet of the dashboard and on the right-hand side of Browse Project page.
The filter links are only defined once and reused in both places.
Links are displayed in two columns from left to right, then down (that is, the right column contains every second link).

Adding Custom Items
To add your own web item to Jira's preset issue filters drop-down location, your web item must include a section attribute with the value "system.preset.filters".
For example, to add a web item module that defines a new 'Filters' drop-down menu link (on a project summary page), your web item module would contain:
1
2<web-item ... section="system.preset.filters" ...>
    ...
</web-item>
It is not possible to add your own web sections to the system.preset.filters location.
Customising the Positions of Items
To customise the position of your own web items in this location, add a weight attribute to your <web-item> and adjust its value with respect to Jira's existing web items. Lower weight values result in these items appearing higher up this 'Filters' drop-down menu.
Source File
To find the values of Jira's existing web items and sections for the system.preset.filters location, view the following file in Jira's source archive:
<source-installation-directory>/jira-project/jira-components/jira-core/src/main/resources/system-preset-filters-sections.xml
Hover Profile Links Location
Available in Jira 4.2 and later.
The system.user.hover.links location defines web items in Jira's hover profile feature, which is accessible when a user hovers their mouse pointer over a Jira user's name throughout Jira's user interface.
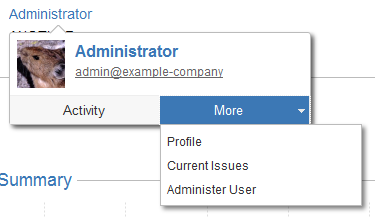
Adding Custom Items
To add your own web item to Jira's hover profile links location, your web item must include a section attribute with the value "system.user.hover.links".
For example, to add a web item module that defines a new hover profile link, your web item module would contain:
1
2<web-item ... section="system.user.hover.links" ...>
    ...
</web-item>
It is not possible to add your own web sections to the system.user.hover.links location.
Customising the Positions of Items
To customise the position of your own web items in this location, add a weight attribute to your <web-item> and adjust its value with respect to Jira's existing web items. Lower weight values result in these items appearing to the left and then higher up the hover profile drop-down menu.
Source File
To find the values of Jira's existing web items and sections for the system.user.hover.links location, view the following file in Jira's source archive:
<source-installation-directory>/jira-project/jira-components/jira-core/src/main/resources/system-user-format-plugin.xml
Dialog Box Hint Location
Available in Jira 4.2 and later.
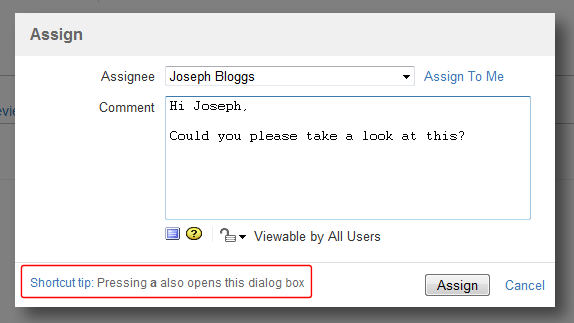
The jira.hints location defines web items that allow you to add hints on Jira's dialog boxes. You can add hints to most Jira dialog boxes.
Adding Custom Items
To add your own web item to Jira's dialog box hints location for a specific dialog box, your web item must include a section attribute with the value "jira.hints/LOCATION_CONTEXT", where LOCATION_CONTEXT is a predefined 'context' in Jira that determines on which dialog box your hints will appear.
The following table lists these predefined contexts available in Jira's dialog box hint location.
Context | Description |
|---|---|
TRANSITION | Hints on a 'transition issue' dialog box. |
ASSIGN | Hints on the 'Assign' dialog box. |
LABELS | Hints on the 'Labels' dialog box. |
COMMENT | Hints on 'Comment' dialog boxes. |
CLONE | Hints on 'Clone Issue' dialog box. |
DELETE_FILTER | Hints on 'Delete Filter' dialog box. |
ATTACH | Hints on 'Attach Files' dialog box (not the 'Attach Screenshot' one). |
DELETE_ISSUE | Hints on 'Delete Issue' dialog box. |
LINK | Hints on 'Link Issue' dialog box. |
LOG_WORK | Hints on 'Log Work' dialog box. |
For example, to add a web item module that defines hints on the 'Attach Files' dialog box, your web item module would contain:
1
2<web-item ... section="jira.hints/ATTACH" ...>
    ...
</web-item>
Source File
To find out how existing web items for the jira.hints location are implemented in Jira, view the following file in Jira's source archive:
<source-installation-directory>/jira-project/jira-components/jira-core/src/main/resources/webfragment/system-hints.xml
Rate this page: