Project settings UI locations
Available: | Jira 4.4 and later |
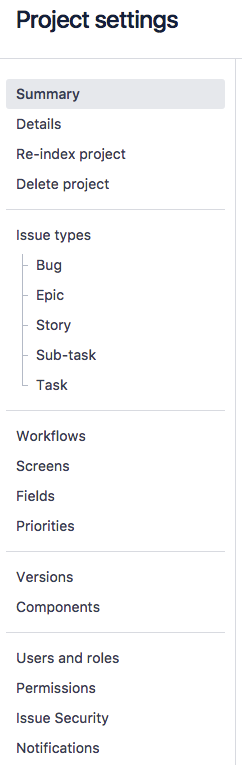
Project configuration administration location
Web Fragment Finder can be useful when looking for Jira UI locations. Note that it is a third-party tool that is not supported by Atlassian.
The atl.jira.proj.config location defines web sections (for groups of tabs) and web items (for individual tabs
within a group) that are available when viewing a project's configuration in Jira's administration area.
You can add new web items to predefined web sections (that is, groups of tabs) or add new sections along with their own items.
Adding new items to existing web sections
To add your own web item to an existing web section (that is, groups of tabs) of Jira project configuration
in the administration area, your web item must include a section attribute with the value
"atl.jira.proj.config/existing_web_section_name", where existing_web_section_name is the existing group
of tabs to which the web item will be added.
The following table lists these existing web sections (by existing_web_section_name) and the existing web items
associated with these web sections. The weight attribute values associated with each web section and item are
indicated in brackets.
For more information about the purpose of this attribute, see Customizing the positions of items and sections.
Group of tabs | Web items associated with this group of tabs |
|---|---|
projectgroup1 (10) | Summary (10) |
projectgroup2 (20) | Workflows (20) |
projectgroup3 (30) | Versions (10) |
projectgroup4 (40) | Users and roles (15) |
For example, to add a web item module that defines a new item in the projectgroup3 section, which appears between
the existing Versions and Components web items, your web item module should contain the following:
1
2<web-item key="my_new_tabbed_item_in_an_existing_project_group" ... section="atl.jira.proj.config/projectgroup3" ... weight="15">
    ...
</web-item>
Adding custom sections and items
To add your own section to the username drop-down menu, define a web section that includes a location attribute
with the value "atl.jira.proj.config".
For example, your web section module should contain the following:
1
2<web-section key="my-custom-group-of-tabs-section" ... location="atl.jira.proj.config" ...>
...
</web-section>
Adding new web items to your own sections is similar to the method for adding new web items to existing web sections.
However, you need to specify the value of your web section's key attribute in the value of your web item's
section attribute (preceded by the location). So, based on the previous example, your web item should contain this:
1
2<web-item key="my_new_tabbed_item_in_a_custom_project_group" ... section="atl.jira.proj.config/my-custom-group-of-tabs-section" ...>
...
</web-item>
Ensuring a web item is displayed by default in a project configuration
To ensure that a particular web item (that is, tabbed page) is displayed after a Jira administrator accesses a project's configuration by selecting the project's menu item, do the following:
-
Define a
metaelement in your HTML template file (such as a Velocity template file) with the attributename="admin.active.section".This element links your HTML template to the menu item that you defined previously in either "Adding new items to existing web sections" or "Adding custom sections and items" section of this page.
- This
metatag should also contain acontentattribute whose value is the project configuration administration location ("atl.jira.proj.config").
For example:
1 2
<meta name="admin.active.section" content="atl.jira.proj.config"/> - This
-
Define another
metatag in the HTML template file with the attributename="admin.active.tab".This element specifies the tabbed page that is displayed by default after a Jira administrator selects the project menu item.
-
This
metatag should also contain acontentattribute whose value is thekeyattribute's value specified in theweb-itemmodule you defined above for either an existing or custom group of tabs. -
For example, following on from the procedure of adding custom sections and items for defining a web item module for a custom group of tabs:
1 2
<meta name="admin.active.tab" content="my_new_tabbed_item_in_a_custom_project_group"/>
-
Customizing the positions of items and sections
To customize the position of your own web items or sections in this location, add a weight attribute to your
web-item or web-section and adjust its value with respect to Jira's existing web items or sections.
Lower weight values result in these items or sections appearing higher up the page.
Source File
To find the values of Jira's existing web items and sections for the atl.jira.proj.config location,
check the following file in Jira's source archive:
<source-installation-directory>/jira-project/jira-components/jira-plugins/jira-project-config-plugin/src/main/resources/atlassian-plugin.xml
Project configuration administration – summary tab location
The webpanels.admin.summary.left-panels and webpanels.admin.summary.right-panels locations define web panels for
individual panels/segments of an HTML page when viewing the summary tab of a project's configuration in Jira
administration area.
The two webpanels.admin.summary.left-panels and webpanels.admin.summary.right-panels locations define web
panels for the respective left and right hand sides of this summary tab.
webpanels.admin.summary.left-panels

webpanels.admin.summary.right-panels

Adding custom panels
To add your own web panel to the summary tab location of Jira project configuration administration, your web panel must include a location attribute with one of the following values:
"webpanels.admin.summary.left-panels"– to add a panel to the left hand side of the summary tab page."webpanels.admin.summary.right-panels"– to add a panel to the right hand side of the summary tab page.
For example, to add a web panel module that defines a new section on the right of the summary tab page, your web panel module should contain this:
1
2<web-panel ... location="webpanels.admin.summary.right-panels" ...>
    ...
        <label key="my-new-panel.title"/>
    ...
</web-panel>
Panel Headings
If you want to create a "panel label" (that is, the collapsible heading that appears at the top of the panel),
define a label element with a key attribute whose value defines a unique property (that is, my-new-panel.title
based on the example above). The string value of this unique property (defined in your plugin's i18n.properties file)
will be shown in bold text at the top of your section.
If you do not want a heading to appear at the top of the panel, include the following child element in your
web-panel module:
1
2<param name="headless">true</param>
Customizing the positions of panels
To customize the position of your own web panels in this location, add a weight attribute to your web-panel and
adjust its value with respect to Jira's existing web panels.
Lower weight values result in these panels appearing higher up the summary tab page.
Source file
To find the values of Jira's existing web panels for the webpanels.admin.summary.left-panels and
webpanels.admin.summary.right-panels locations, check the following file in Jira's source archive:
<source-installation-directory>/jira-project/jira-components/jira-plugins/jira-project-config-plugin/src/main/resources/atlassian-plugin.xml
Project configuration operations location
In Jira 4.4 and later, the system.view.project.operations location defines web items of the "Actions" drop-down menu
when viewing a project's configuration in Jira's administration area.

Adding custom items
To add your own web item to Jira project configuration operations location, your web item must include a
section attribute with the value "system.view.project.operations".
For example, to add a web item module that defines a new project operation link on a project configuration page, your web item module should contain:
1
2<web-item ... section="system.view.project.operations" ...>
    ...
</web-item>
Rate this page: