Managing containerised services (EAP)
Forge Containers are now available through Forge's Early Access Program (EAP). To start testing this feature, submit your app's ID to our team through this link.
EAPs are offered to selected users for testing and feedback purposes. APIs and features under EAP are unsupported and subject to change without notice. APIs and features under EAP are not recommended for use in production environments.
For more details, see Forge EAP, Preview, and GA.
Forge Containers let you package, deploy, and operate services as part of your app, leveraging container technology directly on Atlassian’s infrastructure. This unlocks a broader range of languages, frameworks, and architectures for parts of your app workflow.
The primary goal of Forge Containers is to provide capabilities for hosting and managing the lifecycle of containerised services used by your app.
EAP limitations
Forge Containers is available as part of our Early Access Program (EAP). While in EAP, we will be continuously updating Forge Containers to fix bugs, add functionality, and address developer feedback. At present, Forge Containers has the following limitations:
-
An app can only have one containerised service, and this service can only have one defined container. For a complete list of EAP limitations (along with our plans to address and mitigate each one), refer to Roadmap.
-
Containerised services can't be de-provisioned. Once your app is deployed and installed, its service instance can't be deleted, even if you delete its definiton from the manifest file and re-deploy.
Container lifecycle
Your app’s containerised service lifecycle begins when you upload the service’s container image to a Forge Containers private repository (identified by URI). Each repository stores all images related to a specific container, and each image has a tag for identification. You can use tags to specify which one to use for specific environments.
The following diagram provides a high-level view of the container lifecycle:
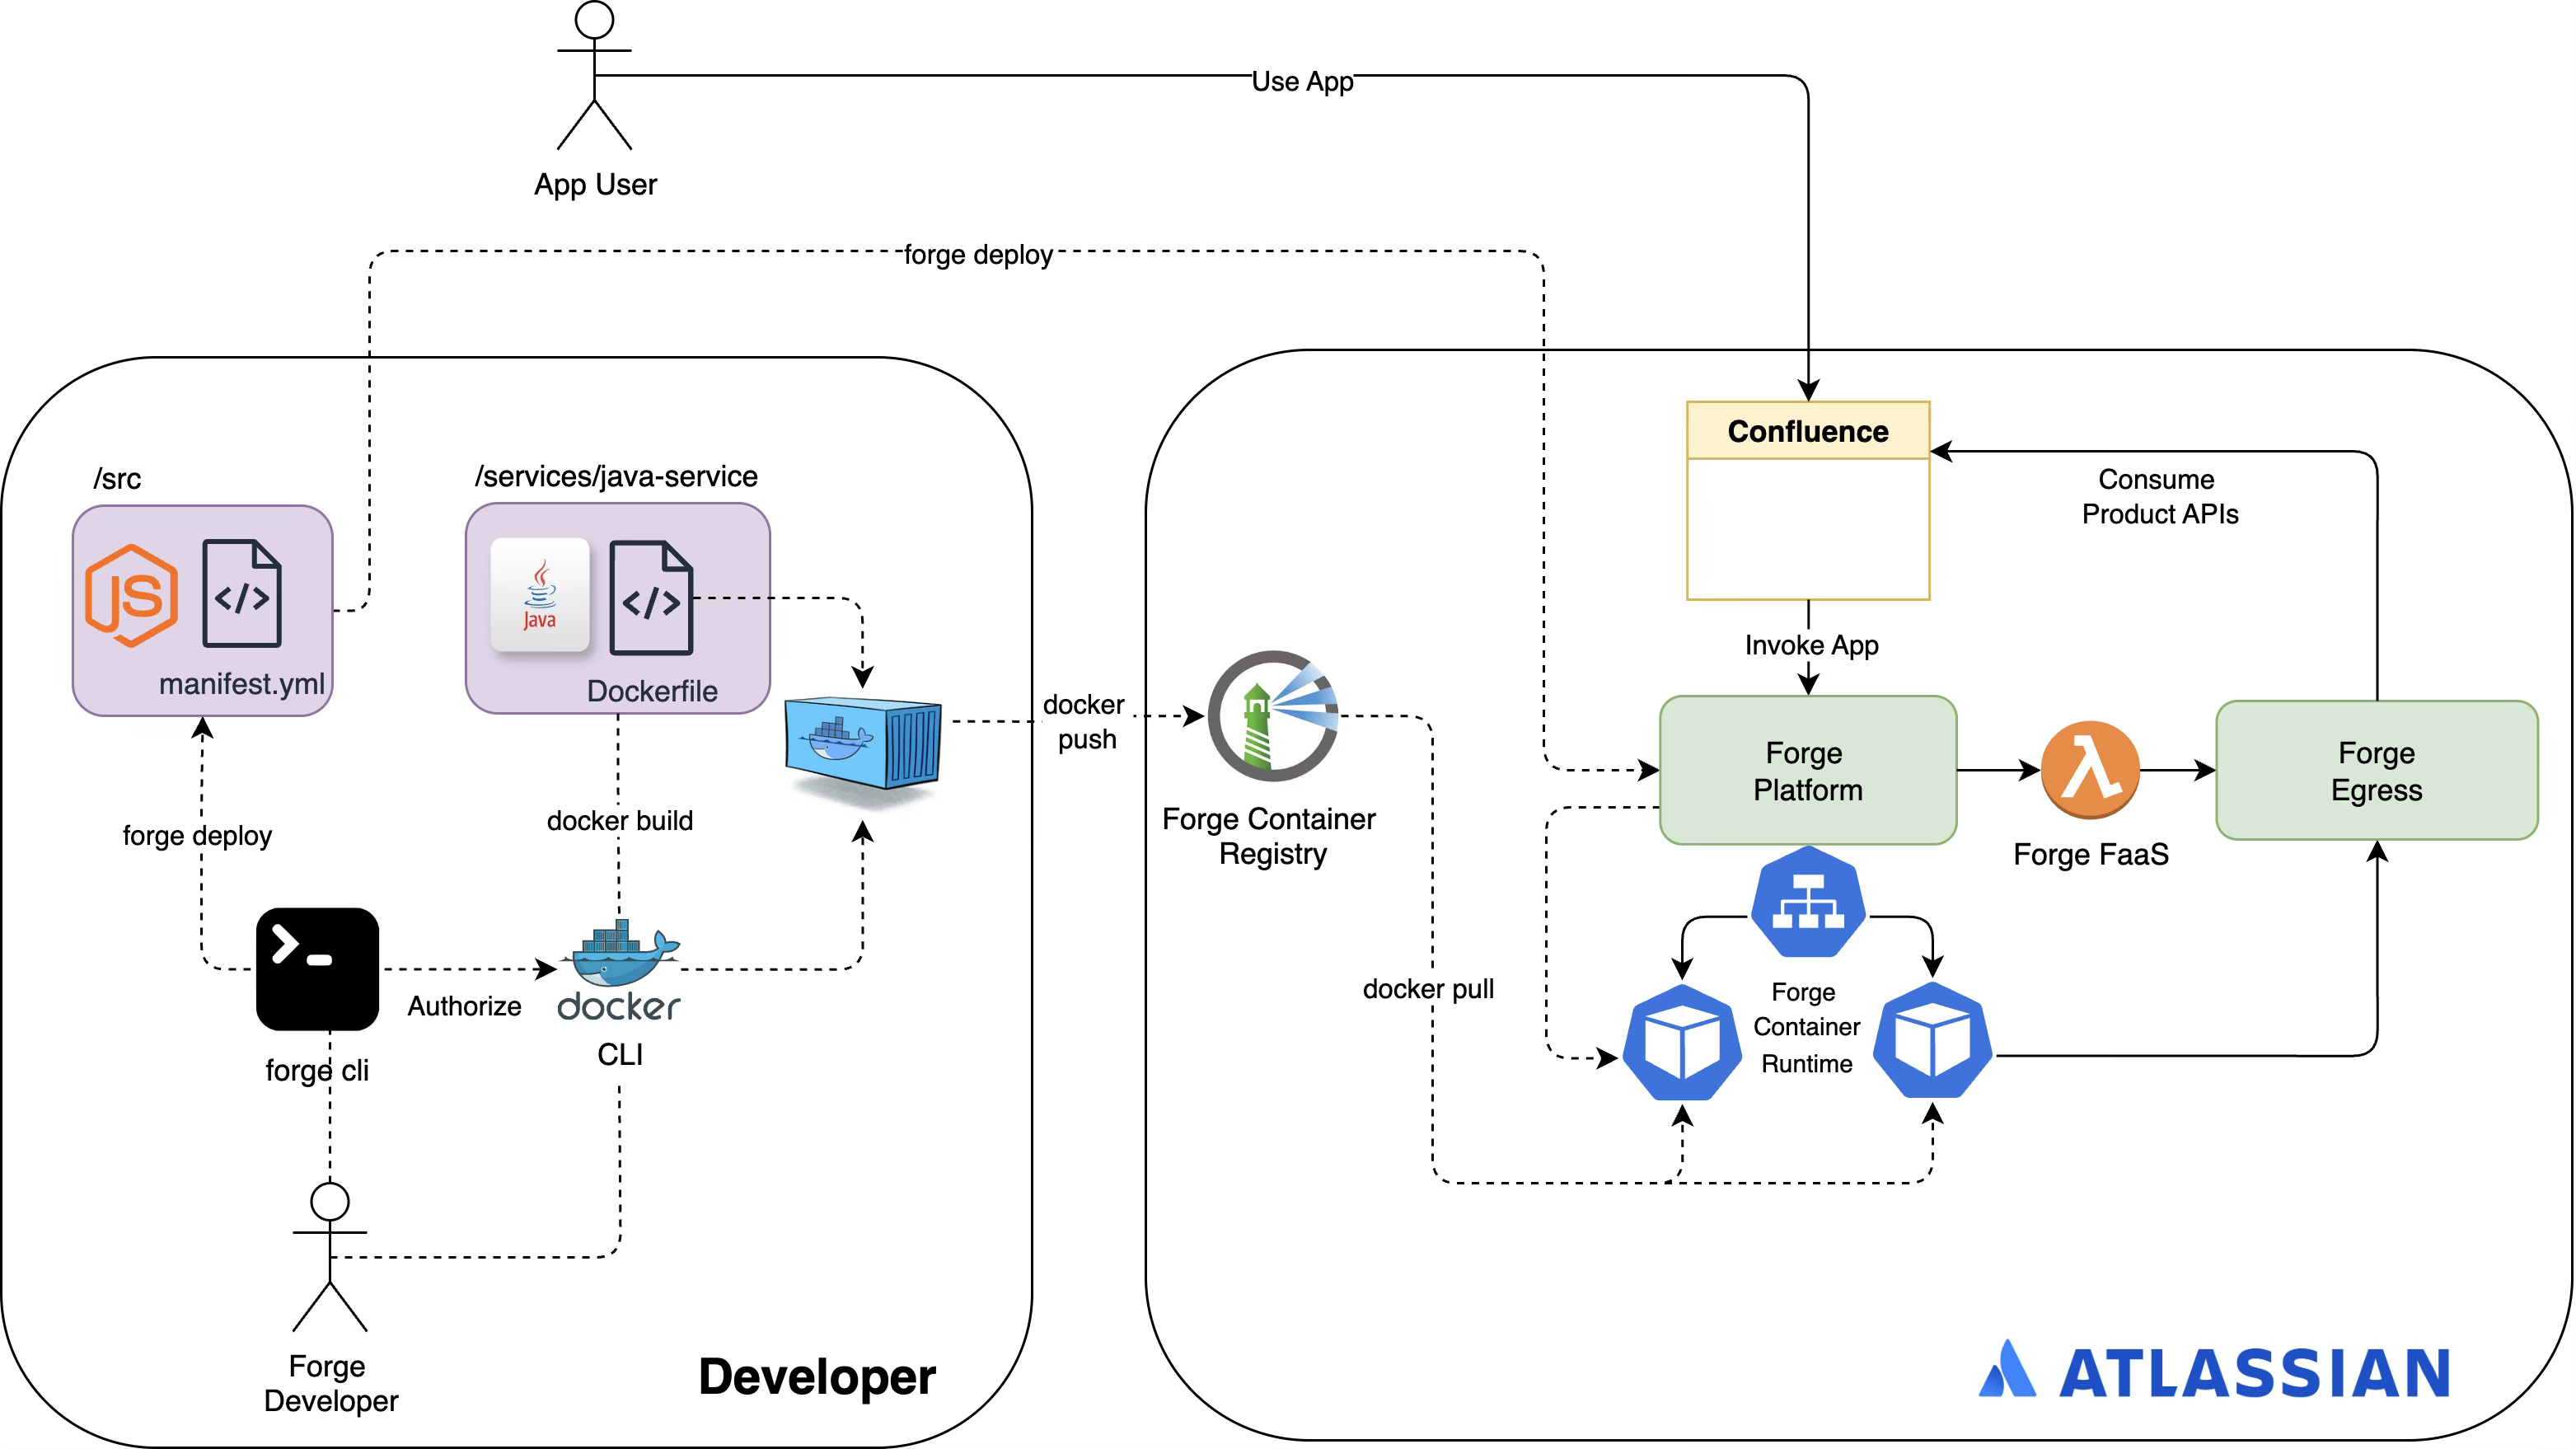
This lifecycle involves the following major phases:
- Image creation: You build a container image that packages your app code and dependencies. You can choose your own platform and tools for doing so, although we recommend Docker as we use
docker pushfor the next step. - Image upload: You upload the image to a private, Forge-managed container repository using
docker push. For information on creating a repository, refer to the Create a repository. - Container deployment: When you deploy your app (
forge deploy), Forge launches your containerised service from the image in the registry. The image is selected by tag, which is specified in the manifest. The following sections describe each procedure involved in this lifecycle.
Runtime command restrictions
The Forge Containers security standard only allows non-root users with a UID and GID of 1000
to execute container runtime commands.
Any containers with runtime commands executed by root will fail to deploy.
Example
The Dockerfile of our
sample app's java-spring-server service creates appuser and sets
it to execute all container runtime commands:
1
2RUN useradd -u 1000 -r -s /bin/false appuser
[...]
USER appuser
Versioning
Running container instances are shared across all app versions. If you have multiple installations of your app with different major versions, only a single container service is run. Your code may need to defensively handle situations where an installation does not have grants for scopes added in newer major versions.
Tagging
Image tags like latest won't work; we recommend using environment variables on your tagging scheme.
Examples
Use UNIX epoch
1
2export TAG=$(date +%s)
Use Git hash
1
2export TAG=${BITBUCKET_COMMIT:0:8}
Termination behaviour
Forge containers can be terminated and replaced at any time. To allow a container to shut down gracefully, the following sequence applies to a container that is being terminated:
- A
SIGTERMsignal is sent to the main process (PID 1) in the container. - The container has a grace period of 30 seconds for cleanup and exit.
- If the process is still running after 30 seconds, a
SIGKILLsignal is sent to forcibly terminate the process.
Ensure your application handles SIGTERM to shut down gracefully.
If your container uses a startup shell script as its entry point to spawn the application process, use exec when starting your application so that it becomes PID 1 and receives SIGTERM directly.
Set service to listen correctly
To receive requests, set your containerised service to listen to the port set on the SERVER_PORT environment variable (by default, Forge sets this to 8080). See Environment variables for a complete list of all variables exported to each container service.
Refer to our sample app for more details.
Create a repository
Forge deploys your container service from a tagged image stored in your app’s Forge Container repository. To create this repository, run forge containers create and enter a name for your service.
1
2forge containers create
Create a new container.
? Enter a name for your container: java-service
Creating new container with key 'java-service'.
Press Ctrl+C to cancel.
✔ Container created.
New repository URI: forge-ecr.services.atlassian.com/forge/5175c066-7f18-474e-9137-19e6718a8c99/java-service
The command will provide you with the URI of your repository, which you’ll use later when you push or upload images.
Define a service
Use the services section of the Forge manifest to define a service for your app, along with its container. For example:
1
2services:
  - key: java-service
    containers:
      - key: java-service
        tag: latest
        resources:
          cpu: "1"
          memory: "2Gi"
        health:
          type: http
          route:
            path: "/healthcheck"
    scaling:
      min: 1
      max: 1
The services property that defines a service backed by a container, which is defined in containers. The containers property lets you configure the container’s resource, scaling, and health check settings.
The tag property specifies which image (from the container repository) Forge should use when deploying your container.
Build an image
When building your container’s image, specify the following:
- Operating system must be
linux - Architecture must be
amd64 - A tag that includes the repository URI For example, with the Docker CLI, run:
1
2docker build . -t "forge-ecr.services.atlassian.com/forge/5175c066-7f18-474e-9137-19e6718a8c99/java-service:latest" --platform linux/amd64
Upload an image
You’ll need to authenticate your image upload tool before using it to push images to your container repository. To do this with Docker CLI, run forge containers docker-login. This command creates a temporary API token scoped to this specific Forge pp and adds it to the Docker CLI.
If you use a different image upload tool, run forge containers get-login to retrieve your temporary API token instead.
Once authenticated, you can upload images to your container repository (through its URI). For example:
1
2docker push "forge-ecr.services.atlassian.com/forge/5175c066-7f18-474e-9137-19e6718a8c99/java-service:latest"
Deploy the service
With this release, Forge will automatically launch an instance of your service when you run the forge deploy command. See Command: deploy for related details.
Start Up Health
Your container must pass health checks before deployment is marked successful and traffic can be routed to it. During startup, your container has up to 50 seconds to begin responding with an HTTP status code between 200 and 399 (inclusive); each health check request has a 3 second timeout. If your container doesn't respond successfully within the startup period, it'll be restarted once; if it fails again during the second attempt, the deployment will fail.
Runtime Health
Once your container is running, it must continue responding successfully to health checks to receive traffic. If it is unresponsive for longer than ~10 seconds, traffic will cease routing to it. If it stays unhealthy for ~20 more seconds, it will be restarted.
Test invocation locally
You can use forge tunnel to test your containerised service locally before pushing its image to Forge. See Testing a containerised service locally for information on setting this up.
Monitor your service
You can monitor the following through the Developer Console:
- Container invocation response time (through Invocation metrics)
- Logs
You can also view logs for service invocations using the forge logs --containers command.
For example:
1
2forge logs -c | grep -o '{.*}' | jq '.'
{
  "@timestamp": "2025-06-09T04:46:59.196716991Z",
  "@version": "1",
  "message": "Received Get Kvs response: <200 OK OK,{\"value\":\"test-value\",\"key\":\"test-key\"},[:status:\"200\", content-length:\"39\", content-type:\"application/json; charset=utf-8\", date:\"Mon, 09 Jun 2025 04:46:59 GMT\", forge-proxy-upstream-latency:\"88\", server:\"Caddy\", \"envoy\", strict-transport-security:\"max-age=31536000\", x-envoy-upstream-service-time:\"99\"]>",
  "logger_name": "com.atlassian.container.WebTriggerEndpoint",
  "thread_name": "http-nio-8080-exec-3",
  "level": "INFO",
  "level_value": 20000,
  "invocationId": "804edb684056c101eeab78c7e194258d7d0b6b6f"
}
{
  "@timestamp": "2025-06-09T04:46:59.197144784Z",
  "@version": "1",
  "message": "Fetching book by title",
  "logger_name": "com.atlassian.container.db.BookRepository",
  "thread_name": "http-nio-8080-exec-3",
  "level": "INFO",
  "level_value": 20000,
  "invocationId": "804edb684056c101eeab78c7e194258d7d0b6b6f"
}
[...]
Rate this page: