Server-side installation
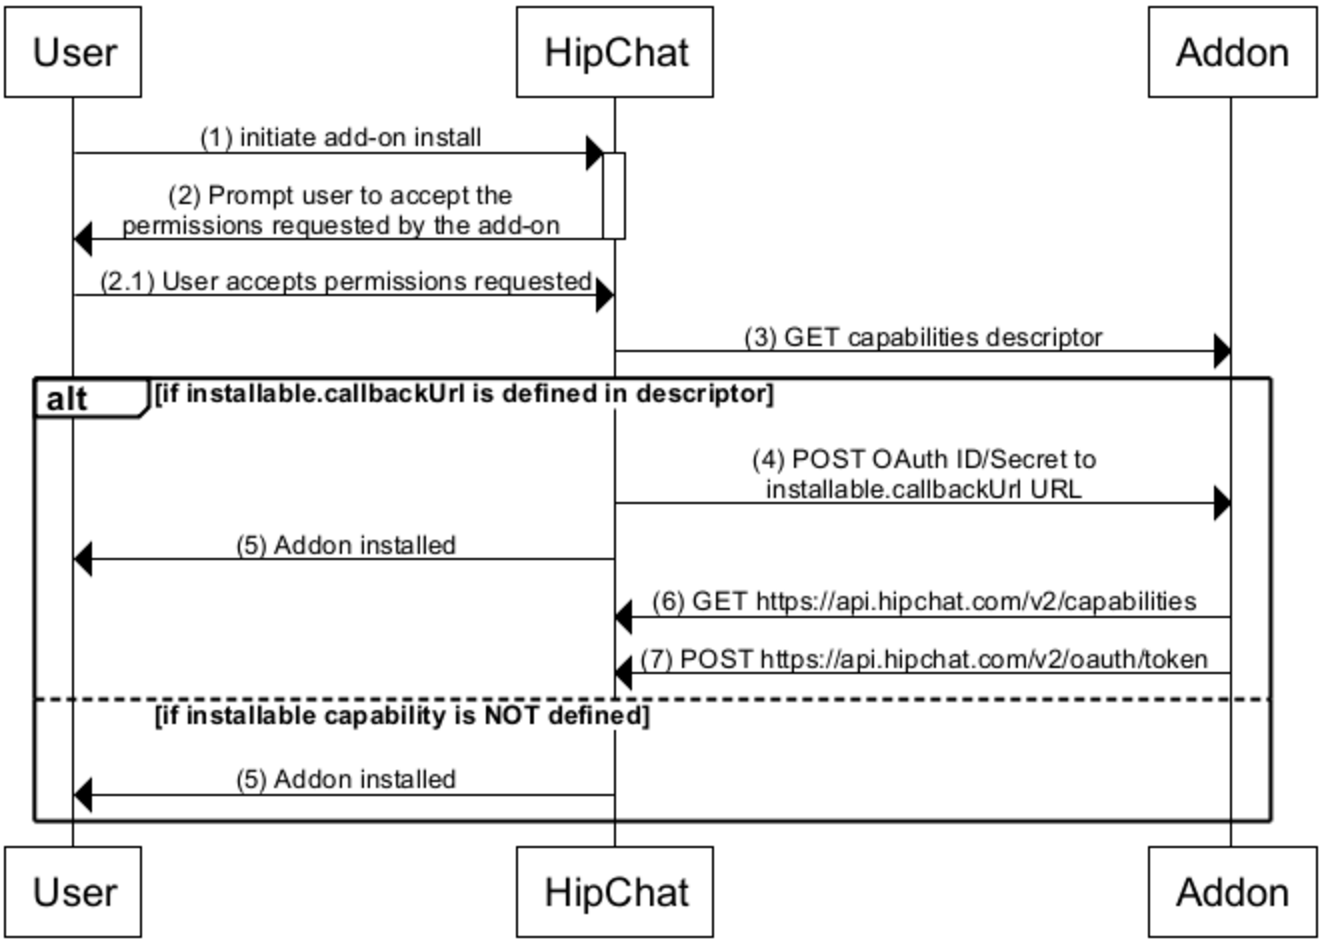
At a high level:
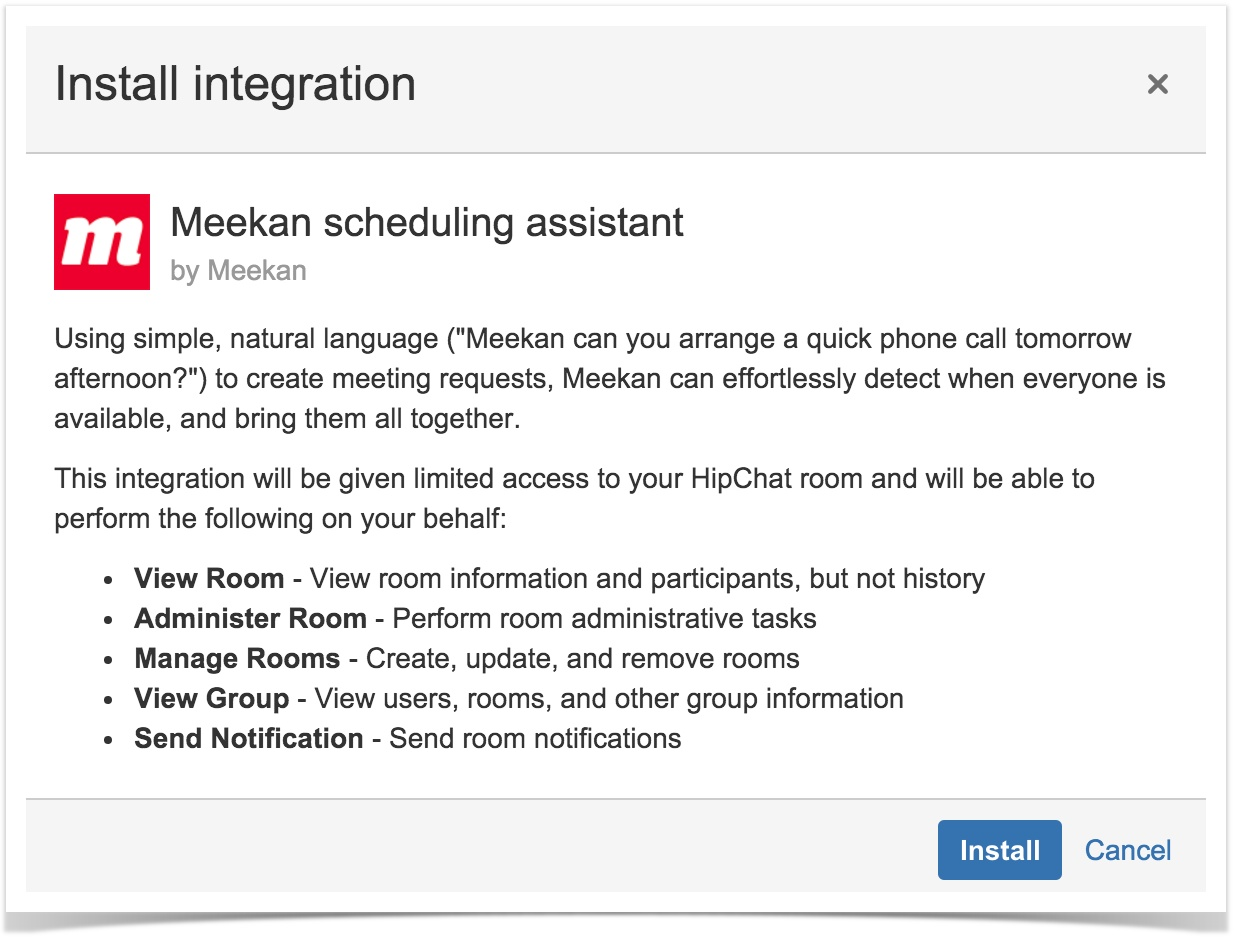
- Users are presented with a dialog asking them to approve the installation of the add-on
- Once the add-on is installed in HipChat, HipChat posts the installation context to a URL you provide in the descriptor
- The message HipChat sends you contains an OAuth ID and OAuth secret, as well as a capabilities document telling your add-on what URLs to invoke to talk to the HipChat REST API
- You can use the OAuth information provided to generate tokens using a standard OAuth2 flow
- You use these tokens to invoke the HipChat REST API
Capability descriptor
Here is a descriptor for an add-on using the server-side installation flow:
1
2{
  "capabilities": {
    ...,
    "installable": {
      "allowGlobal": false,
      "allowRoom": true,
      "callbackUrl": "https://your-addon-url/installed",
      "updateCallbackUrl": "https://your-addon-url/updated"
    },
    "configurable": {
      "url": "https://your-addon-url/configuration"
    },
    ...
}
-
installable: information about where/how the add-on should be installed in HipChatallowGlobal: set totrueif your add-on can be installed globally (which makes it accessible in all rooms). Default:trueallowRoom: set totrueif your add-on can be installed in a room. Default:truecallbackUrl: the URL HipChat will POST the installation information to.updateCallbackUrl(optional): the URL HipChat will POST to when an administrator re-installs the add-on. If this attribute is missing, thecallbackUrlwill receive new installation information, so use this attribute if you want to preserve the OAuth ID across re-installs.
-
configurable(optional): if your add-on exposes a configuration page to usersurl: the url of the configuration page exposed by your add-on
Installation flow

1. The user triggers the installation. See Installation triggers for more details.
- The user receives a prompt asking them to review and approve the permissions the add-on is requesting (aka, Scopes). For example:

-
HipChat makes a GET request for the capabilities descriptor at the URL registered in HipChat or the Atlassian Marketplace by the add-on vendor.
-
If the add-on declares the
installablecapability in its descriptor, HipChat will send the installation data by POSTing to a URL you specified in your descriptor'scapabilities.installable.callbackUrlproperty. Make sure to save this information. The body of the POST contains:
1
2{
     "capabilitiesUrl": "https://api.hipchat.com/v2/capabilities",
     "oauthId": "abc",
     "oauthSecret": "xyz",
     "groupId": 123,
     "roomId": 1234
}
- A capabilities URL: link to the installation's capability document which lists the URLs for the HipChat REST endpoints.
- OAuth ID
- OAuth secret
- Group ID
- Room ID (optional): which room the add-on was installed in.
- HipChat considers the add-on installed and will let the user know that it's been installed and ready to be used.
Next, do the following from your add-on:
-
Retrieve the installation's capability document: issue a GET for the capabilitiesUrl. Look for
capabilities.oauth2Provider.tokenUrlin the capabilities document for the installation. -
Issue a POST to
capabilities.oauth2Provider.tokenUrlusing the OAuth ID and secret you saved from above. Here's a sample curl:
1
2curl '<capabilities.oauth2Provider.tokenUrl>' -H 'Content-Type: application/x-www-form-urlencoded' -u <oauthid>:<oauthsecret> --data 'grant_type=client_credentials&scope=<list of scopes>'
In return, you'll get the access_token details:
1
2{
  access_token: '5236346233724572457245gdgreyt345yreg',
  expires_in: 431999999,
  group_id: 123,
  group_name: 'Example Company',
  scope: 'send_notification',
  token_type: 'bearer'
}
Save this information in your datastore. You'll use this token to make authenticated requests against the HipChat API. Note that this token does expire. Use the expires_in (in seconds) property to determine when you should refresh the token. When the access_token expires, you can repeat step 7 to obtain a new token.
Learn more
Configuration flow
If your add-on exposes a configuration page to users via configurable/url, the configuration page will be exposed to users in a dialog post installation.
Learn more
Handling add-on uninstallations
When a user uninstalls your add-on, your add-on receives a HTTP DELETE request to the installable/callbackUrl specified in the capability descriptor, but this time with the OAuth ID appended to the path.
so if your callback URL is https://my-addon.com/installable and the OAuth ID value for the installation was "12345", the URL for uninstallation will be https://my-addon.com/installable/12345.
Whether your application returns a 200 response or not, the uninstallation will be allowed to continue.
To verify the uninstallation request, you can again choose to attempt to request an OAuth token, which should be rejected due to the uninstallation already taking place on the HipChat server.
Handling add-on updates
When a HipChat administrator re-installs your integration, you would ordinarily receive a new installation request which supersedes the previous one. This means that your add-on will be issued a new OAuth ID and secret, and all existing OAuth tokens become invalid. You can choose to preserve the existing OAuth ID by registering an update endpoint using installable.updateCallbackUrl. If this URL is specified in the descriptor, HipChat will POST an update event to your add-on on re-installation, with the same payload as on uninstallation:
1
2{
     "capabilitiesUrl": "https://api.hipchat.com/v2/capabilities",
     "oauthId": "abc",
     "roomId": 1234
}
Rate this page: