Developing for Atlassian Government Cloud?
This content is written with standard cloud development in mind. To learn about developing for Atlassian Government Cloud, go to our Atlassian Government Cloud developer portal.
Ending Connect support
You can no longer publish Connect apps on the Atlassian Marketplace. All new extensibility features will be delivered only on Forge.
Refer to this blog post for our timeline to end Connect support.
Have an existing Connect app? You can incrementally migrate it to Forge.
Getting started with Connect
Connect is a development framework for extending Atlassian cloud products. Connect gives you control over the tech stack, infrastructure, and integration with Atlassian Cloud products. You determine your security implementation and authentication with external cloud providers, such as AWS, Google Cloud, or Heroku. It handles discovery, installation, authentication, and seamless integration into the user interface.
In this tutorial, you'll learn how to use Connect to develop apps for Jira Cloud products, including:
This includes getting an Atlassian cloud development instance, setting up your local development environment, and validating your setup by building and deploying a Hello World app.
Before you begin
To complete this tutorial, you need the following:
- Your favorite IDE or text editor
- A basic knowledge of JavaScript and web development
- A basic understanding of Jira
- Node.js (version 12.1.0 or later). You also need npm, which is included with Node.js
- A tool to tunnel your local development environment to the internet. We recommend ngrok, which is free and easy to use
Set up your development environment
You need the following things to develop for Jira Cloud:
- A developer instance of Atlassian Cloud for testing and validating apps
- A local development environment for creating apps
Step 1: Prepare for tunneling
In this tutorial, the app server will run on your local development machine. A tunnel tunnel is necessary to allow Jira or Confluence Cloud to send requests to the server running on your machine and install the app. ACE creates tunnels using the ngrok Node.js module, which can be used free of charge after creating an ngrok account. In order to use ngrok in ACE, an auth token is all that's required. Follow this process to obtain one:
- Create a new ngrok account
- Obtain an authtoken
- Copy your personal token value (you'll need this later)

Step 2. Get a cloud development site
The Cloud Developer Bundle provides a free Atlassian cloud development site for building and testing apps. To create your site:
- Go to go.atlassian.com/cloud-dev and sign up. It may take several minutes to provision your site.
- Once your site is ready, sign in, and complete the setup wizard.
Your cloud development site has Confluence and all the Jira products installed. Note that Atlassian cloud development sites have limits on the number of users.
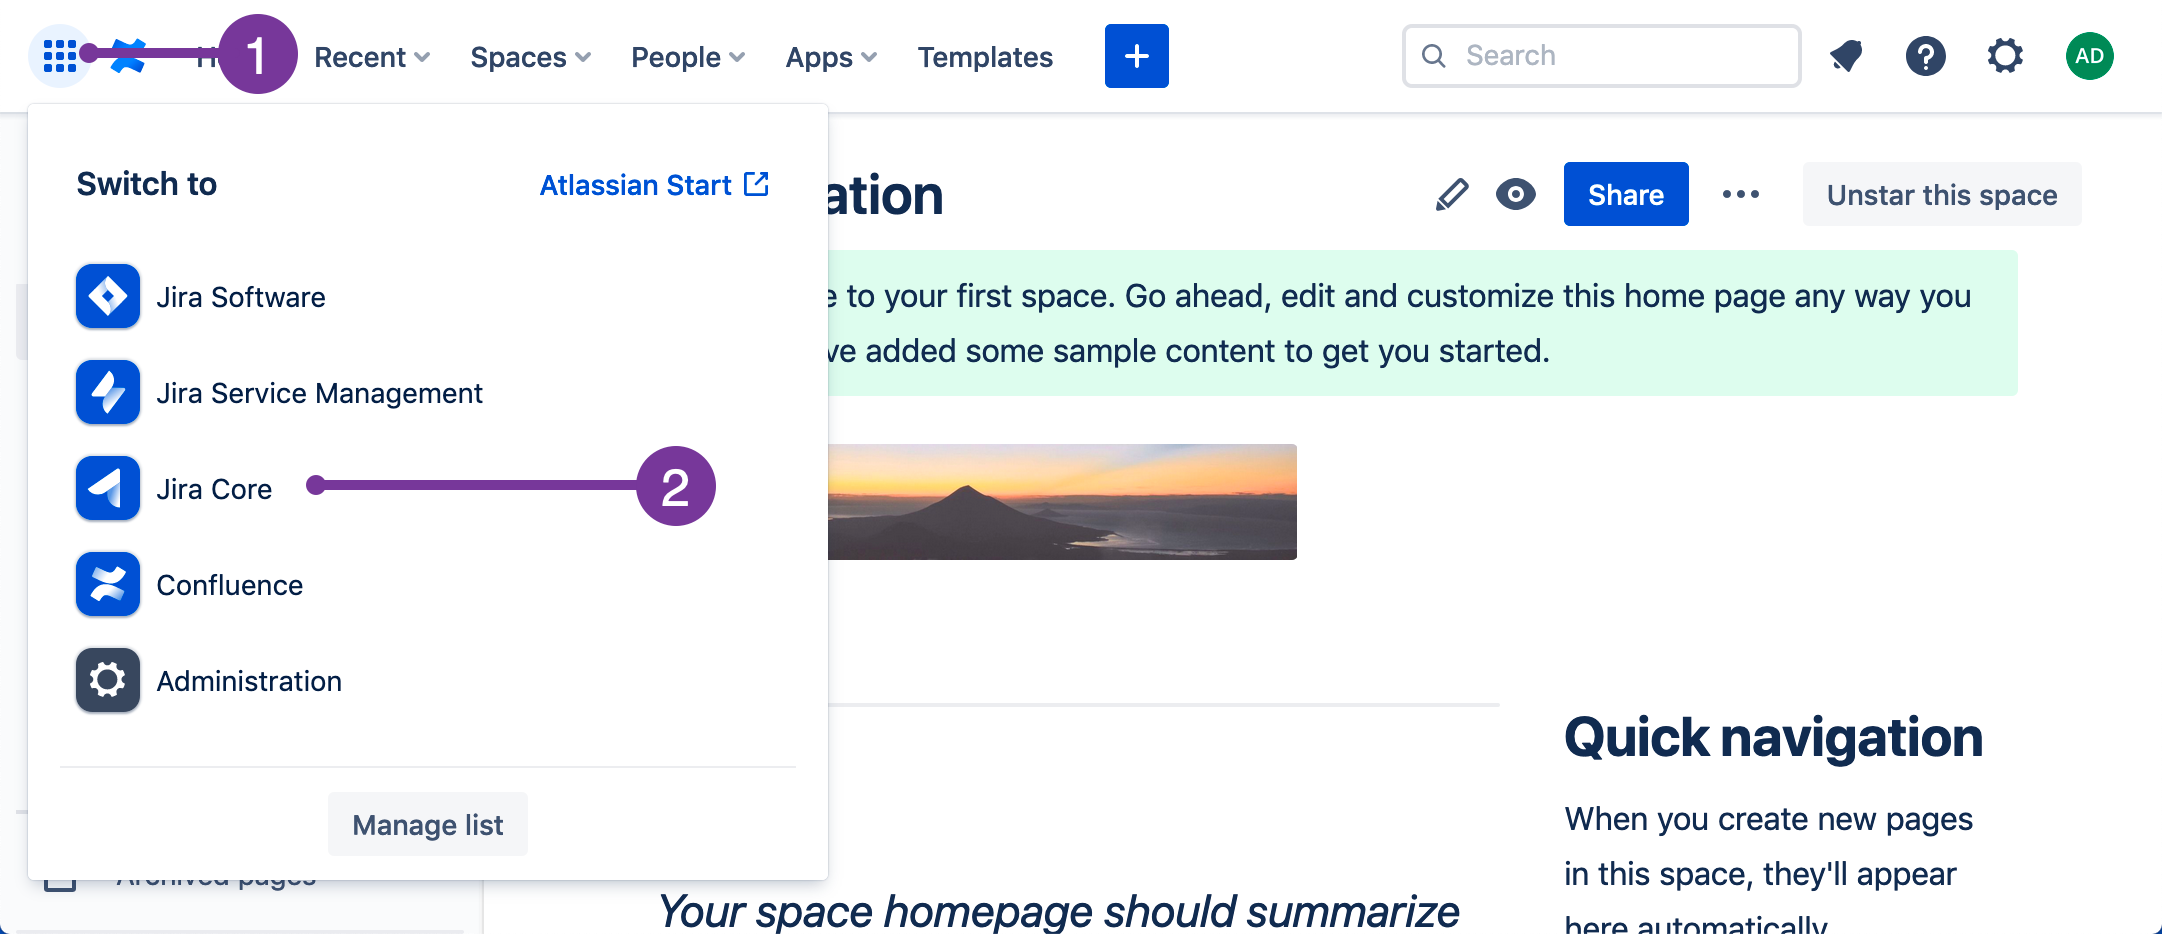
If necessary, use the app switcher to navigate to Jira. Select the app switcher icon, and then choose Jira.
Step 3. Enable development mode in your site
With development mode you can install app descriptors in your development site from any public URL. This means you don't need to list an app in the Atlassian Marketplace before installing it.
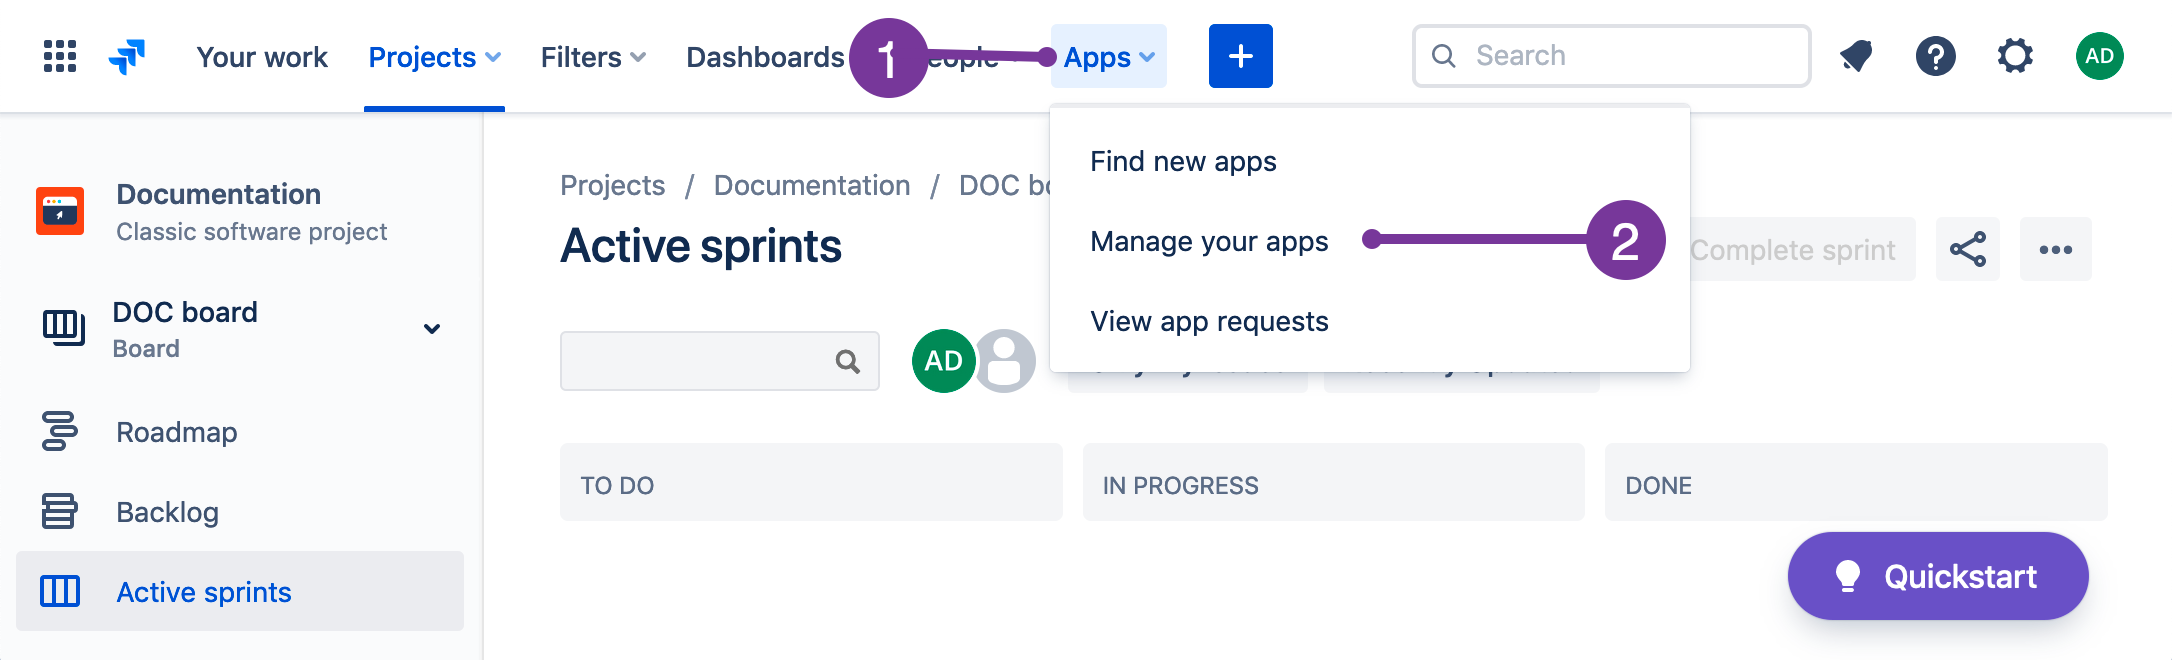
- In the top navigation bar, click Apps then Manage your apps. If Apps isn't visible,
click More first.
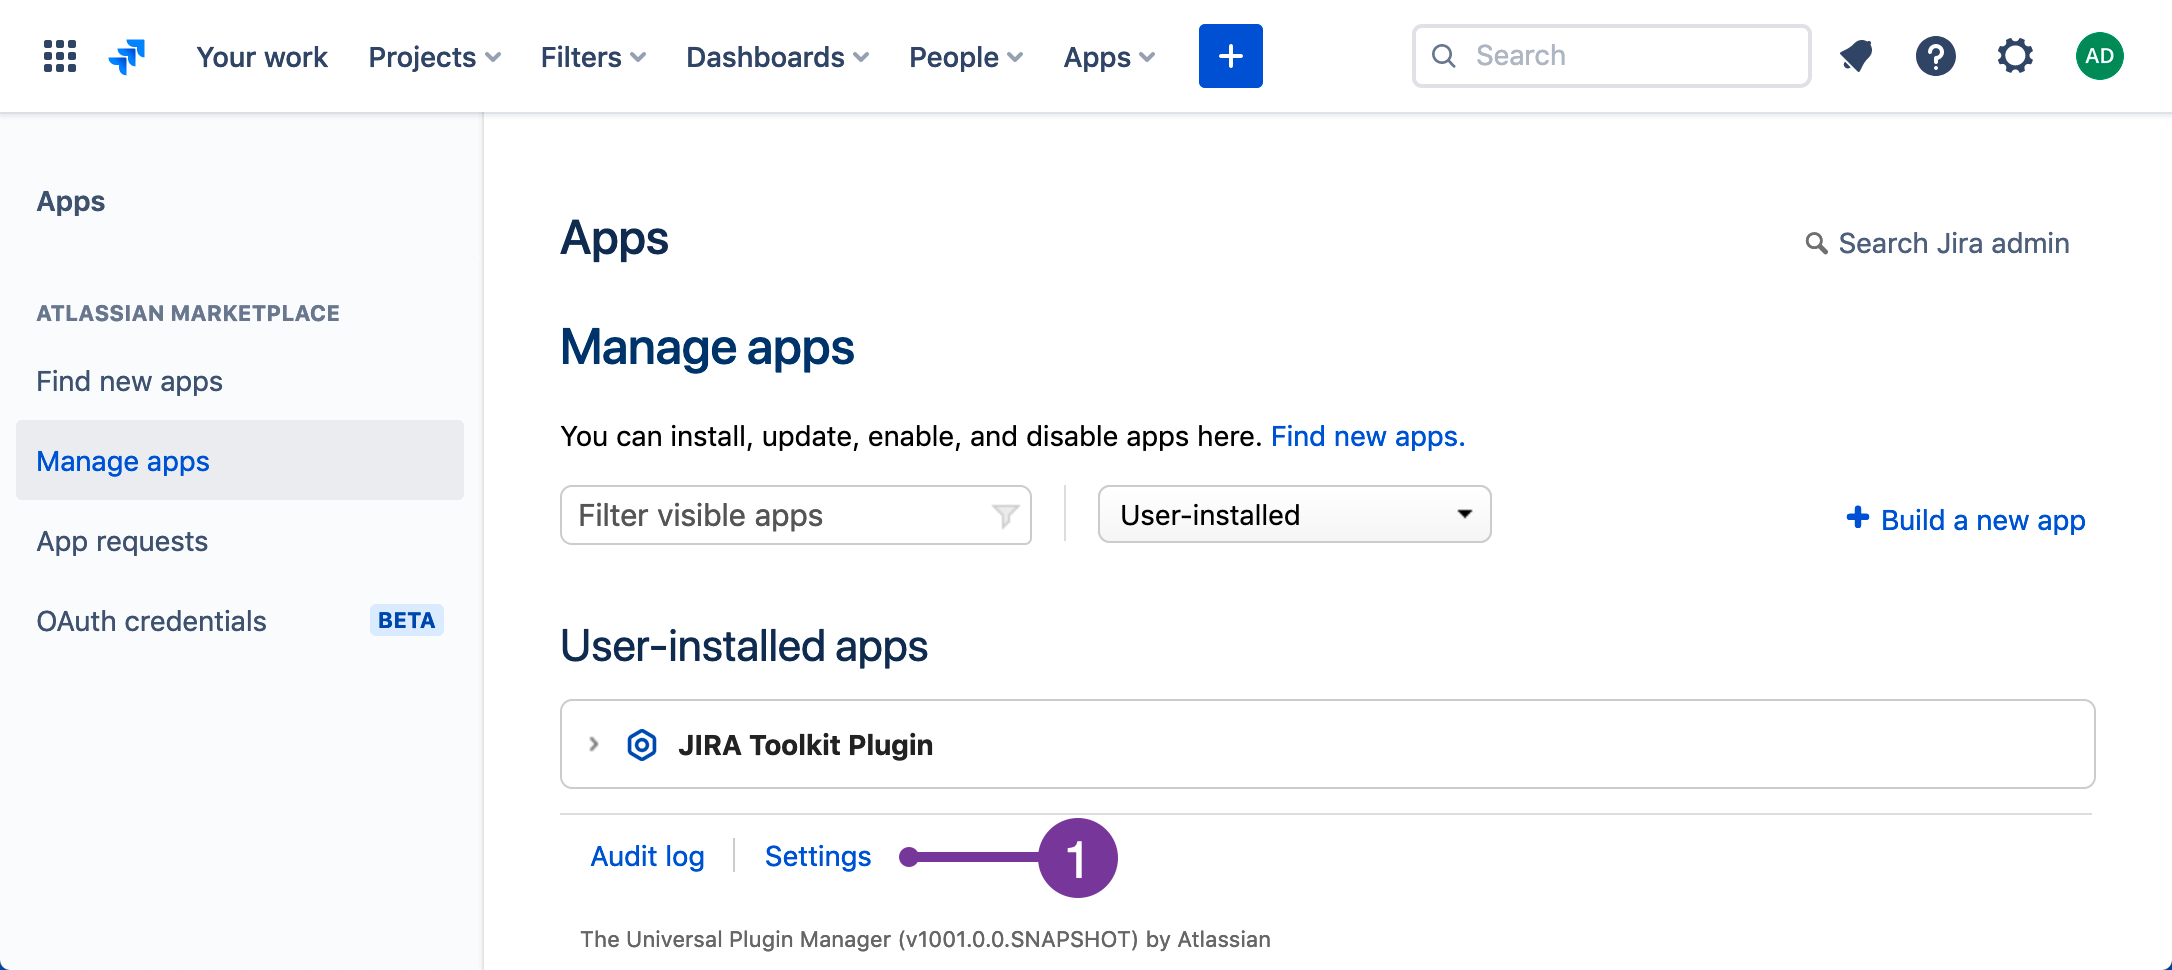
- Under User-installed apps, click Settings.
- Select Enable development mode, and then click Apply.
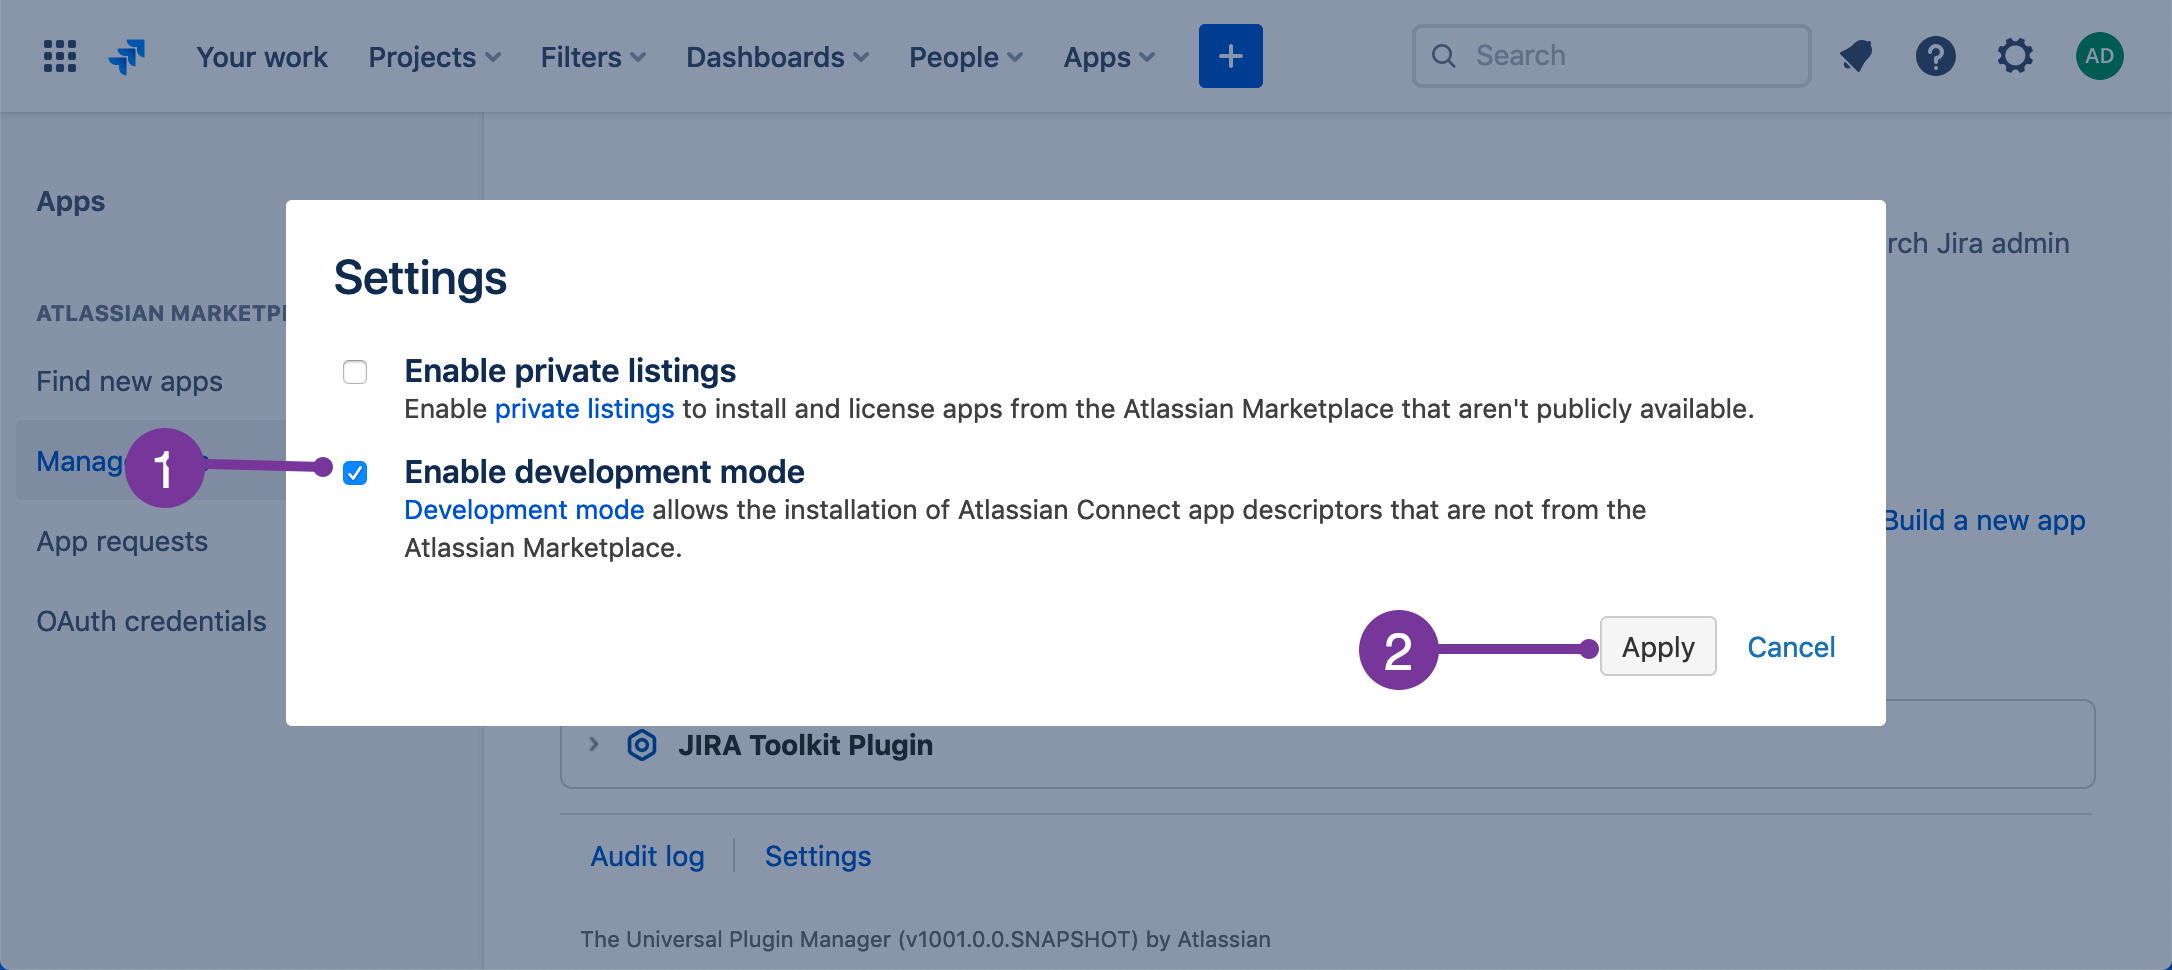
After the page refreshes, you see the Upload app link. This link enables you to install apps during development.
Step 4. Set up your local development environment
If you install an Atlassian Connect app in an Atlassian cloud instance, it's usually hosted elsewhere (for example, a cloud platform service like Heroku). However, it's easiest to develop an app on your local machine and make it available over the internet by tunneling (using HTTPS). This enables you to work locally and test against your Atlassian cloud instance.
-
On your command line, run:
1 2
npm install -g ngrok -
Identify to ngrok using your auth token (from the step "Prepare for tunneling")
1 2
ngrok authtoken <token> -
Start ngrok by running the following command:
1 2
ngrok http 8000We're assuming that you have a working web application listening on http://localhost:8000. If your app is listening on a different URL, change the above command to match.
You should see something similar to the following console UI in your terminal.
1
2
Forwarding https://84c5df439d74.ngrok-free.dev -> http://localhost:8000 -
Confirm new tunnel
Important: for any recently created ngrok account there will be a warning page displayed that needs to be confirmed once before the tunnel can be used. To do this, look for the message
Forwarding https://<some ID>.ngrok-free.app/and open that URL in your browser. You'll see a page like this: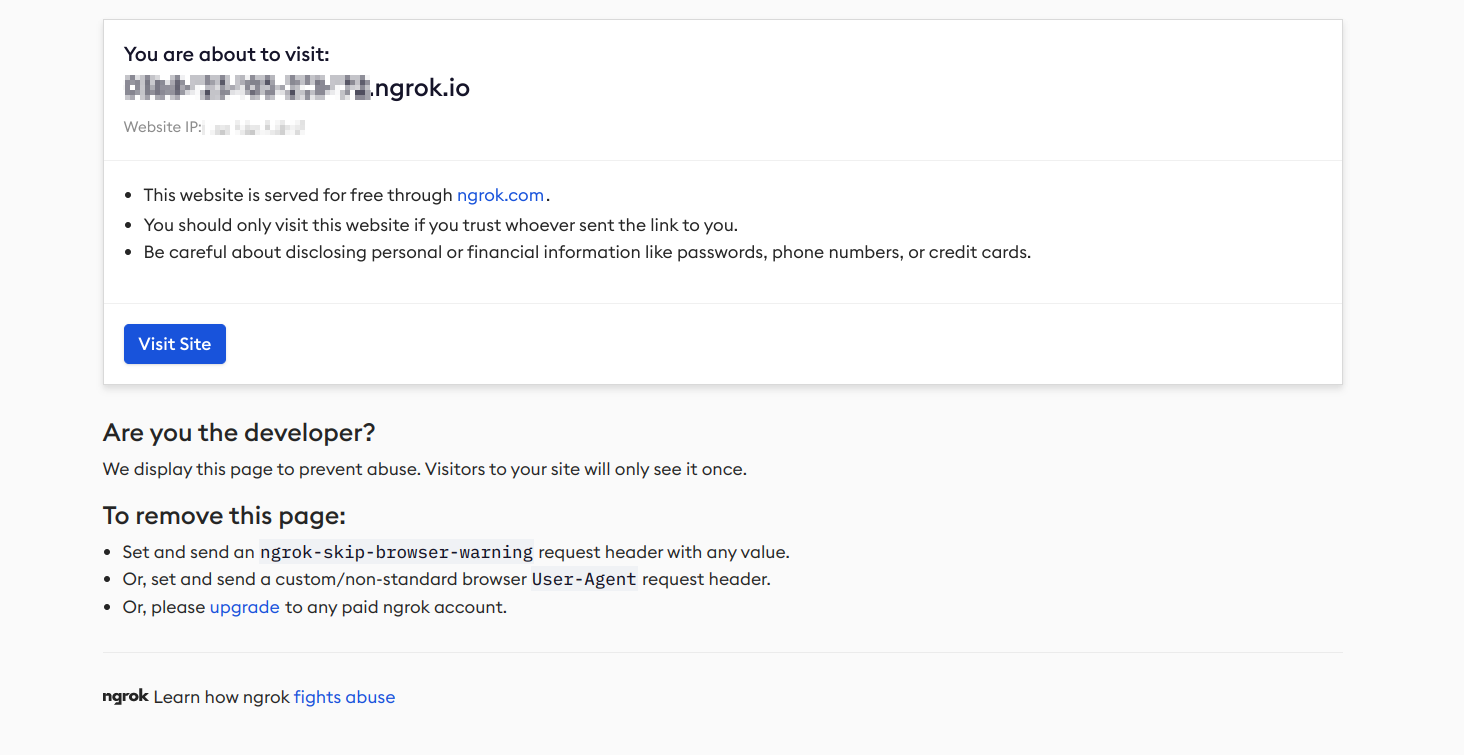
Confirm by clicking on the button labeled "Visit Site". Your tunnel is now fully operational, but this step needs to be repeated every time a new tunnel is opened.
Making your app available to the internet using ngrok is covered later in this tutorial.
Build a basic app
This part of the tutorial gives you a hands-on introduction to Atlassian Connect by building a simple Atlassian Connect app. It also validates that your development environment is set up correctly. The app uses a generalPages module and adds a link titled Greeting to the Jira sidebar.
Step 1. Define the app descriptor
The fundamental building block of an app is the app descriptor file, usually named atlassian-connect.json. The
descriptor file describes your app to the Atlassian application (in this case, Jira Cloud), including the key,
name, permissions needed to operate, and modules it uses for integration.
First, create a project directory and define your app descriptor.
- Create a project directory for your app's source files.
- In the project directory, create a new file named
atlassian-connect.jsonwith this content:
1 2{ "name": "Hello World", "description": "Atlassian Connect app", "key": "com.example.myapp", "baseUrl": "https://<placeholder-url>", "vendor": { "name": "Example, Inc.", "url": "http://example.com" }, "authentication": { "type": "none" }, "apiVersion": 1, "modules": { "generalPages": [ { "url": "/helloworld.html", "key": "hello-world", "location": "system.top.navigation.bar", "name": { "value": "Greeting" } } ] } }
Note, you must specify the correct baseUrl value instead of placeholder-url.
- Save the descriptor file.
- (optional) Validate your descriptor using the JSON schema validator.
This handy tool shows you any errors in your app descriptor, such as missing properties or syntax errors.
You don't need to change the placeholder used for baseUrl now. You update it later in this tutorial,
when you deploy your app.
Step 2. Create the user interface
Now, create the user interface using a simple static HTML page. An app consisting of an app descriptor and an HTML page is the most basic Atlassian Connect app. Such apps are not typical. However, when you understand how the example works, it only takes a few more steps to turn it into a fully-functional app.
For production environments, we recommend bundling CSS and JS files with your site, rather than relying on a third-party CDN.
-
In your project directory, create a new file named
helloworld.htmlwith this content:1 2
<!DOCTYPE html> <html lang="en"> <head> <link rel="stylesheet" href="https://unpkg.com/@atlaskit/css-reset@2.0.0/dist/bundle.css" media="all"> <script src="https://connect-cdn.atl-paas.net/all.js" async></script> </head> <body> <section id="content" class="ac-content"> <h1>Hello World</h1> </section> </body> </html>Note that the app descriptor file,
atlassian-connect.json, references this file in thegeneralPageselement:url: /helloworld.html -
Save the file.
That's all the coding you need to do. Now take a closer look at the contents of the helloworld.html file:
- Styling: The
helloworld.htmlpage uses CSS from Atlaskit. Atlaskit is a library of reusable front-end UI components. This app uses the CSS styling to render theh1element using the Atlassian font stack. scripttag: This script tag includes theall.jsfile, the client library for the Atlassian Connect JavaScript API. It simplifies client interactions with the Atlassian application, such as making anXMLHttpRequest.ac-contentclass: This class wraps the contents of your app and dynamically resizes the iframe in Jira. This class keeps your app content visible without scrollbars.
Deploy and install your app
Use ngrok to make the local app available to the internet, and then tell your Jira instance how to find the descriptor.
Step 1: Host the app on a local web server
You need a simple web server to serve the directory containing your atlassian-connect.json and
helloworld.html files. There are several tools you can use to do this, this tutorial uses
http-server (available via npm).
-
Open your project directory at the command line
-
Install http-server by running:
1 2
npm install http-server -g -
Start the server on port
8000by running:1 2
http-server -p 8000A message on your command line indicates that the server is serving HTTP at an address and port. It will look something like this:
1 2
Starting up http-server, serving ./ on: http://0.0.0.0:8000/ -
Confirm that the files you created in steps 1 and 2 are being served by visiting the following URLs:
The descriptor file can only be fetched from web server ports 80, 443, or 8080.
Step 2: Make the app files available to the internet
Now that your app is hosted on a local web server, use ngrok to make it available over the internet.
-
In a new command line window, run this command to expose your web server to the internet. If your app is not running on port
8000, change the command to use your app's port number.1 2
ngrok http 8000You see a status page on the command line that shows the tunnel's public URL and other information about connections made over the tunnel. If your app is not running when you try to start ngrok, you see a "Failed to complete tunnel connection" message.
-
Get the HTTPS URL from the ngrok status page.

-
Edit the app descriptor file, and set the
baseUrlproperty to the ngrok HTTPS URL. For example:1 2
"baseUrl": "https://bb5a163ef415.ngrok.io" -
Confirm that the descriptor is available by opening the
atlassian-connect.jsonfile in your browser at the ngrok HTTPS URL. For example:1 2
https://bb5a163ef415.ngrok.io/atlassian-connect.jsonThis is the URL you use in the next section to install your app.
Step 3: Install and test your app
The final step in deploying your app is to install it in your Atlassian cloud instance. You do this by adding a link to your app's descriptor file in your Atlassian cloud instance. This enables Jira to install your app.
-
Navigate to Jira in your Atlassian Cloud instance, then choose Jira settings (cog icon) > Apps > Manage apps.
-
Click Upload app.
-
In the From this URL field, provide a link to your app descriptor. This URL is the same as the hosted location of your
atlassian-connect.jsondescriptor file. The example uses the following URL:1 2
https://bb5a163ef415.ngrok.io/atlassian-connect.json -
Click Upload. Jira displays the Installed and ready to go message when the installation is complete.
-
Click Close.
-
Verify that your app appears in the User installed apps list. For example, if you used Hello World for your app name, then Hello World appears in the list.
-
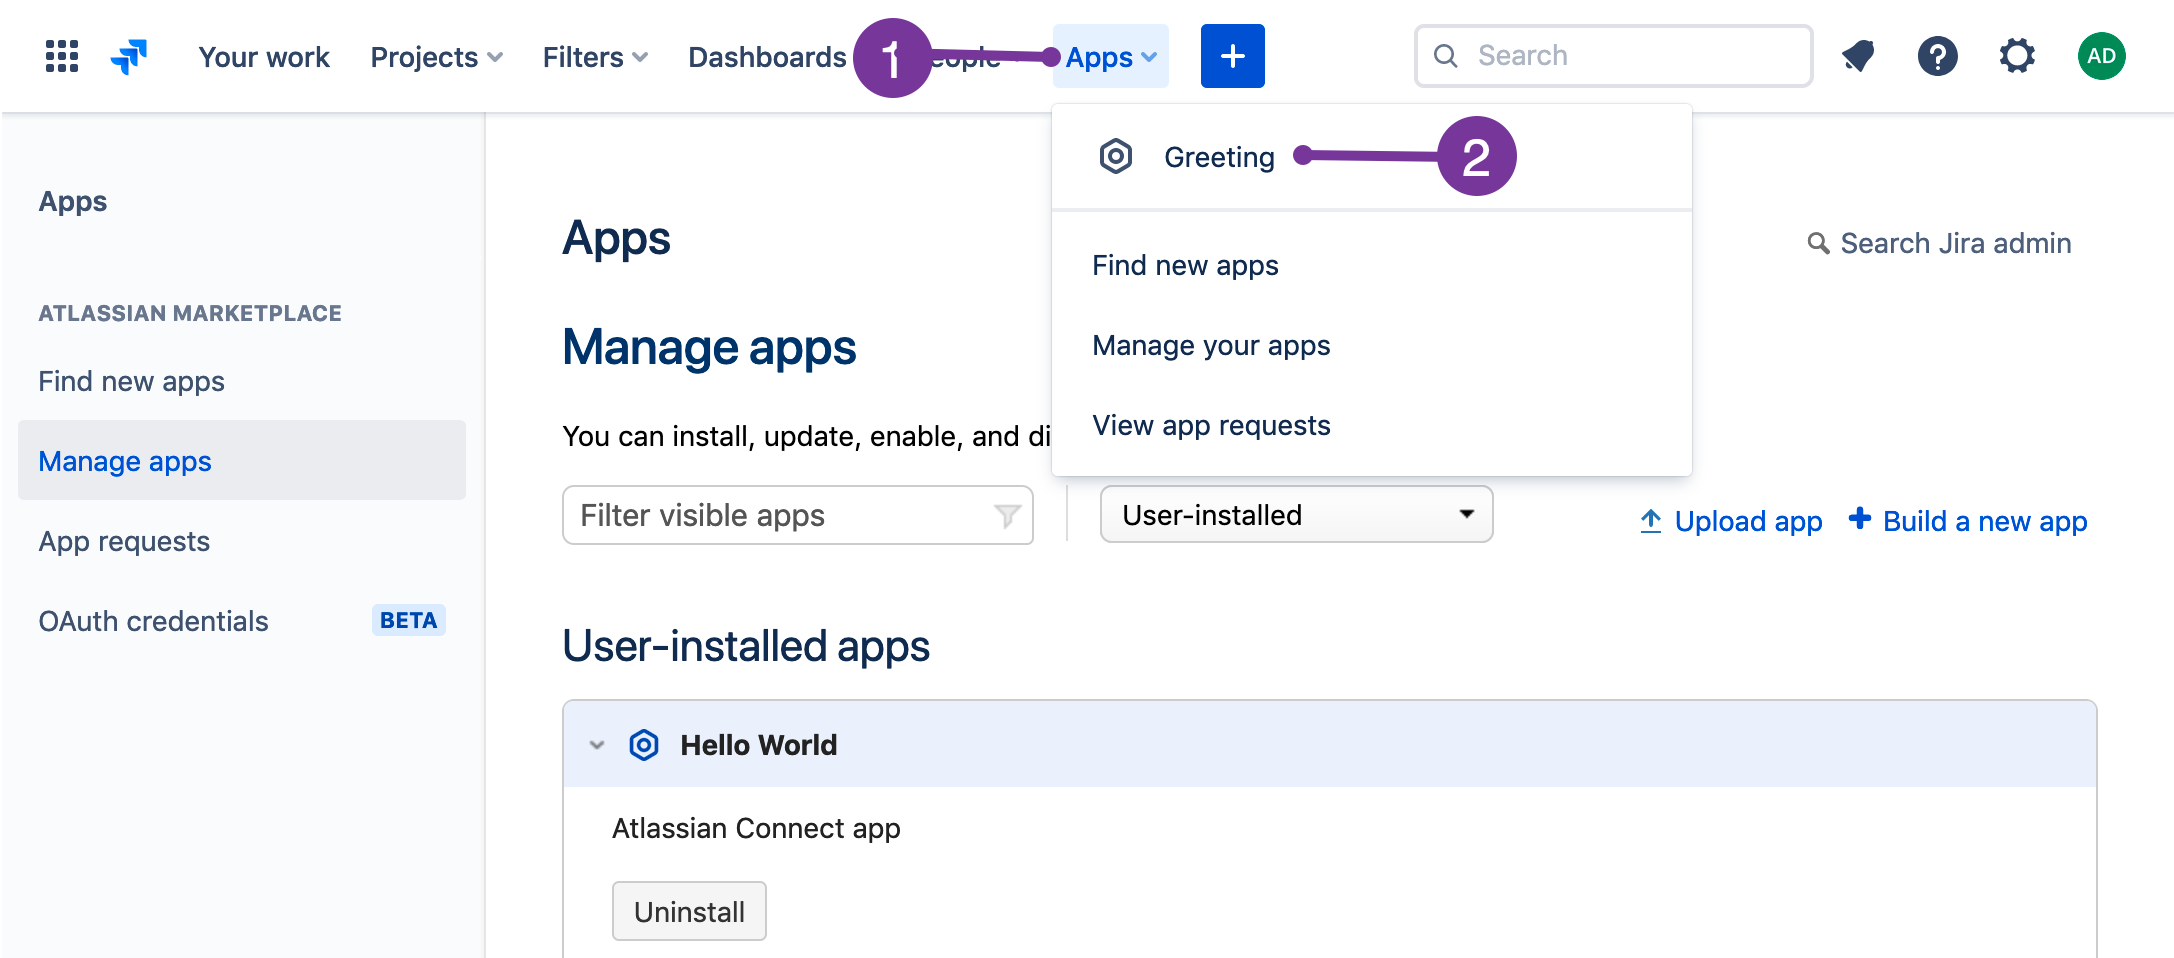
In the top navigation bar, click Apps then Greeting. If Apps isn't visible, click More first.
-
The Hello World message displays.

You've now set up a development environment and built your first app.
Next steps
You now know enough to start developing apps with Atlassian Connect. To continue learning about app development for Jira Cloud:
- Work through some more involved tutorials for building apps for Jira Software, Jira Service Desk tutorials, or Jira platform
- Check out the REST API to see what is possible
Rate this page: