Using the issue field module
The issue field module is used to associate remote entities with issues. The field will be searchable in both the basic search and advanced search; and can be updated via the REST API. For example, Jira Software has the "sprint" entity that is added by the Jira Agile app. The "sprint" field for this entity can be searched for using JQL, viewed and updated on issues, and updated via the REST API, even though the sprint data itself is stored in the Jira Agile app.
This guide will show you how to use the Jira issue field module. We'll take you on a guided tour of an example app, jira-issue-field-demo, that uses the issue field module and explain the key concepts. You won't be building an app yourself in this guide, but you can browse, download, and even run the source code for the example app.
The jira-issue-field-demo app that we will be looking at, uses the issue field module to associate a remote "Teams" entity with Jira issues. Watch this video to see the app in action.
Before you begin
This guide is aimed at developers who are experienced with Jira Cloud development and the Connect framework. If you are new to either of these, we recommend that you read our Getting started guide first.
The "Teams" issue field -- Defining an issue field
As you would have seen in the video, the jira-issue-field-demo adds a "Teams" entity to Jira. Despite the fact that the "Teams" entity is provided by the app, the "Team" field behaves like any other issue field in Jira -- the "Team" field options can be changed as needed, the field itself can be edited in an issue, and issues can be searched by the field and field properties. The key to this is the jiraIssueFields issue field module, which relates the "Teams" entity to issues in Jira.
In this section, we'll show you how an issue field is defined.
Concepts: Defining a jiraIssueFields module
An issue field is implemented in an app by declaring it in the app descriptor:
1
2"jiraIssueFields": [
    {
        "key" : "team-issue-field",
        "name" : {
            "value" : "Team"
        },
        "description" : {
            "value" : "Team tied to issue"
        },
        "type": "single_select",
        "extractions": [{
            "path": "category",
            "type": "string",
            "name": "category"
        }]
    }
]
Let's have a look at the properties of this module:
- The
keyis the unique identifier for the module. You can define this to be any value you want, provided that it uses alphanumeric characters and dashes. However, it's important to note that this key will be used when accessing the field via the REST API. - The
nameanddescriptioncan also be set to any value that you want. These values will be shown to the user when the field is displayed on the view, create, and edit issues screens in the Jira UI. - The
typecan betextorsingle_select. - (optional) The
extractionsare used for single-select fields only. They allow issues to be searched by the property of an option, using JQL. We'll explain this later in this guide.
You can see this module definition in the [atlassian-connect.json] file of the jira-issue-field-demo app.
The "Teams" page -- Adding and removing teams
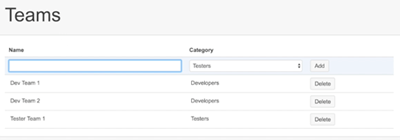
One of the first screens you'll notice in the video is the 'Teams' page, where you add and remove teams. This is a [generalPages module] that renders a basic HTML page. You can see the definition for this in the [atlassian-connect.json] file and the HTML in the [teams.hbs] file.

When you add/remove teams on this page, you are actually adding and removing teams from a directory of teams in the app's database. Behind the scenes is where it gets interesting. The directory of teams is stored in the app database, but this list of teams is synchronized with equivalent data for the issue field in Jira (when you edit or remove a team).
This is all done in the [sync.js] file of the jira-issue-field-demo app. If you browse the file, you'll see that it pulls the team data from the app database, then updates the issue field data in Jira via the REST API.
Concept: Updating issue field data via the REST API
Jira provides a CRUD REST API to administer options for single select issue fields, so that you can keep your app data in sync with Jira. This is done via the option resource:
api/2/field/{fieldKey}/option
This resource has methods to create, retrieve, update, and delete options. Let's take a quick look at the create method. Once you understand how the create methods works, the other methods will be easy to use.
The Create option method requires an option payload. The option payload is globally available, so it’s shown for all projects. The body of the request to create option looks like this::
1
2{
    "value" : "Dev Team 1",
    "properties" : {
        "category" : "Developers"
    }
}
The fields in this option payload are:
- The
valueis the value shown to users in the UI. - By default, the option is shown in all projects without the
scopeproperty defined. - (optional) The
propertiesare any additional properties that define the option.
That's it! Just call the method like any other Jira REST method.
The "Teams in project" page -- Enabling/disabling an option for a specific project
The 'Teams in Project' screen is where you enable and disable teams for a specific project. This is a [jiraProjectAdminTabPanels] module that renders a basic HTML page. You can see the definition for this in the [atlassian-connect.json] file and the HTML in the [teams-project.hbs] file.
Enabling an option means that it is available to be selected in the 'Team' dropdown on issues in the project, and vice versa for disabling an option. What this is actually doing in the code is changing the scope of the option. Enabling an option adds or updates an option with the appropriate scope, via the REST API. Disabling an option does the opposite. This all done in the [teams-project.js] file of the app.

Concept: Changing the scope for options of a single-select issue field
To create an option that is shown only in some projects, define a scope property in the request body. The body of the request looks like this:
1
2{
    "value" : "Dev Team 1",
    "config": {
      "scope" : {
        "projects" : ["1000","1001"]
      }
    },
    "properties" : {
        "category" : "Developers"
    }
}
Changing the scope is as simple as adding or deleting the relevant projectIds from the property. If you want an option to be shown in all projects, then you can omit the scope property altogether.
The issue screen -- Editing the "Team" field
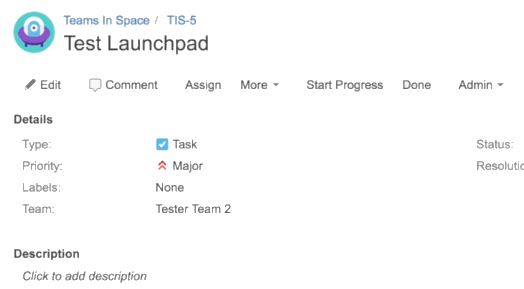
The video demonstrates how the "Team" issue field can be seen on issue screens. It can also be edited via the create issue dialog, the issue edit dialog, and the quick edit on the issue view screen. There is no additional coding required for this.
However, be aware that the issue field is not added to any screens when the app is installed. If a Jira administrator wants to show the field on certain screens (i.e. create, edit, view) for any projects, then they will need to manually configure the appropriate project schemes. To work around this, you can configure your app to display a page when it has finished installing, that tells the Jira administrator that additional configuration is required to show the fields.

JQL search -- Searching for an issue by "team" and "team category"
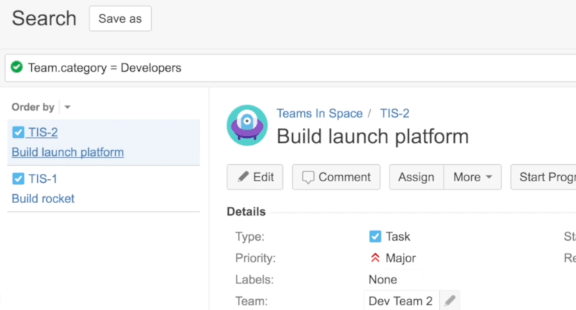
The video demonstrates two different JQL searches related to issue fields: searching by the issue field name (i.e. 'Team') and searching by a property of the issue field (e.g. Team.category).

Concepts: Extracting option properties for searching
You don't need to do any additional coding to enable JQL searching using an issue field. It's automatically enabled when you implement the issue field. However, option properties are not automatically made available as search parameters. You need to "extract" the option property to make it searchable. This is done by defining the property as an extraction in the jiraIssueFields module definition (in the atlassian-connect.json app descriptor):
1
2"extractions": [{
    "path": "category",
    "type": "string",
    "name": "category"
}]
The example extraction above looks for the "category" property of an option and makes it available for search as the "category" search parameter. It also validates the parameter as a string, when a search is run that uses it. In the jira-issue-field-demo app, you can see the extraction defined for the 'category' field in the [atlassian-connect.json] file.
Congratulations!
Next steps
If you've finished this tutorial, check out Jira modules.
Rate this page: