Getting started with atlassian-connect-express
Atlassian-Connect-Express (ACE) is one of the HipChat libraries making building an add-on relatively simple, as it generates most of the plumbing for you.
This tutorial explains what you need to do to build a HipChat Connect add-on using Atlassian-Connect-Express (ACE).
Getting setup
Prerequisites
Before you get started with this tutorial, make sure you have everything you need.
-
Install Node.js
-
Install ngrok (If you have ngrok installed already make sure it's at least version 2.0,
ngrok --version) -
Install Redis
-
Install
atlas-connect, a utility used to generate add-on project templates, by running:
Terminal window
1
2$ npm install -g atlas-connect
Create a new add-on project
Use the following command to create a new project for an add-on:
Terminal window
1
2atlas-connect new -t hipchat my-first-hipchat-addon
This generates a project from a template, with sample code.
Start the add-on
Start a ngrok tunnel
We will start the add-on on your machine, and install it on hipchat.com.
To do this, we need to make your add-on accessible on the internet. To do this, we will open a tunnel with ngrok: it will make your add-on accessible to HipChat, ngrok will proxy the calls:
 In a new terminal window, run
Terminal window
1
2ngrok http 3000
Copy the URL generated by ngrok.

In the project folder, open the config.json file to update the base URL for the add-on with with the URL given to you by ngrok:
config.json
1
2{
  "development": {
    ...,
     "localBaseUrl": "https://561460a3.ngrok.com",
    ...
}
Start redis
In a new terminal window, run:
Terminal window
1
2redis-server
Start the add-on
In a new terminal window, run:
Terminal window
1
2cd my-first-hipchat-addon
npm install
node app.js
The output should be something like:

Install the add-on in HipChat
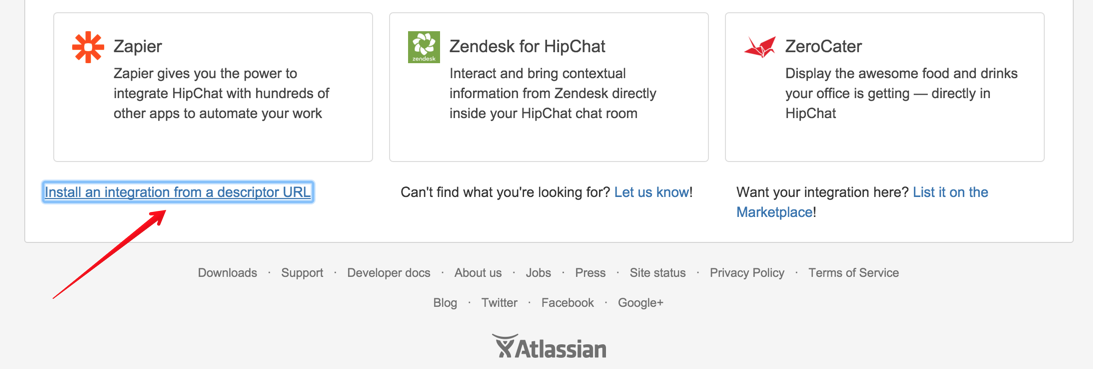
Log into your HipChat account and go to www.hipchat.com/addons
At the bottom of the page, click on:
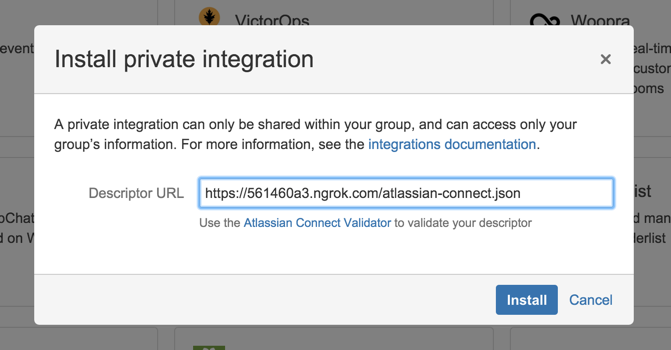
Enter the URL for the add-on descriptor atlassian-connect.json in the dialog box that pops up:
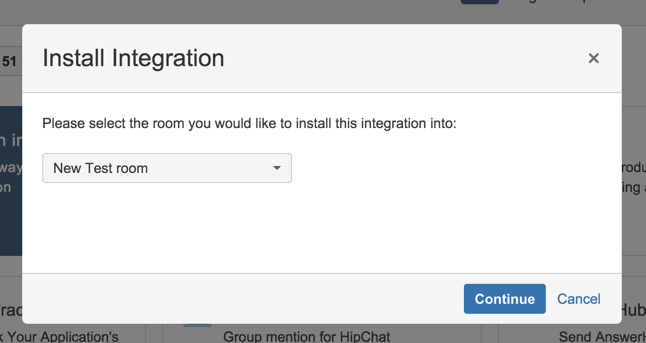
Select a room to install the add-on in:
Accept the scopes:
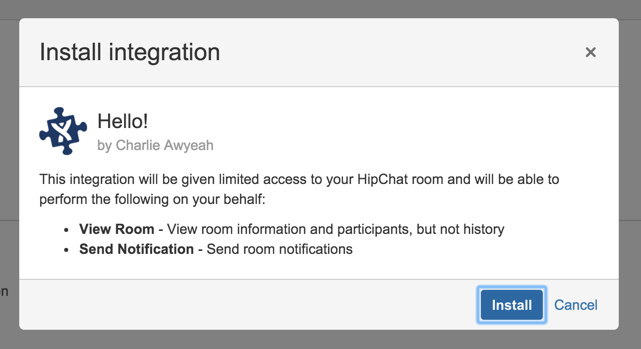
and install the add-on.
You should see the following screen:
Test the add-on
Back in chat view, you should see the following changes:
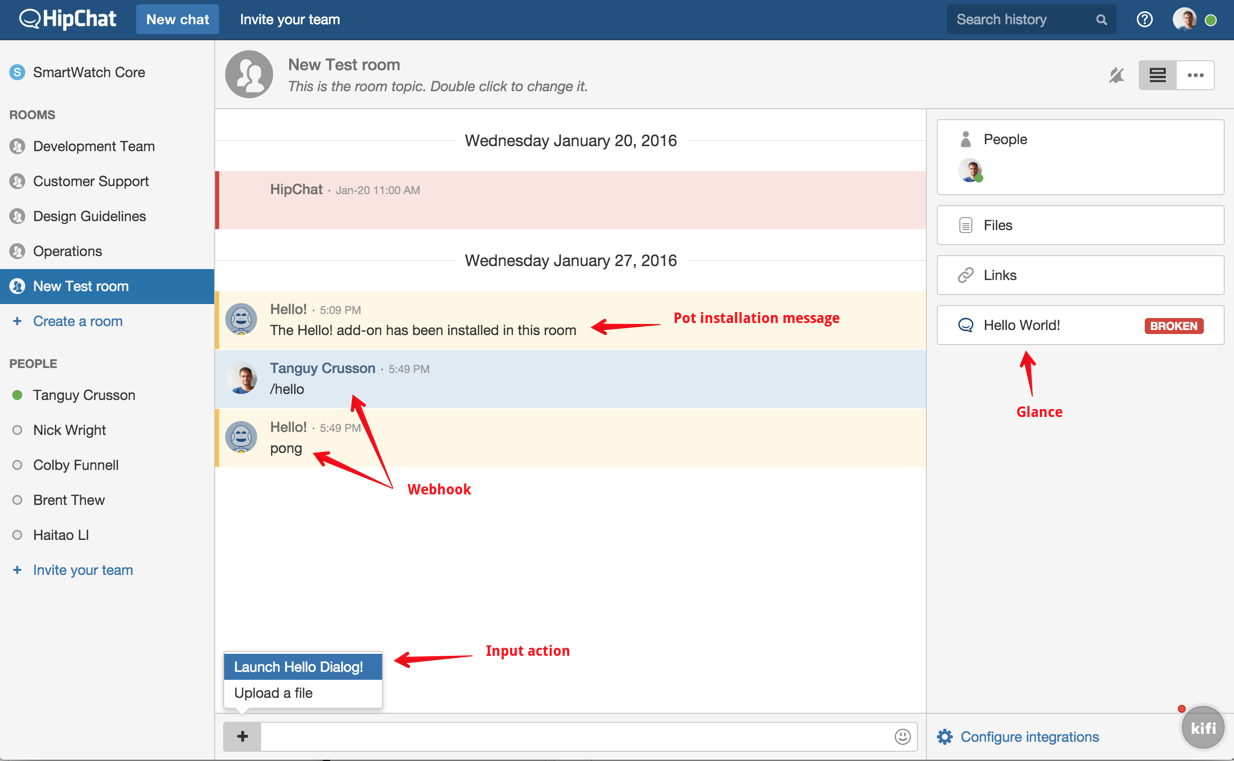
You can click on the input action and the glance to test the add-on.
The add-on also implements a webhook (responds to "/hello")
All good?
You're now ready to start making changes to the add-on.
Understanding the framework
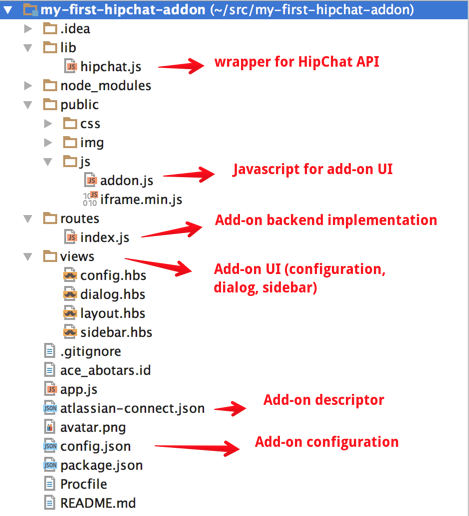
Project structure
| Files | Description |
|---|---|
| atlassian-connect.json | Capability descriptor of the add-on. This is the public contract for the add-on. You change this file to add new capabilities (a new glance, a new webhook, a new dialog, etc.) |
| config.json | The configuration file for the add-on, organised in environments (development, production) |
| hipchat.js | Library - wrapper for the HipChat REST API endpoints |
| index.js | The backend implementation of your add-on. |
views/*.hbs public/js/addon.js | UI implementation of your add-on (configuration pages, dialogs, sidebar views, etc.) |
Express Web application framework for Node.js
ACE leverages the Express Web application framework for Node.js. Here are a couple of basics:
Express lets you define "routes" to define HTTP endpoints. In the template generated for you, you'll find routes in the index.js file. For example, for a POST endpoint:
1
2app.post('/a-url', function(req, res) {
    //handle the request
});
You can define and use middleware in routes. Middleware are functions that perform a specialised task in the processing of a request.
1
2var checkCredentialsMiddleware = function(req, res, next) {
    //validate that the request is properly authenticated
    //and then invoke next()
}

app.post('/a-url',
    checkCredentialsMiddleware, //will be executed first
    function(req, res) {
        //handle the request
    }
});
Configuration
The config.json file contains all of the settings for the add-on server. This file is divided into runtime environments. The default template includes development and production, but you're free to add any other environments you'd like to use.
To run your add-on in a specific environment, use the NODE_ENV environment variable:
1
2NODE_ENV=<environment> node app.js
ACE "addon" object
ACE provides an object, addon, which acts as a datastore for your add-on and provides a number of utility functions.
| What | Description |
|---|---|
| addon.settings | Store for installation data. Any time your add-on is installed, tenant data (OAuth ID, shared secret, API access tokens, etc.) are stored in Redis and indexed by OAuth ID. |
| addon.authenticate() | Anytime HipChat makes a HTTP call to your add-on (e.g. webhook, or loading a view), it includes a signed JWT token in a HTTP header or request parameter. This token contains contextual information about the call (oauthId, roomId, userId, etc.), and is signed. addon.authenticate() is a middleware function you use in HTTP endpoints. It validates JWT tokens and adds contextual information in the request object
index.js
|
| request.clientInfo | Object available for functions using the addon.authenticate() middleware function. Whenever your add-on is installed by a user to a room or globally in a HipChat group, HipChat creates a new OAuth client, and sends an OAuth ID, shared secret, and contextual information about the installation to your add-on. ACE handles this call, and saves this data. The add-on installation data is made available in request.clientInfo:
... and other parameters you shouldn't have to worry about:
|
| request.identity | Object available for functions using the addon.authenticate() middleware function.
Information identifying the group, room and user for the call:
|
| request.context | Object available for functions using the addon.authenticate() middleware function. This object contains contextual information about the call made to the add-on. |
| addon.on() | Function which enables you to register listeners for specific events. For example, if you want to do perform a task after your add-on was installed, like sending a message to a room:
index.js
Available events:
|
Add-on capability descriptor
Your add-on exposes a JSON capability descriptor, available over HTTPS. This descriptor describes how your add-on extends HipChat (public contract). Anytime you want to add a new webhook, glance, actions, etc. you first need to declare it in the add-on capability descriptor.
For an add-on created using ACE, the descriptor file is atlassian-connect.json. Read this file to familiarise yourself with the descriptor format. ACE uses handlebar templates for variable substitution, e.g.
atlassian-connect.json
1
2"callbackUrl": "{{localBaseUrl}}/installable"
localBaseUrl is the variable you changed in the config.json file when setting up your add-on.
Learn more
API reference: Capability descriptor
Add-on installation
Whenever your add-on is installed by a user to a room or globally in a HipChat group, HipChat creates a new OAuth client, and sends an OAuth ID, shared secret, and contextual information about the installation to your add-on. ACE handles this call, saves this data and makes it available in the variable addon.settings, indexed by OAuth ID.
Your add-on can also subscribe to add-on installation events to perform additional tasks:
Error rendering macro 'code': Invalid value specified for parameter 'firstline' addon.on('installed', function(clientKey, clientInfo, req){ //do something }); addon.on('uninstalled', function(clientKey, clientInfo, req){ //do something });
Learn more
API reference: Capability descriptor
Add-on data storage
ACE uses Redis to persist add-on installation data, accessible via the addon.settings object.
To persist application specific data for your add-on - for example, the Twitter integration with HipChat stores the list of search terms users want to watch per room - you can add more data to this object:
index.js
1
2addon.settings.set(key, value, clientKey)
Dev loop
- When you make changes to your add-on capability descriptor, you'll need to restart the node server and reinstall the add-on in HipChat
- When you make changes to project files, you'll just need to restart the node server
Debugging HTTP Traffic
If you're using ngrok, you can point your browser to localhost:4040 to access ngrok's built-in traffic analyzer.
Calling the HipChat REST API
Asking for security scopes
In order to make a REST call, your add-on must have access to the right security scopes. You ask for specific scopes in the add-on capability descriptor (based on what REST endpoints you need to call), and users must accept these scopes when installing your add-on.
For example, if you want to be able to call the get_all_rooms REST endpoint, you need to ask for the "view_room" scope (as described in the API reference for this endpoint):
atlassian-connect.json
1
2"capabilities": {
    ...,
    "hipchatApiConsumer": {
        "scopes": [
            "send_notification",
            "view_room"
        ]
    },
    ...
}
Making a REST call
The file lib/hipchat.js contains wrapper methods for HipChat's REST API endpoints. For example, to send a message to a HipChat room:
index.js
1
2hipchat.sendMessage(clientInfo, roomId, message);
If you want to call an endpoint which is not already covered, just add a new method to this file.
Adding a Webhook
You can add a webhook to listen to messages posted in a HipChat room.
To implement a Webhook , you must first declare it in the add-on capability descriptor atlassian-connect.json.
For example, to listen to all messages in a room (regex .*), and echo them, you first declare it in the add-on descriptor:
atlassian-connect.json
1
2"capabilities": {
    ...,
    "webhook": [
        {
            "url": "{{localBaseUrl}}/echo-webhook",
            "event": "room_message",
            "pattern": ".*",
            "name": "Echo",
            "authentication": "jwt"
        }
    ],
    ...
}
You then implement the endpoint declared in the descriptor, in routes/index.js:
index.js
1
2app.post('/echo-webhook',
    addon.authenticate(), //JWT validation
    function(req, res) {
        var messageTxt = req.body.item.message.message;
        hipchat.sendMessage(req.clientInfo, req.identity.roomId, messageTxt)
            .then(function(data){
                res.sendStatus(200);
        });
    }
);
Adding an add-on Glance
Your add-on declares a glance in the capabilities descriptor:
atlassian-connect.json
1
2"capabilities": {
    ...,
    "glance": [
        {
            "icon": {
                "url": "{{localBaseUrl}}/img/icon.png",
                "url@2x": "{{localBaseUrl}}/img/icon.png"
            },
            "key": "sample-glance",
            "name": {
                "value": "Sample Glance"
            },
            "queryUrl": "{{localBaseUrl}}/glance-data",
            "target": "sample-sidebar"
        }
    ],
    ...
}
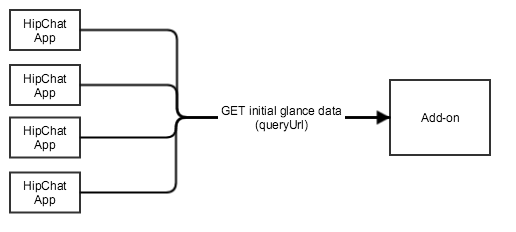
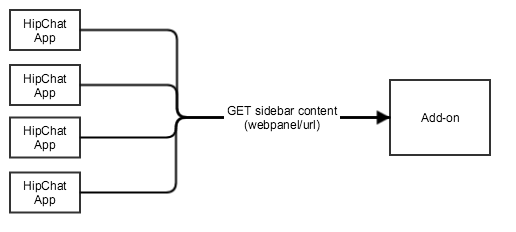
Glance queryUrl
When a user opens a room where your add-on is installed in the HipChat App, the HipChat App retrieves the initial glance value by calling the queryUrl endpoint. This is a cross domain HTTP request, so you need to include CORS headers.
 **index.js**
1
2app.get('/glance-data',
  cors(), //accept cross-domain requests
  addon.authenticate(), //handle JWT token
  function(req, res) {
    var sampleGlanceData = {
      "label": {
        "type": "html",
        "value": "Sample Glance"
      }
    }
    res.json(sampleGlanceData);
  }
);
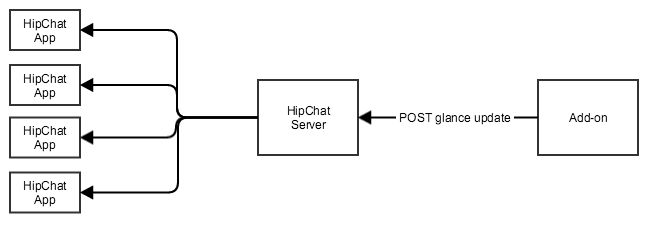
Glance update
HipChat will not poll the queryUrl for updates. Instead, if your add-on wants to update the glance, it needs to POST an update to the HipChat Server. The Server will distribute this update to all connected HipChat Apps.
 **index.js**
1
2var sampleGlanceData = {
    "label": {
        "type": "html",
        "value": "Updated Sample Glance"
    }
}
hipchat.updateGlance(req.clientInfo, req.identity.roomId, 'sample-glance', sampleGlanceData);
Adding an add-on Sidebar or Dialog View
Adding content to the HipChat Sidebar or a HipChat Dialog
You can include a custom view in the HipChat Sidebar. The content will be loaded by the HipChat App in an iframe any time a user opens this Sidebar view.
 You declare the view in the capability descriptor
- for a sidebar view, declare a webPanel element:
atlassian-connect.json
1
2"capabilities": {
    ...,
    "webPanel" : [
        {
            "icon": {
                "url": "{{localBaseUrl}}/img/icon.png",
                "url@2x": "{{localBaseUrl}}/img/icon.png"
            },
            "key": "sample-sidebar",
            "name": {
                "value": "Sample sidebar"
                },
            "url": "{{localBaseUrl}}/sample-sidebar",
            "location": "hipchat.sidebar.right"
        }
    ],
    ...
}
- for a dialog view, declare a dialog element
atlassian-connect.json
1
2"capabilities": {
    ...,
    "dialog": [
        {
            "title": {
                "value": "My Dialog"
            },
            "key": "sample-dialog",
            "options": {},
            "url": "{{localBaseUrl}}/sample-dialog"
        }
    ],
    ...
}
You then expose an endpoint for the webpanel/url specified in the descriptor, in the index.js file:
index.js
1
2app.get('/sample-sidebar',
  addon.authenticate(), //handle the JWT token
  function(req, res) {
    res.render('sample-sidebar', { //render the views/sidebar.hbs template, passing context parameters
      identity: req.identity
    });
  }
);
You then implement the Handlebar template, by creating a new file: views/sample-sidebar.hbs
In this file, first import the layout.hbs file, which in turn imports the HipChat Javascript API, the AUI library - Atlassian User Interface, so you can style your add-on so it looks and feel like HipChat (optional), and jQuery (required by AUI):
sample-sidebar.hbs
1
2<!-- Import the layout -->
{{!< layout}}

<!-- then add any HTML to show in the sidebar -->
Hello world!
Context variables
ACE injects a handful of useful context variables into your render context. You can access any of these within your templates:
title: the add-on's name (derived fromatlassian-connect.json)appKey: the application key defined inatlassian-connect.jsonlocalBaseUrl: the base URI of the add-onhostStylesheetUrl: the URL to the base CSS file for Connect add-ons. This stylesheet is a bare minimum set of styles to help you get started. It's not a full AUI stylesheet.
You can access any of the variables above as normal Handlebars variables. For example:
1
2<h1>{{title}}</h1>
You can also pass your own context variables to the template:
index.js
1
2...
    res.render('sample-sidebar', { //render the views/sidebar.hbs template, passing context parameters
      identity: req.identity,
      myContextParam: myCustomValue
    });
Which you can access the same way:
sample-sidebar.hbs
1
2<h1>{{title}}</h1>
<b>{{myCustomValue.attribute1}}</b>
Using the HipChat Javascript API
The HipChat Javascript API enables you to interact with the HipChat App from within a View. For example, you can add text to the chat input field, create a HipChat room, open a dialog or get the list of room participants.
The import of the Javascript API is done in the layout.
sample-sidebar.hbs
1
2{{!< layout}}
<button id="room">Create a room</button>

$('#room').on('click', function(){
    HipChat.room.create("The Room Name", "The Room Topic", "public/private");
});
Learn more
API guide: Javascript API
Making a call to your add-on back-end from a View
You can make a call to your add-on back-end, using AJAX. You need to include a JWT token to secure the communication, and include context information for your add-on backend.
To do this, ask HipChat to generate a JWT token (using the Javascript API: HipChat.auth.withToken()), and include it in the request:
- Client-side, in sidebar.hbs:
sample-sidebar.hbs
1
2{{!< layout}}
<button id="msg">Send a message</button>
$('#msg').on('click', function(){
    HipChat.auth.withToken(function(err, token) {
        $.ajax({
            type: "POST",
            url: "/send-message",
            headers: { 'authorization': 'JWT ' + token },
            data: {message: 'Hello world'},
            dataType: 'json'
        });
    });
});
- Server-side, in index.js:
index.js
1
2...
app.post('/send-message',
  addon.authenticate(),
  function(req, res) {
    hipchat.sendMessage(req.clientInfo, req.identity.roomId, req.body.message)
      .then(function(data){
        res.sendStatus(200);
      });
  }
);
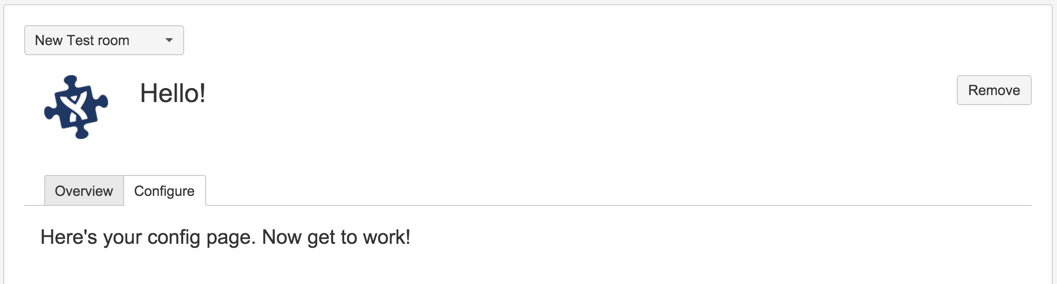
Adding an add-on Configuration page
You declare an add-on configuration page in the capability descriptor:
atlassian-connect.json
1
2"capabilities: {
    ...,
    "configurable": {
        "url": "{{localBaseUrl}}/configure"
    },
    ...
}
Then, follow the same instructions as for adding an add-on sidebar .
Note: the HipChat Javascript API is only partially supported today in the Configuration page.
Learn more
API guide: Configuration Page
How to deploy to Heroku
Before you start, install Git and the Heroku Toolbelt.
If you aren't using git to track your add-on, now is a good time to do so as it is required for Heroku. Ensure you are in your project home directory and run the following commands:
Terminal window
1
2git config --global user.name "John Doe"
git config --global user.email johndoe@example.com
ssh-keygen -t rsa
git init
git add .
git commit . -m "some message"
heroku keys:add
Next, create the app on Heroku:
Terminal window
1
2heroku apps:create <add-on-name>
Then set the public and private key as environment variables in Heroku (you don't ever want to commit these*.pem files into your scm). The two .*pem files were created in your project home directory when you ran the atlas-connect new command.
Terminal window
1
2heroku config:set AC_LOCAL_BASE_URL=https://<subdomain> herokuapp.com --app <add-on-name>
heroku config:set DATABASE_URL=<DB URL> --app <add-on-name>
Lastly, add the project files to Heroku and deploy.
If you aren't already there, switch to your project home directory. From there, run these commands:
Terminal window
1
2git remote add heroku git@heroku.com:<add-on-name>.git
git push heroku master
It will take a minute or two for Heroku to spin up your add-on. When it's done, you'll be given the URL where your add-on is deployed, however, you'll still need to register the atlassian-connect.json descriptor on HipChat.
For further detail, we recommend reading Getting Started with Node.js on Heroku.
Rate this page: