App descriptor
Concepts
Make sure you read the Getting Started section first, to understand what you can do with the HipChat API.
If you'd rather write code straight away, check out our Tutorials section instead.
Add-on capability descriptor
An add-on must expose an HTTP-accessible "capabilities descriptor", a JSON document that describes the add-on and what its capabilities are. For example, here is a simplified descriptor for an add-on that wants to be able to call the HipChat REST API to send notification messages.
1
2{
  "name": "My Integration",
  "key": "com.example.myintegration",
  "capabilities": {
    "installable": {
      "allowGlobal": false,
      "allowRoom": true,
      "callbackUrl": "https://your-addon-url/installed"
    }
    "hipchatApiConsumer": {
      "scopes": [
        "send_notification"
      ]
    }
  }
}
The content of this descriptor depends on how your add-on plans to extend HipChat. At a bare minimum, you need to declare the following capabilities:
- installable: to make sure your add-on can be installed by users
- hipchatApiConsumer: to make sure your add-on can call the HipChat REST API (with a number of security scopes)
Learn more
The HipChat API documentation provides more information about add-on descriptors.
HipChat add-on installations
The HipChat API treats the installation of integrations/add-ons differently to other chat applications: instead of having one OAuth client/shared secret for the add-on that works across all installations, HipChat creates one OAuth client per installation.
A HipChat group represents a team in HipChat, for example in HipChat Cloud:
Each team/group has its own user base, rooms, configuration, etc.
You can choose for your add-on to be installable by users globally for their HipChat group, on a per-room basis, or both.
- If the add-on is installed globally, it works in all rooms in the HipChat group
- If the add-on is installed in a HipChat room, it only works in this room.
Anytime your add-on is installed by a user, and the user accepts the security scopes, HipChat creates an OAuth client / shared secret, and sends it to your add-on via a REST endpoint you declared in your add-on capability descriptor.
Learn more
Your add-on needs to handle the installation process, as described in Installation flow.
Integrate with, and extend HipChat
Once installed, add-ons have access to the full features of the HipChat API. For more information, read the sections below:
Category Page Description Foundation HipChat REST API Explains how to make calls to the HipChat REST API, and in particular:
- Generate access tokens
- Request the appropriate security scopes based on the REST endpoints your add-on wants to use
JWT token Explains how JWT (JSON Web Tokens) are used for HipChat to send signed contextual information to your add-on for each call, and how to make use of it Integrating with HipChat via messages Sending Messages Explains in more details how to send messages to HipChat using the REST API Webhooks Explains how to use webhooks to listen and respond to messages in HipChat rooms, e.g. to implement slash commands Extending the HipChat Apps Glances Explains how to add a status glance to the HipChat right sidebar (e.g. "5 tasks") Actions Explains how to add actions to HipChat messages and HipChat rooms (e.g. "create a task"). Actions can:
- Open a custom Dialog - Archived
- Open a custom Sidebar - Archived
- Open an External Page
Dialog Explains how to add a custom dialog in the HipChat App, and load HTML/JS/CSS from your add-on Sidebar Explains how to add a custom sidebar in the HipChat App, and load HTML/JS/CSS from your add-on Configuration Page Explains how to add a custom configuration page for your add-on in the HipChat administration page, and load HTML/JS/CSS from your add-on Javascript API Explains how to interact with the HipChat App client-side from a Dialog - Archived, Sidebar - Archived or Configuration Page using Javascript
List your add-on in HipChat
Once your add-on is ready, you can make it available to all HipChat users by listing it in the Atlassian Marketplace. Just follow instructions from Listing an add-on.
Other ways to create a simple add-on
There are simpler (albeit more limited) ways you can build an add-on with HipChat today:
Build-your-own wizard
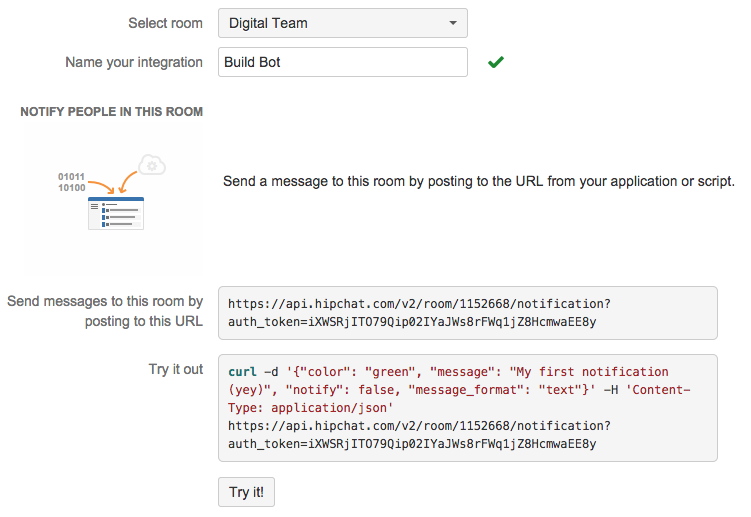
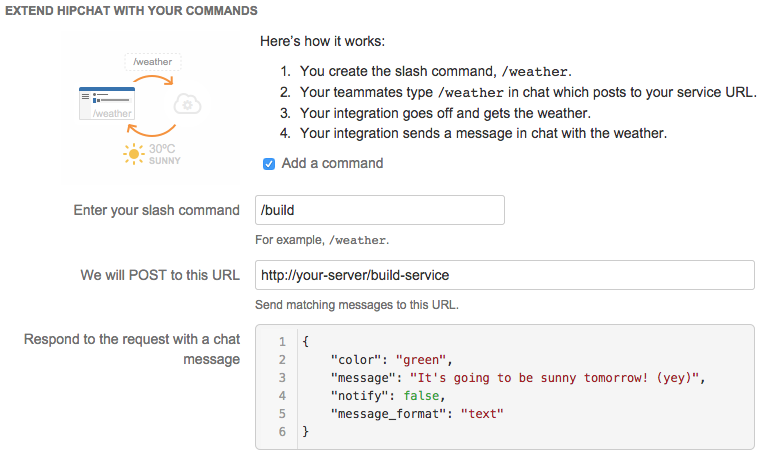
To make things even easier, we have built a simple wizard to build an add-on that can send notification messages to a room, and listen to a slash command.
You can access this wizard from the HipChat administration screen for integrations.
 |  |
Notification-only add-on
Using this method, you can quickly build an add-on that allows you to send notifications to a HipChat room.
To install your add-on in a room, users have to generate tokens from the HipChat web administration screens and paste them in your application, as demonstrated in this video:
In your application, you need to ask users:
- For a token that users generate in HipChat
- For a room ID, which they also get from HipChat, so you know where to post the notification messages
- If you plan to support HipChat Server, you should also ask users for the base URL of their HipChat instance, e.g. myhipchat.company.com. Note: your integration will only work if the HipChat instance is addressable. If it is protected by a firewall without inbound access, it won't work. Make sure to highlight that in your documentation/troubleshooting guide.
You can then use these tokens to post notifications to the room the add-on was installed in, using the send_notification REST endpoint:
HipChat currently supports plain text and HTML notifications (the HTML is curated).
1
2POST /v2/room/{id_or_name}/notification
Authorization: Bearer <token>

{
  "color": "green",
  "message": "My notification message",
  "notify": false,
  "message_format": "text"
}
Limitations
Depending on what method you choose, parts of the API are available to your add-on:
Add-on built using the build-your-own wizard |
Notification-only add-on
| |
|---|---|---|
| Install the integration in a room | yes | yes |
| Install the integration globally | no | no |
Send notification messages to HipChat rooms | yes | yes |
| Use the HipChat REST API | no | no |
| Listen to events via Webhooks | yes Partial: only one "slash command" | no |
| Expose configuration pages in HipChat | no | no |
| Listing your add-on in the Atlassian Marketplace | no | yes |
| Support HipChat Cloud and HipChat Server | yes | yes |
Rate this page: