Building an add-on with your own technology stack
If you use one of the HipChat libraries, building an add-on is relatively simple, as they generate most of the plumbing for you. If that's what you're looking for, check out Getting started with atlassian-connect-express (Node.js). However these libraries make choices and rely on dependencies (Mongo, Redis) which may not work for you. If you want to build an add-on on your own stack, you've landed in the right spot.
This tutorial explains what you need to do to build a HipChat Connect add-on from scratch, using Node. We'll be using Express.js which is a "Fast, unopinionated, minimalist web framework for Node.js" and will handle both starting a web server and routing for us.
Repository
The add-on described in this tutorial is available here: bitbucket.org/hipchat/hipchat-sample-addon-nodejs
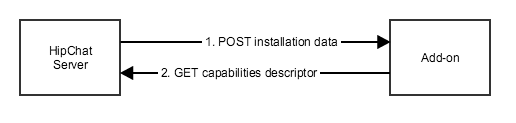
Expose a capability descriptor
Your add-on must expose a JSON capability descriptor, available over HTTPS.
 This descriptor describes how your add-on extends HipChat.
For example this descriptor is for an add-on which:
- Can be installed in a room ("installable" capability)
- Can send notifications to HipChat rooms ("hipchatApiConsumer" capability, with "send_notification" scope)
1
2{
    "name": "Sample Addon",
    "description": "Sample HipChat Addon",
    "key": "sample-hipchat-addon",
    "links": {
        "homepage": "https://my.server.com/my-addon",
        "self": "https://my.server.com/my-addon/capabilities.json"
    },
    "vendor": {
        "name": "Atlassian",
        "url": "https://www.atlassian.com/"
    },
    "capabilities": {
        "hipchatApiConsumer": {
            "fromName": "Sample Add-on",
            "scopes": [
                "send_notification"
            ]
        },
        "installable": {
            "allowGlobal": false,
            "allowRoom": true,
            "callbackUrl": "https://my.server.com/my-addon/installed"
        }
    }
}
Learn more
API reference: Capability descriptor
What data you need to store
Your add-on will need to store data. We recommend indexing this data by oauthId, which is unique for each installation.
In the sample code below, we're just using local variables:
1
2var installationStore = {};
var accessTokenStore = {};
In real-life implementations, you'll want to store that in a proper datastore.
Installation data
Any time your add-on is installed by a user, HipChat sends your add-on information about the installation, for example:
1
2{ oauthId: 'cba74fbc-1b26-407e-811d-b9e377e4c440',
  capabilitiesUrl: 'https://api.hipchat.com/v2/capabilities',
  roomId: 100,
  groupId: 1,
  oauthSecret: 'NothWQ2HtSdsidQxxxkmMUzsACNzPSR' }
Capabilities document
Part of the installation data is capabilitiesUrl, the URL to a capabilities document for this installation.
This data gives you a list of endpoints your add-on should use to invoke the HipChat REST API. In particular:
1
2{
  "capabilities": {
    ...
    "oauth2Provider: {
      "authorizationUrl": "https://www.hipchat.com/users/authorize",
      "tokenUrl": "https://api.hipchat.com/v2/oauth/token"
    },
    "hipchatApiProvider": {
      "availableScopes": [list of scopes granted to the addon],
      "url": "https://api.hipchat.com/v2/"
    },
    ...
}
- oauth2Provider/tokenUrl: the endpoint you use to generate an add-on access token to invoke any REST API endpoint (as described in API access tokens
- hipchatApiProvider/url: the base URL for any HipChat REST API endpoint
- **oauth2Provider/**authorizationUrl: the endpoint you use to ask a user permission to act on their behalf with a User token (as described in API access tokens)
Make sure you use the URLs from the capabilities document instead of hard-coding https://api.hipchat.com/v2/ in your implementation.
Otherwise this means your add-on won't work in a HipChat Server installation, where the base URL is different (e.g. https://api.my.hipchat.server/v2/).
API access tokens
Your add-on generates access tokens to be able to make REST calls to the HipChat API. These tokens are short lived (1h) and should be stored while they are valid.
Add-on specific data
For example configuration or user specific data.
Handle the installation flow
Whenever your add-on is installed/uninstalled by a user, HipChat makes a POST to a REST endpoint exposed by your add-on, with details of the installation.
 First you need to specify, in the capabilities descriptor:
- A REST endpoint for HipChat to POST the installation data to when your add-on is installed: capabilities/installable/callbackUrl
- A REST endpoint for HipChat to POST to when your add-on is uninstalled: capabilities/installable/uninstalledUrl.
- whether the add-on can be installed globally (all rooms for a HipChat group), in specific HipChat rooms, or both.
1
2"capabilities": {
    ...,
    "installable": {
        "allowGlobal": true,
        "allowRoom": true,
        "callbackUrl": "${host}/installed",
        "uninstalledUrl": "${host}/uninstalled"
    },
    ...
}
To implement the installation endpoint:
- Expose an installation endpoint
- Retrieve the capabilities document by GETting the capabilitiesUrl from the installation data.
- Store this data for later use, indexed by oauthId
1
2app.post('/installed', function (req, res) {

    var installation = req.body;
    var oauthId = installation['oauthId'];

    //store the installation data
    installationStore[oauthId] = installation;

    // Retrieve the capabilities document
    var capabilitiesUrl = installation['capabilitiesUrl'];
    request.get(capabilitiesUrl, function (err, response, body) {
        var capabilities = JSON.parse(body);
        logger.info(capabilities, capabilitiesUrl);

        // Save the token endpoint URL along with the client credentials
        installation.tokenUrl = capabilities['capabilities']['oauth2Provider']['tokenUrl'];

        // Save the API endpoint URL along with the client credentials
        installation.apiUrl = capabilities['capabilities']['hipchatApiProvider']['url'];

        res.sendStatus(200);
    });

});
Make sure to implement the uninstallation flow as well, to clean up installation data and access tokens when a user uninstalls your add-on:
1
2app.get('/uninstalled', function (req, res) {
    logger.info(req.query, req.path);
    var redirectUrl = req.query['redirect_url'];
    var installable_url = req.query['installable_url'];

    request.get(installable_url, function (err, response, body) {
        var installation = JSON.parse(body);
        logger.info(installation, installable_url);

        delete installationStore[installation['oauthId']];
        delete accessTokenStore[installation['oauthId']];

        // Redirect back to HipChat to complete the uninstallation
        res.redirect(redirectUrl);
    });
});
Learn more
API guide: Installation flow
Manage add-on security
API access tokens
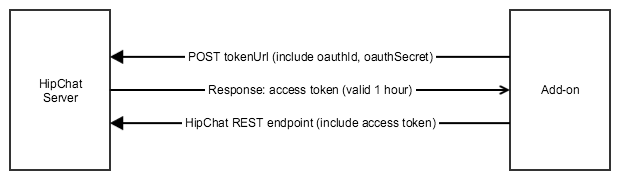
You'll need a token to make calls to the HipChat REST API. To generate a token, make a POST to the tokenUrl from the capabilities document:
- Method: POST
- URL: tokenUrl provided in the capabilities document in the installation data
- Headers: basic auth with the OAuth credentials from the installation data
- Body: OAuth dictates application/x-www-form-urlencoded parameters
- grant_type: 'client_credentials'
- scopes (optional): a space delimited list of scopes that are a subset of the scopes declared in the descriptor.
1
2function refreshAccessToken(oauthId, callback) {
    var installation = installationStore[oauthId];
    var params = {
        uri: installation.tokenUrl,
        auth: {
            username: installation['oauthId'],
            password: installation['oauthSecret']
        },
        form: {
            grant_type: 'client_credentials'
        }
    };

    request.post(params, function (err, response, body) {
        var accessToken = JSON.parse(body);

        //Store the access token
        accessTokenStore[oauthId] = {
            // Add a minute of leeway
            expirationTimeStamp: Date.now() + ((accessToken['expires_in'] - 60) * 1000),
            token: accessToken
        };
        callback(accessToken);
    });
}
A token typically expires after an hour, after which you need to generate a new one:
1
2function isExpired(accessToken) {
    return accessToken.expirationTimeStamp < Date.now();
}

function getAccessToken(oauthId, callback) {
    var accessToken = accessTokenStore[oauthId];
    if (!accessToken || isExpired(accessToken)) {
        refreshAccessToken(oauthId, callback);
    } else {
        process.nextTick(function () {
            callback(accessToken.token);
        });
    }
}
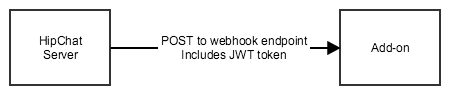
JWT tokens
Any time HipChat makes a HTTP call to your add-on, it includes a signed JWT token in a HTTP header.
This token contains contextual information about the call (oauthId, roomId, userId, etc.).
This token is signed, and you can verify its signature using the shared secret from the installation data. This helps you validate that the call is really from HipChat, and from this installation.
Here's how to handle JWT tokens sent by HipChat to your add-on:
- Extract the token. Depending on the call:
- from the HTTP header "Authorization"
- from the request parameter: "signed_request"
- Decode the base64-encoded token
- Extract the oauthId which is in the 'iss' (issuer) parameter from the JWT token
- Lookup the installation data for this oauthId
- Use the sharedSecret from the installation data to validate the signature of the token
This sample implementation is a middleware function which will be added to the call chain for each inbound call. It validates the token as per description above, and sets a variable 'res.locals.context' with the context provided by HipChat (oauthId, roomId).
1
2function validateJWT(req, res, next) {
    try {
        var encodedJwt = req.query['signed_request']
            ||req.headers['authorization'].substring(4)
            ||req.headers['Authorization'].substring(4);

        var jwt = jwtUtil.decode(encodedJwt, null, true);
        var oauthId = jwt['iss'];
        var roomId = jwt['context']['room_id'];

        var installation = installationStore[oauthId];
        jwtUtil.decode(encodedJwt, installation.oauthSecret);

        res.locals.context = {oauthId: oauthId, roomId: roomId};
        next();
    } catch (err) {
        res.sendStatus(403);
    }
}
Learn more
API guide: JWT token
Call the HipChat REST API
To call the HipChat REST API, you need an access token.
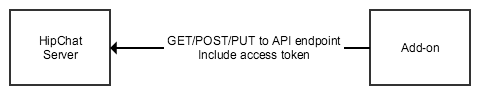 - Method: POST/PUT/GET
- URL: {apiUrl}/{apiEndpoint}
- Headers: access token
- Body: dependent on the endpoint
- Method: POST/PUT/GET
- URL: {apiUrl}/{apiEndpoint}
- Headers: access token
- Body: dependent on the endpoint
For example, to post a message to a HipChat room:
1
2function sendSampleMessage(oauthId, roomId) {
    var installation = installationStore[oauthId];
    var notificationUrl = installation.apiUrl + 'room/' + roomId + '/notification';
    getAccessToken(oauthId, function (token) {
        request.post(notificationUrl, {
            auth: {
                bearer: token['access_token']
            },
            json: {
                'message_format': 'text',
                'message': 'Hello world',
                'notify': false,
                'color': 'gray'
            }
        }
    });
}
Listen to HipChat events with Webhooks
To implement a Webhook, you must first declare it in the add-on capability descriptor.
For example this one listens to all messages posted in the room in which the add-on is installed (regex .*).
1
2"capabilities": {
    ...,
    "webhook": [
        {
            "url": "https://my.server.com/my-addon/echo-webhook",
            "event": "room_message",
            "pattern": ".*",
            "name": "Echo",
            "authentication": "jwt"
        }
    ],
    ...
}
You must then implement the endpoint declared in the descriptor:
- Method: POST
- URL: the one declared in the descriptor webhook/url
- Body: JSON data, whose format depends on the webhook event, as per reference documentation for webhooks
For example:
1
2app.post('/echo-webhook',
    validateJWT, //will be executed before the function below, to validate the JWT token and create a context object with oauthId and roomId
    function (req, res) {

        var message = req.body;
        var echoMessage = "echo " + message['item']['message']['message'];
        sendMessage(res.locals.context.oauthId, res.locals.context.roomId, echoMessage);
        res.sendStatus(204);
    }
);
Add an add-on Glance
Your add-on declares a glance in the capabilities descriptor:
1
2"capabilities": {
    "glance": [
        {
            "icon": {
                "url": "https://my-server/my-addon/resources/img/icon.png",
                "url@2x": "https://my-server/my-addon/resources/img/icon.png"
            },
            "key": "sample-glance",
            "name": {
                "value": "Sample Glance"
            },
            "queryUrl": "https://my-server/my-addon/glance-data",
            "target": "sample-sidebar"
        }
    ]
}
Glance queryUrl
When a user opens a room where your add-on is installed in the HipChat App, the HipChat App retrieves the initial glance value by calling the queryUrl endpoint. This is a cross domain HTTP request, so you need to include CORS headers.
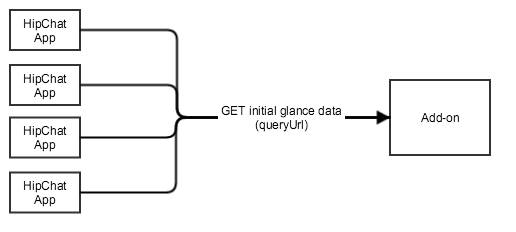
- Method: GET
- URL: the URL declared in the descriptor (capabilities/glance[x]/queryUrl)
- Context for the call (roomId, oauthId, userId) included in the JWT token
You first need to validate the JWT token, then return the glance data. This is a cross domain request, so make sure to include CORS headers.
1
2app.get('/glance-data', validateJWT, function (req, res) {

    //Handle CORS headers (cross domain request)
    res.header("Access-Control-Allow-Origin", "*");

    //Return glance data
    var sampleGlanceData = {
        label: {
            value: "<b>Hello</b> World",
            type: "html"
        }
    };
    res.send(JSON.stringify(sampleGlanceData));
});
Glance update
HipChat will not poll the queryUrl for updates. Instead, if your add-on wants to update the glance, it needs to POST an update to the HipChat Server. The Server will distribute this update to all connected HipChat Apps.
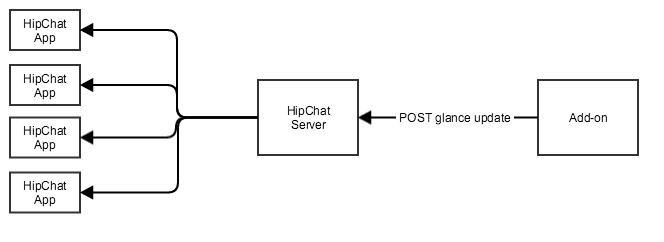
- Method: POST
- URL to update the glance for a room: {apiUrl}/addon/ui/room/{roomId}
- Header: access token
- Body: glance data
1
2function updateGlanceData(oauthId, roomId, glanceData) {
    var installation = installationStore[oauthId];
    var roomGlanceUpdateUrl = installation.apiUrl + 'addon/ui/room/' + roomId;

    getAccessToken(oauthId, function (token) {
        request.post(roomGlanceUpdateUrl, {
            auth: {
                bearer: token['access_token']
            },
            json: {
                glance: [{
                    key: "sample-glance",
                    content: glanceData
                }]
            }
        }, function (err, response, body) {
            logger.info(response);
            logger.info(err || response.statusCode, roomGlanceUpdateUrl)
        });
    });
}
Add an add-on Sidebar
Adding content to the HipChat Sidebar
You can include a custom view in the HipChat Sidebar. The content will be loaded by the HipChat App in an iframe any time a user opens this Sidebar view.
You declare the sidebar in the capability descriptor:
1
2"capabilities": {
    ...,
    "webPanel" : [
        {
            "icon": {
                "url": "https://my-server/my-addon/resources/img/icon.png",
                "url@2x": "https://my-server/my-addon/resources/img/icon.png"
            },
            "key": "sample-sidebar",
            "name": {
                "value": "Sample sidebar"
                },
            "url": "https://my-server/my-addon/sidebar",
            "location": "hipchat.sidebar.right"
        }
    ],
    ...
}
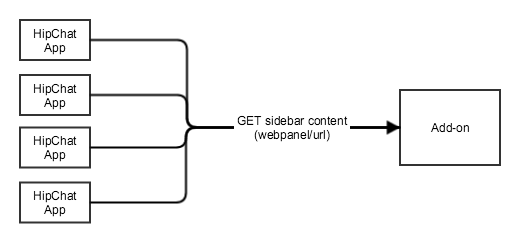
You then expose an endpoint for the webpanel/url specified in the descriptor:
- Method: GET
- URL: the URL declared in the descriptor (capabilities/webpanel[x]/url)
- Context for the call (roomId, oauthId, userId) included in the JWT token
You first need to validate the JWT token, then return the sidebar content.
1
2app.get('/sidebar', validateJWT, function (req, res) {
    res.redirect('/sidebar.html');
});
In the view, you need to import the following:
- The HipChat Javascript client library all.js. This will enable you to use the Javascript API from within the view
- Optionally: the Atlassian User Interface library (AUI) for creating user interfaces according to the Atlassian Design Guidelines (ADG)
1
2<head>
   <script src="https://www.hipchat.com/atlassian-connect/all.js"></script>
    <link rel="stylesheet" href="//aui-cdn.atlassian.com/aui-adg/5.9.5/css/aui.css" media="all">
</head>
Securing your add-on front-end/backend communications
You can use the Javascript API to retrieve a JWT token which you can include in any request sent from your add-on front-end to your add-on back-end.
For example, if you want to post a message to the HipChat room when a user clicks on a button in the sidebar:
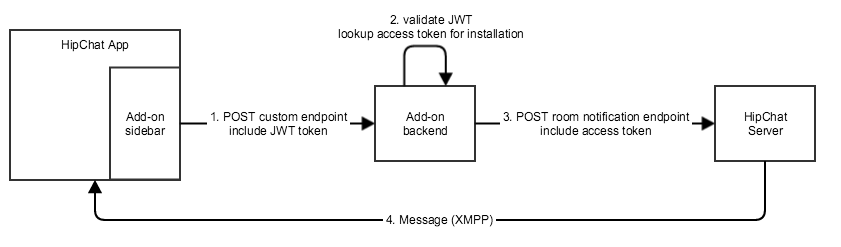 - In the add-on front-end code:
- Request a JWT token using the Javascript API, with HipChat.auth.withToken(callback)
- Make a REST call to your add-on back-end
- In the add-on front-end code:
- Request a JWT token using the Javascript API, with HipChat.auth.withToken(callback)
- Make a REST call to your add-on back-end
1
2...
<button class="aui-button" id="sendCard" >Send a Card</button>
...
$( "#sendCard" ).click(function() {
   //This will request a JWT token from the HipChat client, signed with the installation shared secret,
   //which you use to secure the REST call
   HipChat.auth.withToken(function(err, token) {
      //then, make a REST call to the add-on backend, including the JWT token
      $.ajax({
         type: "POST",
         url: "/post-card",
         headers: { 'authorization': 'JWT ' + token },
         data: {cardDescription: 'This card was posted from the Sidebar'},
         dataType: 'json',
         error: function (jqXHR, status) {
            alert('fail' + status.code);
         }
      });
   });
});
- In the add-on backend code:
- Expose an endpoint for your add-on front-end
- Validate the JWT token
- Retrieve the installation details using the information from the JWT token
- Make a REST call to HipChat to post a message
1
2app.post('/post-card', validateJWT, function (req, res) {
    var request = req.body;
    sendSampleCardMessage(res.locals.context.oauthId, res.locals.context.roomId, req.body.cardDescription);
    res.sendStatus(204);
});
Learn more
API guide for the Sidebar: Sidebar
API reference: Webpanel
API guide for the HipChat Javascript API: Javascript API
Atlassian User Interface: AUI
Atlassian Design Guidelines: ADG
Add an add-on Dialog
You declare a dialog in the capability descriptor:
1
2"capabilities": {
    ...,
    "dialog": [
        {
            "title": {
                "value": "My Dialog"
            },
            "key": "sample-dialog",
            "options": {},
            "url": "https://my-server/my-addon/dialog"
        }
    ],
    ...
}
Then, follow the same instructions as for adding an add-on sidebar.
Add an add-on Configuration page
You declare an add-on configuration page in the capability descriptor:
1
2"capabilities: {
    ...,
    "configurable": {
        "url": "https://my-server/my-addon/configure"
    },
    ...
}
Then, follow the same instructions as for adding an add-on sidebar.
Note: the HipChat Javascript API is only partially supported today in the Configuration page.
Learn more
API guide: Configuration Page
Rate this page: