Creating a custom Release Notes template containing release comments
Many Jira users want to expand the generated Release Notes to include release comments for each issue in the report. This tutorial shows how to do this using a custom field and some customized Velocity templates. Tutorial assumes the reader understands Jira's custom fields. For more information on custom fields, see the Jira documentation.
For Jira Data Center applications, ensure you copied the changes to all nodes. Otherwise, your app won't include the release comments.
Step 1: Create a custom field
In this step you add a custom field for your release note comments. Note that you'll be associating this custom field with a screen. You can use the default screen or create your own beforehand.
- In Jira, click the
 > Issues.
 - In the left menu, click Custom fields.
- To start the adding custom field wizard, click Add custom field. Create a field with the following details:
- Type: Text Field (multi-line).
- Name: Release notes comments.
- Description: This is a comment to include on the generated Release Notes.
- Associated screens: Resolve Issue Screen
- To create your custom field, click Update.
You have now finished creating a custom field that will be displayed when you resolve or close an issue. You'll use this to enter comments to appear on the Release Notes.
Step 2: Create custom Velocity templates for Release Notes
Velocity is the templating engine used in Jira. Currently Jira ships with a text and an HTML Release Notes report
template. For this tutorial, you will modify the existing templates to also display the custom field that you created
in the previous step, for each issue in the report.
This templates are located under <jira-application-dir>/WEB-INF/classes/templates/jira/project/releasenotes.
The modified releasenotes-text.vm template looks something like this:
1
2#macro (getReleaseNoteComment $issue $customFieldManager)
#set ($customFields = $customFieldManager.getCustomFieldObjects($issue.project.getLong("id"), $issue.issueType.getString("id")))
#foreach($customField in $customFields)
#if($customField.name.equals("release notes comments"))
#if($customField.getValue($issue)) - Release Comment: $textUtils.htmlEncode($customField.getValue($issue))#end
#end
#end
#end

<title>$textUtils.htmlEncode($action.getText('release.notes.html.title', $project, $version))</title>
<body>
<table>
<tr>
<td>

#foreach ($issueType in $issueTypes)
#if($issueType.issues.size() > 0)
<h2>$textUtils.htmlEncode($issueType.name)</h2>
<ul>
#foreach ($issue in $issueType.issues)
<li>[<a href='$!requestContext.canonicalBaseUrl/browse/$issue.key'>$issue.key</a>] - #doubleEncode($issue.summary)#getReleaseNoteComment($issue $customFieldManager)</li>
#end
</ul>
#end
#end
</td>
</tr>

<tr>
<td>

<hr width="100%">

<a name="editarea"><h2>$action.getText('release.notes.edit.copy')</h2></a>
<p>$action.getText('release.notes.description')<br></p>

<textarea rows="40" cols="120">

$action.getText('release.notes.heading', $project, $version)

#foreach ($issueType in $issueTypes)
#if($issueType.issues.size() > 0)
** $textUtils.htmlEncode($issueType.name)
#foreach ($issue in $issueType.issues)
* [$issue.key] - $textUtils.htmlEncode($issue.summary)#getReleaseNoteComment($issue $customFieldManager)
#end
#end

#end
</textarea>
</td>
</tr>
</table>
</body>
The modified releasenotes-html.vm template looks like this:
1
2#macro (getReleaseNoteComment $issue $customFieldManager)
#set ($customFields = $customFieldManager.getCustomFieldObjects($issue.project.getLong("id"), $issue.issueType.getString("id")))
#foreach($customField in $customFields)
#if($customField.name.equals("release notes comments"))
#if($customField.getValue($issue)) - <b>Release Comment</b>: $textUtils.htmlEncode($customField.getValue($issue))#end
#end
#end
#end
<title>$action.getText('release.notes.html.title', $project, $version) </title>
<body>
<table>
<tr>
<td>

#foreach ($issueType in $issueTypes)
#if($issueType.issues.size() > 0)
<h2>$textUtils.htmlEncode($issueType.name)</h2>
<ul>
#foreach ($issue in $issueType.issues)
<li>[<a xhref='$!appProps.getString("jira.baseurl")/browse/$issue.key'>$issue.key</a>] -
 $textUtils.htmlEncode($issue.summary)#getReleaseNoteComment($issue $customFieldManager)</li>
#end
</ul>
#end
#end
</td>
</tr>

<tr>
<td>

<hr width="100%">

<a name="editarea"><h2>$action.getText('release.notes.edit.copy')</h2></a>
<p>$action.getText('release.notes.description')<br></p>

<textarea rows="40" cols="120">

$action.getText('release.notes.heading', $project, $version)
#foreach ($issueType in $issueTypes)
#if($issueType.issues.size() > 0)

<h2>$textUtils.htmlEncode($issueType.name)</h2>
<ul>
#foreach ($issue in $issueType.issues)
<li>[<a xhref='$!appProps.getString("jira.baseurl")/browse/$issue.key'>$issue.key</a>] -
 $textUtils.htmlEncode($issue.summary)#getReleaseNoteComment($issue $customFieldManager)</li>
#end
</ul>
#end
#end
</textarea>
</td>
</tr>
</table>
</body>
The only difference between the two templates and their originals is the definition of the Velocity macro getReleaseNoteComment
and its use after the issue summary. In the macro, we use the context variable $customFieldManager, which is
an instance of the com.atlassian.jira.issue.CustomFieldManager interface. We use the CustomFieldManager to get
all CustomFieldObjects for the current issue and then iterate through them looking for the field we want.
When we find the field named "Release Notes comments", we get and display the value if it is not null.
We do not use the getCustomFieldObjectByName method because it is deprecated and we cannot be certain that
the custom field name will be unique within the Jira instance.
These Velocity templates will display the "Release Notes comments" custom field in your generated Release Notes. You can restart Jira and it will pick up changes.
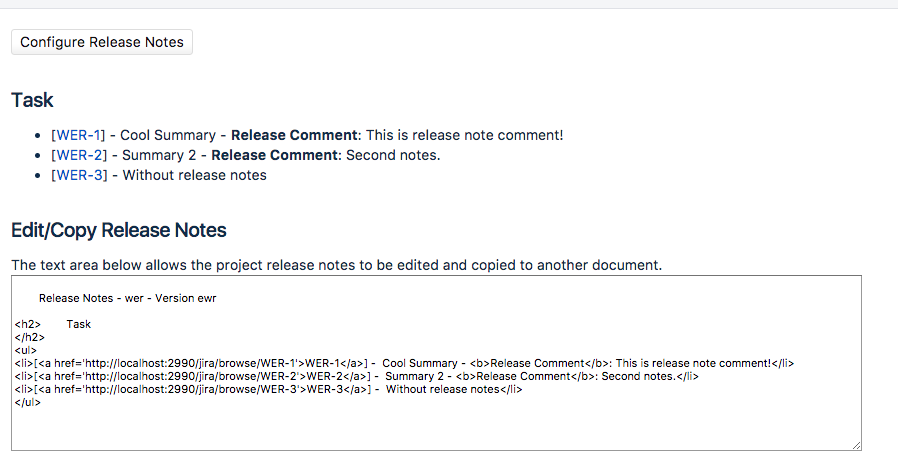
Here is an example of Release Notes comments:
Deploying Velocity templates without a restart
In a development instance, you can play with picking up Velocity file changes without a restart.
From <jira-install>/atlassian-jira/WEB-INF/classes/velocity.properties:
- Change
class.resource.loader.cachefromtruetofalse. - Uncomment (that is, remove the # sign from)
\#velocimacro.library.autoreload=true.
Keep in mind that the next time you upgrade Jira or need a new installation for any reason, you will have to manually copy any changes you have made to the JSPs or templates into the new installation of Jira. If the JSPs or templates have changed in the newer version, you will have to port your customization into them.
Step 3: Modify Jira to use custom Velocity templates
-
Place the two velocity templates into the
<jira-application-dir>/WEB-INF/classes/templates/jira/project/releasenotessubdirectory of your Jira Installation Directory. -
To specify your new template formats, change the value of the
jira.releasenotes.templatesproperty in thejira-config.propertiesof your Jira Home Directory.Note that this file might not exist if you use a new installation or an upgraded installation where your previous Jira application versions were never customized. If this file does not exist, create it using a text editor.
There is no need to modify the
jira.releasenotes.templatenamesproperty because we still want an HTML and Text option and we have only changed the templates themselves. -
Change the
jira.releasenotes.templatesproperty value to look like the following, representing your new HTML and Text Velocity template files, respectively:1 2
jira.releasenotes.templates = releasenotes-with-releasecomment-html.vm, releasenotes-with-releasecomment-text.vm
When modifying the properties in jira-config.properties file, note that the corresponding entries in both of these properties must be in the same order. If these properties don’t exist in the file, then for each property, add its name,
followed by an '=', followed by the content of the property's corresponding <default-value/> element copied from your Jira installation's jpm.xml file.
See Making changes to the jira-config.properties file for more information.
-
Save your modified
jira-config.propertiesfile and restart Jira. -
Now you can test if what you have done works. You must make sure you can generate some Release Notes that will contain issues.
- Make sure that you have created a version for the project you test this under (Release Notes can only be generated for a version).
- Make sure that you have some issues that have the fix versions set to the version you created above.
- Make sure that you have entered some release comment text on the issues with the fix versions from above (in our example, if there is not a release comment for an issue, then nothing will display and it will look very much like the original Release Notes).
-
Go to the Release Notes page and follow Creating Release Notes guidelines. You should see the Release Note comments text after the summary text for each issue.
Step 4: Filter Release Notes
As an optional extra, you can filter the Release Notes based on various issue properties to see if they match
your criteria. For example, to print only issues that have a resolution of Fixed and a Status, put an #if
statement around the code that creates a bullet point for the issue:
1
2#set ($resolution = $issue.getResolutionObject())
#set ($status = $issue.getStatusObject())
## check for resolved or closed and fixed
#if (($status.getId() == "5" || $status.getId() == "6") && $resolution.getId() == "1")
 <li>[<a href='$!appProps.getString("jira.baseurl")/browse/$issue.getString("key")'>$issue.getString("key")</a>] -
 $textUtils.htmlEncode($issue.getString("summary"))#getReleaseNoteComment($issue $customFieldManager)</li>
#end
Conclusion
This tutorial shows a modification to the Release Notes reports, but the concepts used within should show you how to customize Release Notes to fit many other needs. The use of custom fields and the mechanism for accessing their values through a Velocity template can allow a great number of extensions beyond the scope of this example.
Have fun and good luck!
Related topics
- Available fields: for details on what information you can retrieve, see the Jira Remote API. For example:
- Template syntax: the Velocity User Guide will help you choose the right syntax.
- Help & Support: post in the Jira development category on Atlassian Community to get help from the user community.
Rate this page: