OAuth
This page shows you how to authenticate clients against the Jira REST API using OAuth (version 1.0a). We’ll explain how OAuth works with Jira and walk you through an example of how to use OAuth to authenticate a Java application against the Jira REST API for a user. While there are other methods of authenticating against Jira, we recommend that you use OAuth.
Code samples
If you prefer to figure things out from the source code, feel free to check the output of this
tutorial on Bitbucket (look for
the java directory). Note, there are examples in that repository for other languages including
Node.js, PHP, Python, Perl, and Ruby.
Authorization flow
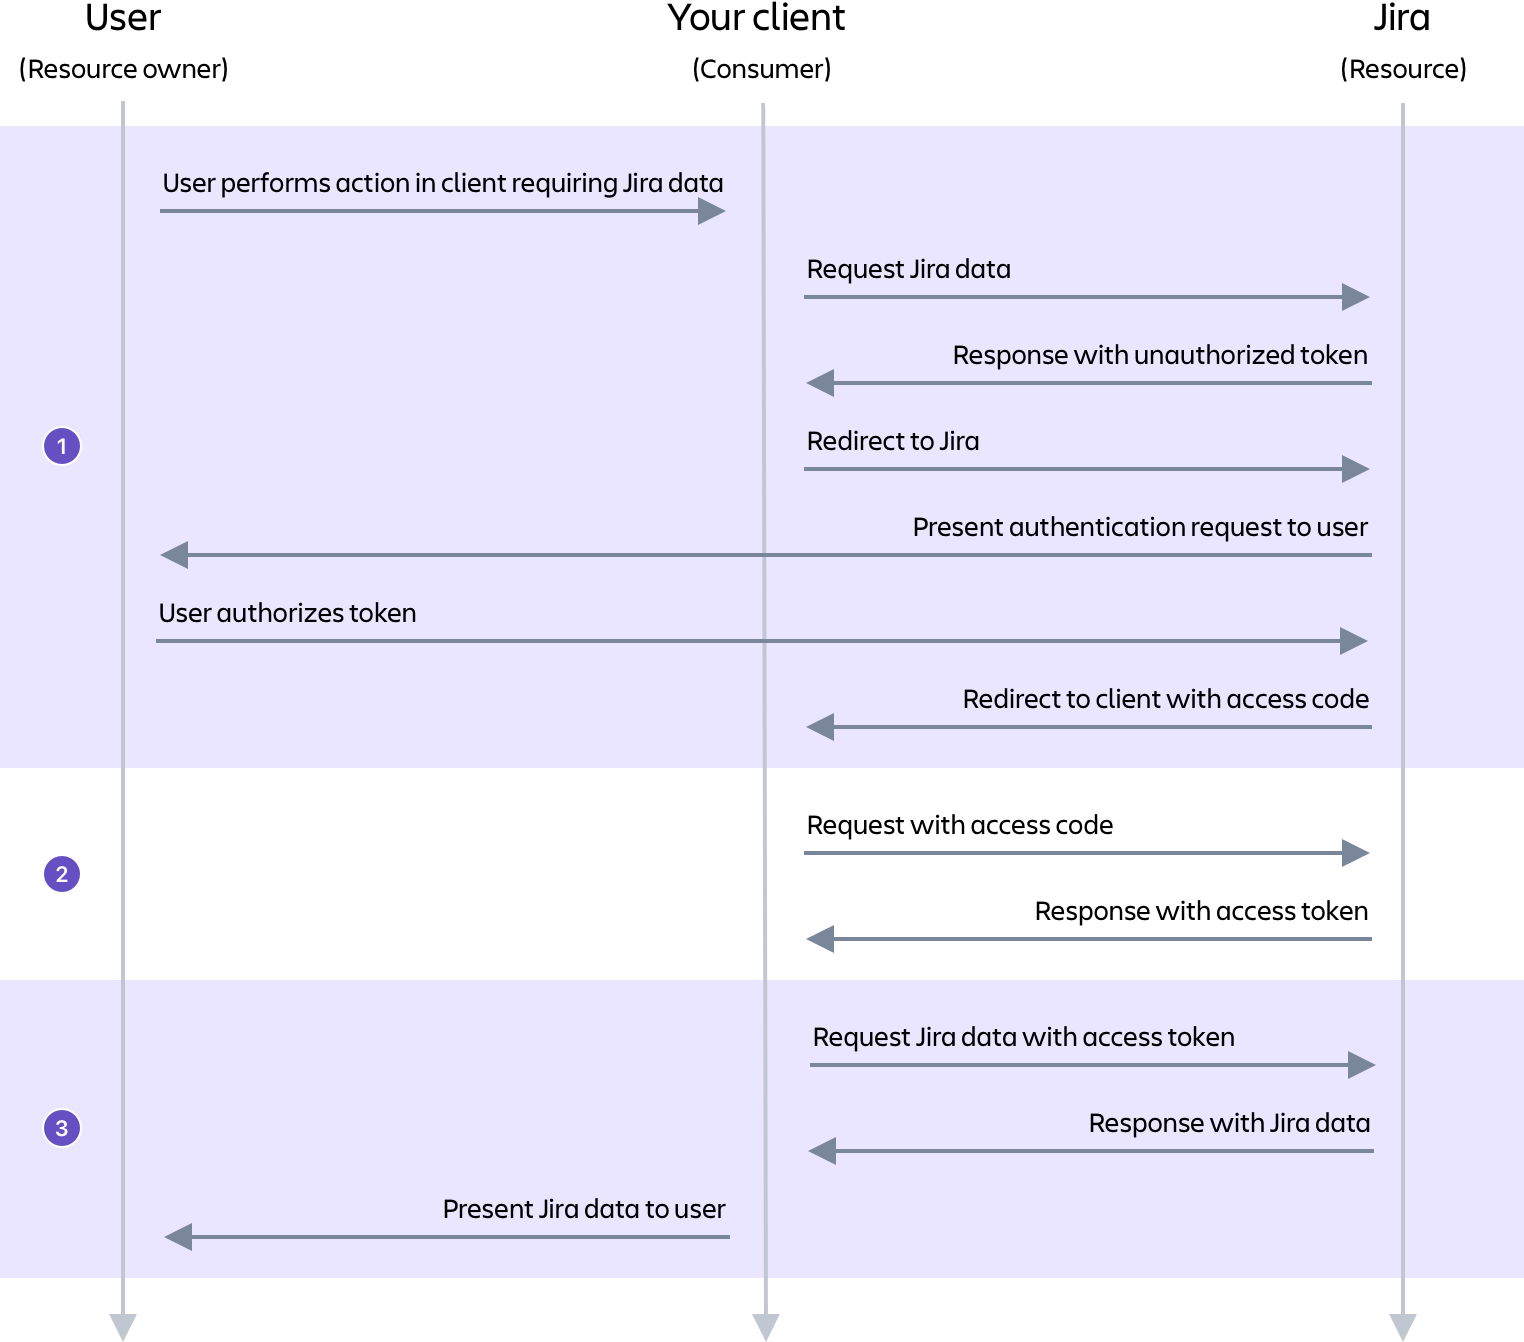
OAuth is an authorization protocol that contains an authentication step. OAuth allows a user (resource owner) to grant a third-party application (consumer/client) access to their information on another site (resource). This process is commonly known as the OAuth dance. Jira uses 3-legged OAuth (3LO), which means that the user is involved by authorizing access to their data on the resource (as opposed to 2-legged OAuth, where the user is not involved).
In Jira, a client is authenticated as the user involved in the OAuth dance and is authorized to have read and write access as that user. The data that can be retrieved and changed by the client is controlled by the user's permissions in Jira.
The authorization process works by getting the resource owner to grant access to their information on the resource by authorizing a request token. This request token is used by the consumer to obtain an access token from the resource. Once the client has an access token, it can use the access token to make authenticated requests to the resource until the token expires or is revoked.
This process can be separated into three stages:
- The user authorizes the client with Jira to receive an access code.
- The client makes a request to Jira with the access code and receives an access token.
- The client can now receive data from Jira when it makes a request including the access token. Note, the client can continue making authenticated requests to Jira until the token expires or is revoked.
The authorization flow is shown in more detail in the following diagram.
Before you begin
To complete this tutorial, you'll need the following set up in Jira:
- A Jira Data Center site; ours is running at
localhost:8080 - A user that has permission to browse a project
You'll also need the following on your system:
- Maven (3.x)
- Java; we're using Oracle JDK 1.8
- OpenSSL; included on Mac and Linux, but will need to be installed on Windows
If you’d like to check an example OAuth authentication, also see Jira REST API - example OAuth authentication.
Step 1: Configure Jira
In Jira, OAuth consumers are represented by application links. Application links use OAuth with RSA-SHA1 signing for authentication. This means that a private key is used to sign requests, rather than the OAuth token secret/consumer secret. In the following steps, you’ll generate an RSA public/private key pair, then create a new application link in Jira that uses the key.
Generate an RSA public/private key pair
In terminal, run the following openssl commands. You can do this anywhere in your file system, but note that this is where the files will be created.
- Generate a 1024-bit private key:
1
2openssl genrsa -out jira_privatekey.pem 1024
- Create an X509 certificate:
1
2openssl req -newkey rsa:1024 -x509 -key jira_privatekey.pem -out jira_publickey.cer -days 365
- Extract the private key (PKCS8 format) to the
jira_privatekey.pcks8file:
1
2openssl pkcs8 -topk8 -nocrypt -in jira_privatekey.pem -out jira_privatekey.pcks8
- Extract the public key from the certificate to the
jira_publickey.pemfile:
1
2openssl x509 -pubkey -noout -in jira_publickey.cer  > jira_publickey.pem
Create an application link
-
In Jira, navigate to Jira settings (cog icon) > Applications > Application links.
-
In the Enter the URL of the application you want to link field, enter any URL, for example,
http://example.com/, and then click Create new link. Ignore the No response was received from the URL you entered warning that is displayed and click Continue. -
On the first screen of the Link applications dialog, select the Create incoming link checkbox (1).
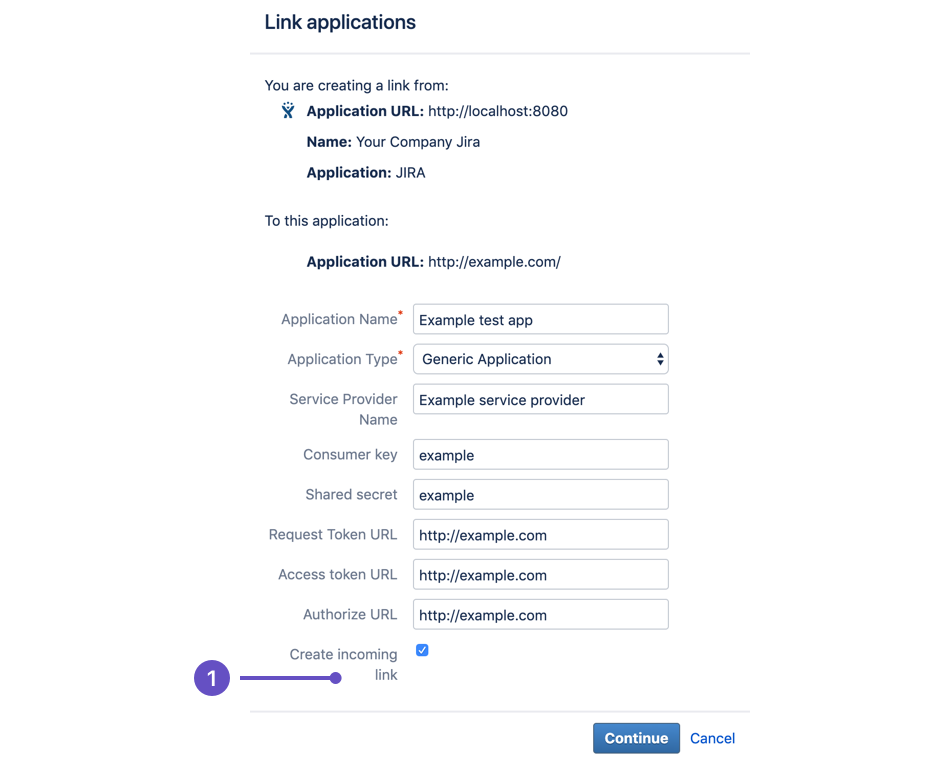
It doesn't matter what you enter in the remaining fields (URL, name, type, and so on). This is because we only want to retrieve data from Jira, therefore we only need to set up a one-way (incoming) link from the client to Jira.
-
On next screen of the Link applications dialog, enter the consumer details for the sample client:
- Consumer key =
OauthKey - Consumer name =
Example Jira app - Public key = Copy the public key from the
jira_publickey.pemfile you generated previously and paste it into this field (for example,dv5y+mjc4fZHHoLAwg...)
- Consumer key =
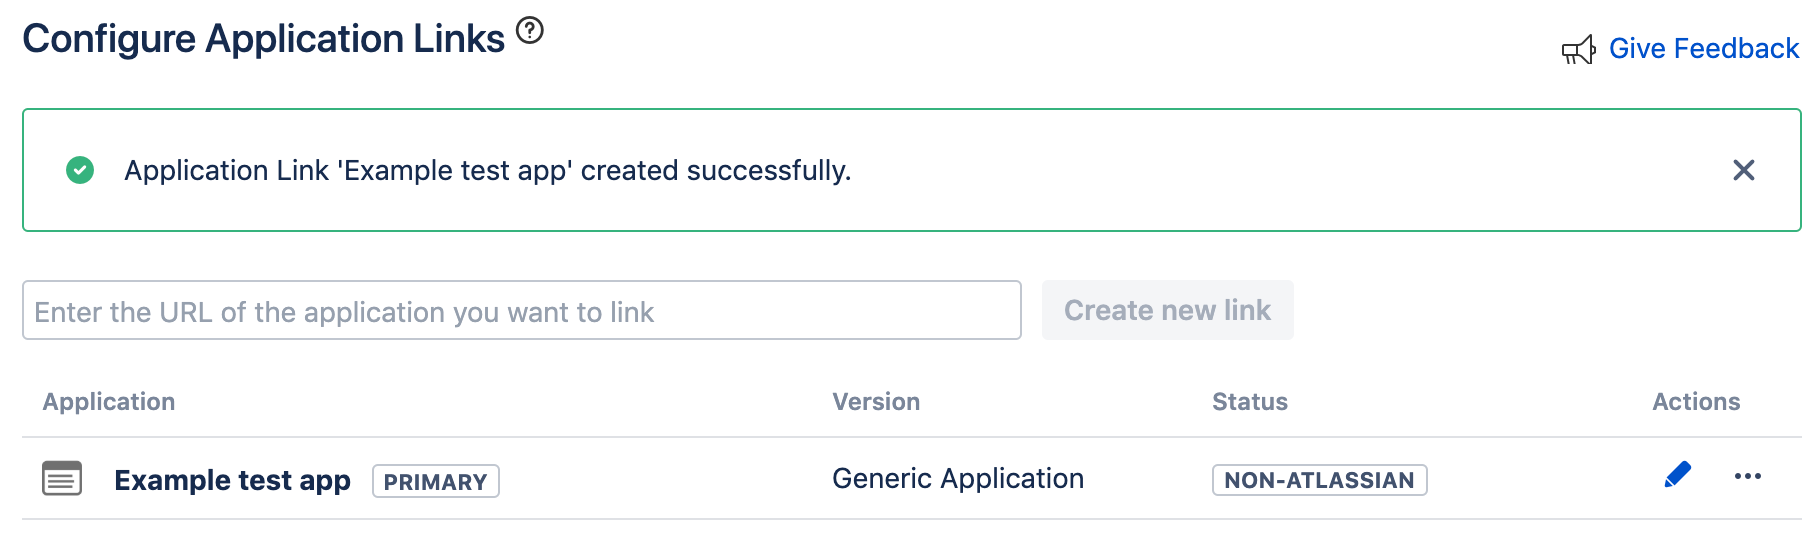
-
Click Continue. The application link you created will show in a screen like the following.
Step 2: Create the client
Next we will create our sample client, which is the consumer in this example.
- Clone the client code from the Bitbucket repository.
- In the client code, find and open the
PropertiesClient.javafile (in pathjava/src/main/java/com/atlassian/oauth/client/example) . - Alter the values in
DEFAULT_PROPERTY_VALUESforJIRA_HOMEandPRIVATE_KEY.
1
2* Change `JIRA_HOME` to the URL of your Jira site. Ours is `http://localhost:8080`.
1
2* Change `PRIVATE_KEY` to the private key in your `jira_privatekey.pcks8` file.

For us, the `DEFAULT_PROPERTY_VALUES` field looks like the following:

``` java
private final static Map<String, String> DEFAULT_PROPERTY_VALUES = ImmutableMap.<String, String>builder()
        .put(JIRA_HOME, "http://localhost:8080")
        .put(CONSUMER_KEY, "OauthKey")
        .put(PRIVATE_KEY, "AKJsdaSLKFlkadfdjfsjfsdkjfksjf...")
        .build();
```
4. In terminal, navigate to the java directory and build the client by running the following
command:
1
2``` bash
mvn clean compile assembly:single
```

You'll see a message like the following in terminal when the client is built:

``` bash
[INFO] --------------------------------------
[INFO] BUILD SUCCESS
[INFO] --------------------------------------
[INFO] Total time: 2.995 s
[INFO] Finished at: 2019-03-27T15:43:45+11:00
[INFO] Final Memory: 25M/588M
[INFO] --------------------------------------
```
Step 3: Authorize
We're now ready to authorize our client with Jira. This is the process of getting an access token from Jira (the resource), that our client (the consumer) can use to access information on the Jira site.
-
In terminal, navigate to the
targetdirectory of the sample OAuth client project. -
Run the following command:
1 2
java -jar OAuthTutorialClient-1.0.jar requestTokenThis command requests an unauthorized request token from your Jira instance. You'll see the following output with the details of your new request token:
1 2
Token: ec3dj4byySM5ek3XW7gl7f4oc99obAlo Token Secret: OhONj0eF7zhXAMKZLbD2Rd3x7Dmxjy0d Retrieved request token. go to https://jira101.atlassian.net/plugins/servlet/oauth/authorize?oauth_token=ec3dj4byySM5ek3XW7gl7f4oc99obAlo to authorize itThe request token will persist for 10 minutes. If it expires, you'll need to request a new one.
-
In your browser, go to the URL specified in the terminal output. You'll see the following screen:
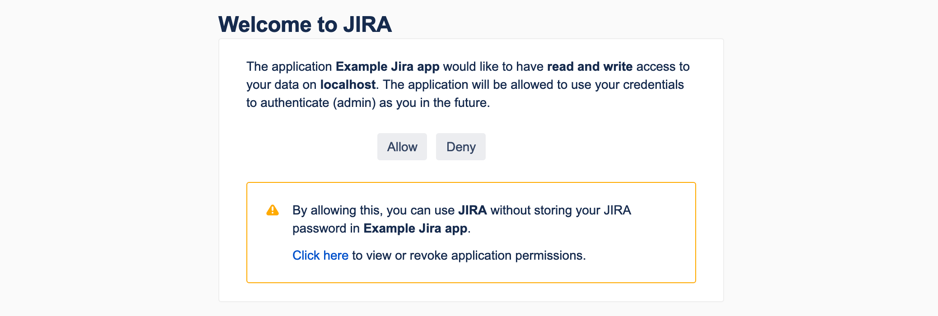
-
Click Allow. This will authorize the request token.
You'll see the following output in your browser:1 2
Access Approved You have successfully authorized 'Example JIRA app'. Your verification code is 'qTJkPi'. You will need to enter this exact text when prompted. You should write this value down before closing the browser window.Copy your verification code to use in the next step.
-
In terminal, run the following command, replacing the example verification code (
qTJkPi) with your own verification code from the previous step:1 2
java -jar OAuthTutorialClient-1.0.jar accessToken qTJkPiYou'll see the following output in terminal, with your access token:
1 2
Access Token: W1jjOV4sq2iEqxO4ZYZTJVdgbjtKc2yeNote that to get the access token in OAuth, you need to pass the consumer key, request token, verification code, and private key. However, in the sample client, information like the consumer key, request token, private key, and so on, are stored in the
config.propertiesfile when they are generated (have a look at it as you complete this tutorial and you'll see the new values added). You probably don't want to do this for a production implementation, but this makes the sample client easier to use for this example.
We now have what we wanted: an access token that we can use to make an authenticated request to the Jira REST API.
Step 4: Make a request
An access token is all that we need to make an authenticated request to the Jira REST API using OAuth. Requests are made as the user who authorized the initial request token. The access token will persist for 5 years, unless it is revoked.
The sample OAuth client only makes GET requests. To use it, run the following command, substituting
{URL for operation} with the URL of the operation that you want to call:
1
2java -jar OAuthTutorialClient-1.0.jar request {URL for operation}>
In the code, the sample OAuth client actually stores the access code in the config.properties file when it
is obtained. When a request is made, the sample client passes the stored access code rather than you having
to enter it.
Here's an example of a request to get the list of projects in Jira, using the sample OAuth client:
1
2java -jar OAuthTutorialClient-1.0.jar request http://localhost:8080/rest/api/latest/project
In our Jira site, the above operation returns a list of projects like this:
1
2[
  {
    "expand": "description,lead,url,projectKeys",
    "self": "http://localhost:8080/rest/api/2/project/10101",
    "id": "10101",
    "key": "SP",
    "name": "A second project",
    "avatarUrls": {
      "48x48": "http://localhost:8080/secure/projectavatar?avatarId=10324",
      "24x24": "http://localhost:8080/secure/projectavatar?size=small&avatarId=10324",
      "16x16": "http://localhost:8080/secure/projectavatar?size=xsmall&avatarId=10324",
      "32x32": "http://localhost:8080/secure/projectavatar?size=medium&avatarId=10324"
    },
    "projectTypeKey": "business"
  },
  {
    "expand": "description,lead,url,projectKeys",
    "self": "http://localhost:8080/rest/api/2/project/10100",
    "id": "10100",
    "key": "TP",
    "name": "Test project",
    "avatarUrls": {
      "48x48": "http://localhost:8080/secure/projectavatar?avatarId=10324",
      "24x24": "http://localhost:8080/secure/projectavatar?size=small&avatarId=10324",
      "16x16": "http://localhost:8080/secure/projectavatar?size=xsmall&avatarId=10324",
      "32x32": "http://localhost:8080/secure/projectavatar?size=medium&avatarId=10324"
    },
    "projectTypeKey": "business"
  }
]
Congratulations! You now know how to use OAuth to make an authenticated request to the Jira REST API.
Development tips
You can implement OAuth in a number of ways, depending on what you build. However, we encourage you to browse the source code for our sample Java OAuth client to get an idea of how it is implemented, regardless of the technologies that you use.
In addition, you'll find a number of general tips below that should be helpful, regardless of how you implement OAuth.
- Use OAuth libraries. Rather than implementing everything yourself, there are a number of OAuth libraries that you can use at Code at OAuth.net. The sample OAuth client uses the Google OAuth Client Library for Java.
- Requests for tokens must be made using HTTP POST.
- Set the callback to 'oob' (that is, out of band) when creating the request token if you want to show the
token secret to the user.
See
getAndAuthorizeTemporaryTokeninJIRAOAuthClient.javain the sample OAuth client for an example of this. You can then set the callback to some other URL after the user authorizes the token so that Jira sends the token and secret to that URL. - When making requests, pass the OAuth access token in the request header, do not pass it in the request body. If you pass the OAuth data in the request body, it will return a "400 Bad Request" error for most methods.
CAPTCHA
CAPTCHA is a tool that can distinguish a human being from an automated agent such as a web spider or robot. CAPTCHA is triggered after several consecutive failed login attempts, after which the user is required to interpret a distorted picture of a word and type that word into a text field with each subsequent login attempt. If CAPTCHA has been triggered, you cannot use Jira's REST API to authenticate with the Jira site.
If CAPTCHA was triggered you will receive an error response from Jira when making requests through
the REST API. You can determine if CAPTCHA is causing the error by checking if there is an
X-Seraph-LoginReason header with a value of AUTHENTICATION_DENIED in the response. If present,
this means the application rejected the login without even checking the password. While this is the
most common indication that Jira's CATPCHA feature has been triggered, you can also check the number
of failed login attempts for the bot-user in Jira's user administration.
Next steps
- Check out the Jira REST APIs:
- Read some Jira REST API examples
Rate this page: