Developing for the Jira project-centric view
This page provides you with development guidelines for adding your app to the new project-centric view in Jira.
Read the Design guide - Jira project-centric view before you read this page. The design guide will help you provide the best user experience for your app in the project-centric view.
Overview
The administrator can disable the project-centric view on both the user level or global level.
For both Jira Cloud and Jira Data Center, individual users can switch it on or off. Administrators are also be able to override this setting, for example, to enable or disable it for all users. This means that your app will need to cater for instances where the project-centric view is enabled, as well as instances where it is disabled.
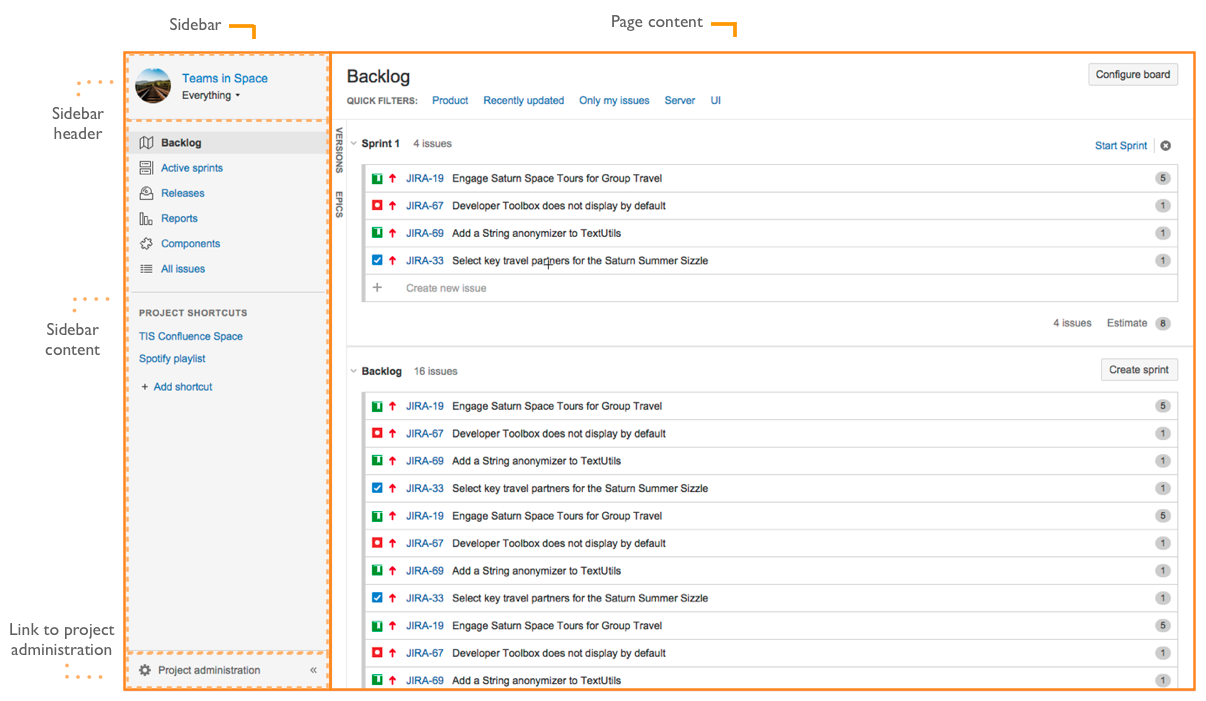
The project-centric view features the following components:
- Sidebar header
- Sidebar content section, including project navigation, project links and favorite filters for the user
- Sidebar administration link (if the currently logged in user is a project administrator)
- Page content area
Below, you can see an example of the Jira project-centric view.
Guidelines
Most apps will just need to add links for their project-related content to the sidebar. If you want to do this, read the Basic implementation section below.
If you want a more customized implementation, for example, you want your app's sidebar link to open a particular board in the project, read the Advanced implementation section below.
Basic implementation
To add a link for your app to the sidebar, you will need to add the link to the sidebar as a web-item, then provide the content in the main page content area.
Step 1. Add the link to the sidebar as a web-item
-
Add your link as a web-item to the
jira.project.sidebar.plugins.navigation``web-section. -
The following context parameters are available for your web-item. Specify the parameters that you need.
Parameter Description project The current project object projectKey The current project key pathEncodedProjectKey URL path encoded project key queryEncodedProjectKey URL query param encoded project key Pluggable Scope Filter Parameters See Scope filters section below For more details, see the
ProjectContextPopulatorin the jira-projects plugin.
For example, here is the web-item definition for the 'Releases' link shown in the Example Jira project-centric view screenshot above:
1
2<web-item key="release-page" i18n-name-key="version.release" section="jira.project.sidebar.plugins.navigation" weight="300">
    <label key="project.page.release.title"/>
    <link>/projects/$pathEncodedProjectKey?selectedItem=com.atlassian.jira.jira-projects-plugin:release-page</link>
    <param name="iconClass" value="aui-icon-large icon-sidebar-release"/>
    <condition class="com.atlassian.jira.projects.page.release.VersionsDefinedAndVisibleCondition"/>
</web-item>
Step 2. Provide the content
- Define a web-panel for your content.
- Reference the web-panel from the sidebar link that you added as a web-item, in the previous step.
For example, here is the web-item and web-panel definitions for the 'Releases' link shown in the Example Jira project-centric view screenshot above.
1
2<web-item key="release-page" i18n-name-key="version.release" section="jira.project.sidebar.plugins.navigation" weight="300">
    <label key="project.page.release.title"/>
    <link>/projects/$pathEncodedProjectKey?selectedItem=com.atlassian.jira.jira-projects-plugin:release-page</link>
    <param name="iconClass" value="aui-icon-large icon-sidebar-release"/>
    <condition class="com.atlassian.jira.projects.page.release.VersionsDefinedAndVisibleCondition"/>
</web-item>

<web-panel key="release-page-key" location="com.atlassian.jira.jira-projects-plugin:release-page">
    <resource name="view" type="soy" location=":project-subpages-soy/Jira.Projects.Release.Templates.page"/>
    <context-provider class="com.atlassian.jira.projects.page.release.ReleasePageContextProvider"/>
    <condition class="com.atlassian.jira.projects.page.release.VersionsDefinedAndVisibleCondition"/>
</web-panel>
Note how the link property in the release-page web-item references the location property in the release-page-key web-panel. The ProjectPageServlet will take care of wiring up the selectedItem with the web-panel location and rendering the panel when the web-item URL is requested. Additional web-resources (JS, CSS) can also be included on the page by adding them to the jira.project.sidebar <context/>.
This mechanism is the same for atlassian-connectapps. For example, the following atlassian connect descriptor would render a sidebar link and content when selected.
1
2{
     "name": "Hello World",
     "description": "Atlassian Connect app",
     "key": "com.example.myaddon",
     "baseUrl": "http://localhost:8000",
     "vendor": {
         "name": "Example, Inc.",
         "url": "http://example.com"
     },
     "authentication": {
         "type": "none"
     },
     "apiVersion": 1,
     "modules": {
        "webItems": [
            {
                "location": "jira.project.sidebar.plugins.navigation",
                "key": "connect-provided-link-to-panel",
                "url": "/projects/{project.key}?selectedItem=com.example.myaddon:connect-provided-link-to-panel",
                "context": "product",
                "name": {
                    "value": "My Web Item"
                }
            }
        ],
        "webPanels" : [
            {
                "key": "connect-provided-web-panel",
                "url": "/helloworld.html?pkey={project.key}",
                "location": "com.example.myaddon:connect-provided-link-to-panel",
                "name": {
                    "value": "My Web Panel"
                }
            }
        ]
     }
 }
Advanced implementation
The project-centric view allows you to extend both the sidebar and page content, as described below.
Extending the sidebar
If you want to customise the sidebar further for your app, it can be extended in more advanced ways by using scope filters, the JavaScript API, or the Serverside Rendering API. The sidebar is rendered and provided by the new jira-projects plugin. Hence, to use any of the advanced methods for extending the sidebar, you will need to include the jira-projects-api jar in your app's dependencies:
1
2<dependency>
    <groupId>com.atlassian.jira</groupId>
    <artifactId>jira-projects-api</artifactId>
    <version>${latest.jira.projects.plugin.version}</version>
    <scope>provided</scope>
</dependency>
Advanced methods for extending the sidebar:
Scope filters
Jira projects provide an additional scope filter to allow users to select a project-specific Agile board. Scope filters can add additional context used to render web-items and page content via the new project-scope-filter-context-provider plugin module. This is useful if web-items in the sidebar require additional context about which agile board has been selected for example.
Example:
In Jira Agile's example, the following scope filter context provider shows additional parameters for web-items defined in Jira Agile that plugs into the sidebar:
1
2<project-scope-filter-context-provider key="board-scope-filter" class="com.atlassian.greenhopper.web.sidebar.AgileBoardScopeFilterContextProvider" />
This simply implements the following interface provided by the jira-projects-api:
1
2/**
 * Provides a context map with scope filter params that may be needed to render project links and pages.  For example
 * Jira may decide to put the currently selected board into the context which will then be used to add
 * Agile reports to the reports page.
 *
 * @since v1.6.0
 */
public interface ProjectScopeFilterContextProvider
{
    /**
     * Given a project, return context with scope filter params.
     *
     * @param project the currently selected project
     * @return context param map
     */
    Map<String, Object> getContext(final Project project);
}
Additional context provided by this mechanism can then be used when rendering links. For example, by using an additional selectedBoardId param in the URL as follows:
1
2
3
4
5
6
7<web-item key="project-sidebar-work-scrum" name="Scrum Work Mode Button in the Project Sidebar" section="jira.project.sidebar.plugins.navigation" weight="8">
    <label key="gh.rapid.pool.link.scrum.label"/>
    <link>/secure/RapidBoard.jspa?projectKey=$pathEncodedProjectKey&rapidView=$selectedBoardId</link>
    <param name="iconClass" value="aui-icon-large agile-icon-work"/>
    <condition class="com.atlassian.greenhopper.web.sidebar.IsScrumBoardCondition"/>
</web-item>
JavaScript API
The sidebar also provides a rich javascript API to allow apps to override default behaviour client-side if required. For more details, see Sidebar JavaScript API for Jira project-centric view.
Serverside Rendering API
The sidebar is rendered by a number of re-usable Java components that can be injected. Rendering is broken down into the following components:

Before Jira 9 the main entry point to render a project centric sidebar was provided by the ProjectSidebarRenderer component and its render(projectKey, selectedItemId) method.
Since Jira 9 and asynchronous sidebar rendering, we introduced SidebarPlaceholderRenderer component and its render(selectedItemId) method.
Also, it is necessary to provide special arguments to enable front-end side rendering. Read more here.
Extending the page content
Full control of rendering
You should only use this option for advanced apps where you need full control of the URL state. An example of this is Jira's agile board, where the sidebar allows users to switch between Backlog, Active Sprints and Reports via sidebar links on the client side.
This approach lets you implement advanced navigation, like sub-navigation within the page. However, in many cases, it is better to implement the basic web-panel (described above) instead -- here are some of the reasons why:
- The web-panel is simpler to implement, especially if you have a simple (static) app.
- The sidebar is rendered for you. In addition, the context for your web-panel is populated with the same project parameters and scopefilter parameters as for web-items.
If you choose to implement full control of rendering, your app will need to render the sidebar. - The sidebar client-side web-resources are already included.
If you choose to implement full control of rendering, your app must include the sidebar client-side web-resources in thejira.project.sidebarcontext . ProjectPageServletin the jira-projects plugin selects the correct item in the sidebar based on theselectedItemURL parameter.
If you choose to implement full control of rendering, your app's code will have to handle selecting the correct item.
To implement full control of rendering for your app's page content:
- Render the entire page, including the sitemesh decorator using an existing plugin mechanism (most likely a servlet or webwork action).
- In this servlet or webwork action, get the
SidebarPlaceholderRenderercomponent injected and render the sidebar HTML using an appropriate AUI page structure. The jira-projects plugin provides aJira.Projects.Templates.pagesoy template to make this easier - Before Jira 9, make sure to require all web-resources in the
jira.project.sidebarweb-resource context. This step is not necessary in Jira 9.
Content sub-navigation component
In project-centric navigation model, once users arrive at certain project pages, they can filter the content on that particular page by using the subnavigation control. For example, in the screenshot in the right, once the reports page is loaded, users can select to narrow down what they see and choose to display only the information regarding the Control Chart.
The jira-projects plugin exposes the content subnavigator as a reusable component. The subnavigator is a component that gets rendered on the client side, using JavaScript code. In order to use this component, your app must declare a dependency with com.atlassian.jira.jira-projects-plugin:subnavigator, so that the required JavaScript resources are downloaded and available on the browser.

The procedure for implementing this component is best explained by example: consider the reports page shown in the screenshot on the right. This is how it is bringing the resources required to use the subnavigator on the client side:
1 2<web-resource key="reports-page-subnavigator"> <context>com.atlassian.jira.project.reports.page</context> <dependency>com.atlassian.jira.jira-projects-plugin:sidebar</dependency> <dependency>com.atlassian.jira.jira-projects-plugin:subnavigator</dependency> <resource location="/page/project/report/subnavigator-init.js" name="reports-subnavigator-init.js" type="download"/> <transformation extension="js"> <transformer key="jsI18n"/> </transformation> </web-resource>
As you can see, there is a dependency declared on the reports.page web resource, so that whenever the page is loaded, the subnavigator resources are also downloaded.
Once the page is loaded, you can initialize the subnavigator in your JavaScript code like this:
1
2var subnavigator = new Jira.Projects.Subnavigator({
    id: "reports",                                       // identifier for the subnavigator component
    triggerPlaceholder: triggerPlaceholder,              // css selector where the trigger of the the component will be rendered
    contentPlaceholder: contentPlaceholder,              // css selector where the options of the component will be rendered
    itemGroups: [{                                       // array of arrays, each of one containing a list of items to be displayed by the container
        id: "report-id",
        label: "report-label",                           // text that will be displayed for the item
        description: "report-description",                // text that will be displayed on a tooltip when the mouse is over the item
        link: "report-url"                               // link to follow when the item is selected
    }],
    selectedItem: "selected-report-id"                   // id of the initially selected item
});
subnavigator.show();

subnavigator.on("itemSelected", function(event) {        // listening for changes on the selected item
    event.preventDefault();
    console.log(event.item);                             // the event will give you access to the selected item
});
The most detailed and up to date documentation around this component can be found in the source code on src/main/resources/static/components/subnavigator/Subnavigator.js
The jira-projects-page-objects also provides a Subnavigator.java that you can use as a PageObject for the component on your web driver tests.
Need help?
Post your question on our forums: Atlassian Answers. This is probably the fastest way to get help, as many of our customers and staff are active on Atlassian Answers.
Rate this page: