Extending the rich text editor in JIRA
The rich text editor referenced in this guide is the editor found inside Jira issues, or the agent's view of Jira Service Management issues. It is not the same editor that is used in the customer portal of Jira Service Management, which is not extensible.
| Level of experience | ADVANCED |
| Time estimate | 2:00 |
| Atlassian application | JIRA 7.3+ |
Feature overview
In this tutorial, you'd like to add some new functionality to the visual editor in JIRA. The idea is simple: have a {footer} macro that will be able to render HTML markup with custom CSS styles. Given markup:

Custom macro renderer
Firstly, you need to add a new macro renderer to the plugin:
-
Define new
<macro>element inatlassian-plugin.xml:atlassian-plugin.xml
1 2
<macro key='footer' name='{footer} formatting macro' class='com.atlassian.jira.plugin.editor.ref.FooterMacro'> <description>Insert footer content with regards.</description> <param name="convert-selector">div.footer-macro:not(.header-macro)</param> <param name="convert-function">RefPlugin.Macros.Footer.convert</param> </macro> -
Implement the renderer Java class:
FooterMacro.java
1 2
package com.atlassian.jira.plugin.editor.ref; import com.atlassian.renderer.RenderContext; import com.atlassian.renderer.v2.RenderMode; import com.atlassian.renderer.v2.macro.BaseMacro; import com.atlassian.renderer.v2.macro.MacroException; import java.util.Map; public class FooterMacro extends BaseMacro { @Override public boolean hasBody() { return true; } @Override public RenderMode getBodyRenderMode() { return RenderMode.allow(RenderMode.F_ALL); } @Override public String execute(Map<String, Object> parameters, String body, RenderContext renderContext) throws MacroException { return "<div class=\"footer-macro\">" + body + "</div>"; } } -
Bonus: How do I output different HTML for WYSIWYG?
RenderContextcomes with a param:IssueRenderContext.WYSIWYG_PARAMand it can be used to return different result in such situation:FooterMacro.java
1 2
package com.atlassian.jira.plugin.editor.ref; import com.atlassian.jira.issue.fields.renderer.IssueRenderContext; import com.atlassian.renderer.RenderContext; import com.atlassian.renderer.v2.RenderMode; import com.atlassian.renderer.v2.macro.BaseMacro; import com.atlassian.renderer.v2.macro.MacroException; import java.util.Map; public class FooterMacro extends BaseMacro { @Override public boolean hasBody() { return true; } @Override public RenderMode getBodyRenderMode() { return RenderMode.allow(RenderMode.F_ALL); } @Override public String execute(Map<String, Object> parameters, String body, RenderContext renderContext) throws MacroException { if (Boolean.TRUE.equals(renderContext.getParam(IssueRenderContext.WYSIWYG_PARAM))) { return "<div class=\"footer-macro editing\">" + body + "</div>"; } else { return "<div class=\"footer-macro\">" + body + "</div>"; } } }
Converting HTML back to Wiki markup
Because Wiki markup is the storage format of JIRA, we need to define how our new HTML markup should be converted back to Wiki text:
Add new <web-resource> to atlassian-plugin.xml:
atlassian-plugin.xml
1
2<web-resource key="handler" name="JIRA Editor Reference Plugin Context Init">
    <context>jira.rich.editor</context>

    <resource name="soy/footer-macro.soy.js" type="download" location="soy/footer-macro.soy" />

    <transformation extension="soy">
        <transformer key="soyTransformer"/>
    </transformation>
</web-resource>
Provide conversion code, a template which is supposed to print appropriate wiki markup:
**footer-macro.soy **
1 2{ namespace RefPlugin.Macros.Footer } /** * @param node * @param innerMarkup */ {template .convert} {lb}footer{if $node.title}:title={$node.title}{/if}{rb}{$innerMarkup}{lb}footer{rb} {/template}
Alternatively, define RefPlugin.Macros.Footer.convert as a global function with following signature:
1
2function (params) {
    return '{footer'+(params.node.title ? ':title='+params.node.title:'')+'}'+params.innerMarkup+'{footer}';
}
This interface is suitable for more advanced use.
Now while doing changes in Visual mode, your content will be stored as a valid wiki format.
Loading web-resources into editor context
Editor content is loaded into an <iframe>, which has basic JIRA stylesheets. We also want to provide our set of CSS, just to make sure that our new widget will be displayed correctly.
-
Add new
<web-resource>dedicated for editor content resources:atlassian-plugin.xml
1 2
<web-resource key="content" name="JIRA Editor Reference Plugin Content Resources"> <context>jira.view.issue</context> <context>jira.rich.editor.content</context> <context>gh-rapid</context> <transformation extension="less"> <transformer key="lessTransformer"/> </transformation> <resource type="download" name="less/footer-content.css" location="less/footer-content.less"/> </web-resource> -
Create stylesheet file:
1 2
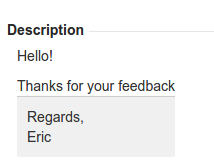
div.footer-macro { border-top: 1px #ccc solid; padding: 10px; background: #f0f0f0; }
As a result:

Adding new button to toolbar
We would like to add new button to the dropdown:

The caveat here is that dropdown menu is rerendered when we click its' button, so we need to bind to dropdown click event in order to add our custom menu item.
We could use JIRA.Events.NEW_CONTENT_ADDED event, but for RTE customisation it's more convenient to use jira/editor/registry module.
toolbar-init.js
1
2require([
    "jquery",
    "jira/util/formatter",
    "jira/editor/registry"
], function (
    $,
    formatter,
    editorRegistry
) {
    var FOOTER = formatter.I18n.getText('refplugin.toolbar.footer');
    var FOOTER_PLACEHOLDER = formatter.I18n.getText('refplugin.macro.footer.placeholder');
    var DROPDOWN_ITEM_HTML = '<li><a href="#" data-operation="footer">' + FOOTER + '</a></li>';

    editorRegistry.on('register', function (entry) {
        var $otherDropdown = $(entry.toolbar).find('.wiki-edit-other-picker-trigger');

        $otherDropdown.one('click', function (dropdownClickEvent) {
            var dropdownContentId = dropdownClickEvent.currentTarget.getAttribute('aria-owns');
            var dropdownContent = document.getElementById(dropdownContentId);
            var speechItem = dropdownContent.querySelector('.wiki-edit-speech-item');

            var footerItem = $(DROPDOWN_ITEM_HTML).insertAfter(speechItem);
        });
    });
});
This code should be executed whenever editor may be initialized:
atlassian-plugin.xml
1
2<web-resource key="toolbar" name="JIRA Editor Reference Plugin Toolbar Init">
    <context>jira.rich.editor</context>

    <context>jira.view.issue</context>
    <context>jira.edit.issue</context>
    <context>jira.create.issue</context>
    <context>gh-rapid</context>

    <resource type="download" name="js/toolbar-init.js" location="js/toolbar-init.js"/>
</web-resource>
Implementing toolbar action
Rich Text Editor in JIRA is built on top of TinyMCE library and in this example we are using TinyMCE 4 API.


In click event handler we need to replace current selection with HTML markup of footer macro. In case nothing is selected, put placeholder text.
footer-init.js
1
2editorRegistry.on('register', function (entry) {
    var $otherDropdown = $(entry.toolbar).find('.wiki-edit-other-picker-trigger');

    $otherDropdown.one('click', function (dropdownClickEvent) {
        var dropdownContentId = dropdownClickEvent.currentTarget.getAttribute('aria-owns');
        var dropdownContent = document.getElementById(dropdownContentId);
        var speechItem = dropdownContent.querySelector('.wiki-edit-speech-item');

        var footerItem = $(DROPDOWN_ITEM_HTML).insertAfter(speechItem).on('click', function () {
            entry.applyIfTextMode(addWikiMarkup).applyIfVisualMode(addRenderedContent);
        });

        entry.onUnregister(function cleanup() {
            footerItem.remove();
        });
    });
});

function addWikiMarkup(entry) {
    var wikiEditor = $(entry.textArea).data('wikiEditor');
    var content = wikiEditor.manipulationEngine.getSelection().text || FOOTER_PLACEHOLDER;
    wikiEditor.manipulationEngine.replaceSelectionWith(RefPlugin.Macros.Footer.wiki({content: content}));
}

function addRenderedContent(entry) {
    entry.rteInstance.then(function (rteInstance) {
        var tinyMCE = rteInstance.editor;
        if (tinyMCE && !tinyMCE.isHidden()) {
            var content = tinyMCE.selection.getContent() || FOOTER_PLACEHOLDER;
            tinyMCE.selection.setContent(RefPlugin.Macros.Footer.html({content: content}));
        }
    });
}
Here we use jira/editor/registry module to access editor instance, you can see its' documentation here. First we subscribe for register event, so that our callback is executed once user activates the editor. When user clicks our "Footer" item, we use entry to check current editor mode and add appropriate markup.
addWikiMarkup adds wiki markup for Text mode using API of a textarea wrapped by jira-wiki-editor-plugin.
addRenderedContent uses TinyMCE 4 API to insert HTML markup. rteInstance here is a promise since it is not initialized until we activate Visual mode.
entry.onUnregister call is not needed in this very example since the dropdown menu is rerendered, it is just an example of how to clean up stuff after the editor is hidden (i.e. unregistered from the Registry).
Running and testing
Web driver tests
JIRA comes with excellent Selenium/WebDriver testing framework. You can interact with application through Page Objects APIs, please read more in tutorial about writing integration tests using PageObjects on Atlassian Developers.
Rich Text Editor for JIRA has it's own page objects, you can add them to your project pom.xml:
pom.xml
1
2<dependency>
    <groupId>com.atlassian.jira.plugins</groupId>
    <artifactId>jira-editor-pageobjects</artifactId>
    <version>1.2.7</version>
    <scope>test</scope>
    <exclusions>
        <exclusion>
            <groupId>com.atlassian.jira</groupId>
            <artifactId>atlassian-jira-pageobjects</artifactId>
        </exclusion>
    </exclusions>
</dependency>
Start with enabling feature in test setUp:
TestRefPlugin.java
1
2@Before
public void setUp() throws Exception {
    backdoor.applicationProperties().setOption(APKeys.JIRA_OPTION_RTE_ENABLED, true);
}
In this test case, we need to create new issue, use new toolbar button, save description and then check using backdoor, what is the actual state stored in database:
TestRefPlugin.java
1
2@Test
public void testToolbarCustomizationInVisualMode() {
    final String key = backdoor.issues().createIssue("HSP", "xxx").key;
    ExtendedViewIssuePage viewIssuePage = jira.goTo(ExtendedViewIssuePage.class, key);
    Poller.waitUntilTrue("Editable description should show when empty", viewIssuePage.hasEditableDescriptionTimed());

    DescriptionSectionRte descriptionSectionRte = viewIssuePage.editDescription(DescriptionSectionRte.class);
    final RichTextEditor richTextEditor = descriptionSectionRte.getRichTextEditor().switchMode(EditorMode.WYSIWYG);

    richTextEditor.clickToolbarButton(new ToolbarButton("Footer", "[data-operation='footer']"));

    Poller.waitUntilEquals("{footer}Footer...{footer}", richTextEditor.getTimedSource());
}
Verifying HTML → Wiki markup integrity
Rich Text Editor for JIRA comes with powerful HTML → Wiki markup converter. Adding new NodeHandlers should be followed by running test suite, which is available under this url:
Consider writing your own tests for new macro:
-
Add qunit resource:
atlassian-plugin.xml
1 2
<resource type="qunit" name="js/foooter-handler-tests.js" location="/js//foooter-handler-tests.js" /> -
Implement simple test case:
foooter-handler-tests.js
1 2
AJS.test.require(['com.atlassian.jira.plugins.jira-editor-ref-plugin:handler'], function () { var htmlConverter = require('jira/editor/converter'); var Strings = require('jira/editor/converter/util/strings'); module('Footer macro Handler'); test('Test footer macro', function () { assertConversion('<div class="footer-macro">footer</div>', '{footer}footer{footer}'); assertConversion('<div class="footer-macro">footer with <b>Bold</b></div>', '{footer}footer with *Bold*{footer}'); }); var assertConversion = function (html, markup, testName) { htmlConverter.convert(html).then(function (result) { equal(result, markup, testName); }).fail(function (e) { throw e; }); }; }); -
Launch tests in browser: foooter-handler-tests.js
Question: Setting up the framework and writing tests takes a lot of time, do I need that?
Answer: Yes! Introducing regressions to editing experience in JIRA may cause your users to disable your plugin.
Wrap up and next steps
After reading this tutorial you should be able to customize toolbar, perform operations on editor, add new type of content and test your changes.
Our {footer} macro can be enchanted with new features, example ideas: convert {footer} to appropriate HTML in Visual mode or changing background color.
Resources that may help you:
Rate this page: