Jira Service Management webhooks
When you create an automation rule, you can use a webhook THEN action to send Jira Service Management events to third-party applications and plugins. For example, you might use a webhook to alert your remote application when an SLA is about to be breached. When you use a webhook, your remote application doesn't have to periodically poll Jira Service Management to find out if changes have occurred.
A webhook is a user-defined callback over HTTP. In Jira Service Management, webhook configuration is built into the automation settings. This page describes how a webhook works and shows you how to configure one.
Async webhooks are now default in Jira Data Center
Starting from Jira Data Center 10.0.0, asynchronous webhooks are now the default and only option. This update significantly improves the user experience by processing webhooks through a dedicated thread pool, rather than tying them to the user request. Previously, in Jira 9 and earlier, webhooks were processed synchronously, with the most computationally intensive work performed during the HTTP request.
Environments with exceptional webhook usage in both Jira 9 and 10 might exceed the guardrails set by the default parameters. You can customize these limits to better suit your organization’s needs. We recommend testing the asynchronous webhooks within your staging environments before a final upgrade. If you experience any issues, check our list of known problems or reach out to our support team.
Explore how to tune webhook performance parameters in Jira
Overview
A Jira Service Management webhook is a THEN action in an automation rule. When you configure a rule, you can specify WHENs and IFs, then use the webhook to define your action. For example, this image shows a rule that uses a webhook to page second-level support when a "Time to Resolution" SLA is about to breach:
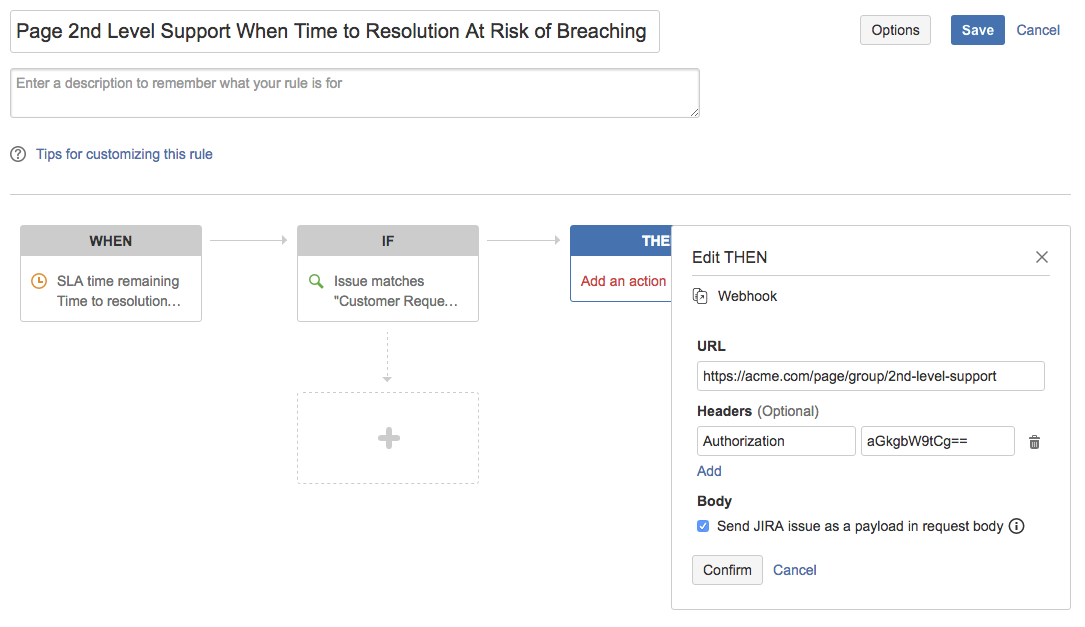
Adding a webhook to an automation rule
If you’re using Jira Service Management 4.6 or later, you need to add webhook URLs to the Jira whitelist. For more info, see Configuring the whitelist.
- Navigate to **Project settings > Automation, **then create a **Custom ** rule or edit an existing rule.
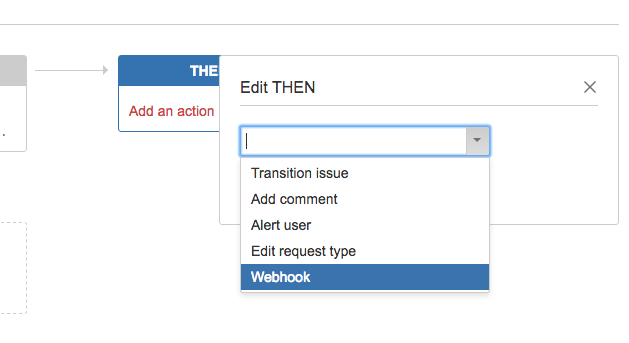
- Configure the WHEN and IF settings as desired, then add a THEN action and choose Webhook.
- Configure the webhook settings, name your rule, and save it.
Webhook settings
-
URL - In Jira Service Management Cloud, use port 80 for "http://" URLs and port 443 for "https://" URLs.
-
Jira issue payload - If you choose the Send Jira issue payload in request body option, a JSON object containing the issue details is attached to the request body. The shape of the JSON payload is as follows:
1 2
{ "issue" : { "id": "18001", "self": "https://mycompany.atlassian.net/rest/api/2/issue/18001", "key": "IT-4", "fields": { "summary" : "I cannot get my second screen to work", "description" : "Have tried multiple ports, cables, but no luck", "status" : { "name" : "Waiting for Support", ... }, "reporter" : { "name" : "jsmith", ... }, ... } }, "timestamp" : 1462941258113 // Time when webhook was fired - UTC milliseconds from epoch }For more information about issue shape, see Jira REST API get-issue endpoint. Note that expand params are not applicable to Jira Service Management Webhook.
Issue information in the payload is generated by the user who runs the automation rule. This user can be configured as the Project Default or the user who triggers the rule. If the user does not have permission to see some fields, then those values do not render. See Automating Your Service Management for more info.
Webhook execution
- Request method - When a webhook THEN action triggers, Jira fires an HTTP POST request to the URL you configured.
- Success criteria and timeout - A webhook HTTP POST request is considered successful if the server returns a response with status code range 200 (inclusive) to 300 (exclusive). Jira Service Management waits 5 seconds to establish a TCP connection with the webhook server, and 20 seconds for a response after connection is established. If the webhook requests fails, Jira Service Management does not retry the connection.
- Asynchronous webhook execution - The webhook THEN action is executed asynchronously. If many executions are triggered in a short period of time, they are queued and actioned one at a time without blocking the other automation rules you have in Jira Service Management.
How to send a custom payload
- Check the Send custom payload radio button.
- Insert the variables you’d like to include in the payload, via the dropdown.
- If you want your payload to be URL-encoded, check Encode as form.
- Specify your payload in JSON format.

Examples
-
Sending SMS through Twilio - Specify URL: https://{Your-Account-id}:{Your-Auth-Token}@api.twilio.com/2010-04-01/Accounts/{Your-Account-id}/Messages.json. Choose to send custom payload and specify the payload as
1 2
{ "To":"+61XXXXXXX", "From":"+61XXXXXX", "Body":"${issue.key} : Request Details ${request.details}" } -
Sending message to Slack - Specify the Slack webhook URL for the channel: https://hooks.slack.com/services/T00000000/B00000000/XXXXXXXXX. Choose to send custom payload and specify the payload as
1 2
{ "text": "High priority incident has occurred - ${issue.summary}. Click here to respond - ${request.url} " }
Rate this page: