Creating workflow extensions
Applicable: | Jira 7.0.0 and later. |
Level of experience: | Advanced. You should have completed at least one intermediate tutorial before working through this tutorial. See the list of tutorials in DAC. |
Time estimate: | It should take you approximately 1 hour to complete this tutorial. |
Overview of the tutorial
Jira administrators can customize Jira workflows to suit the goals and processes of the teams that use a project. The workflow determines what states the Jira issue life cycle consists of, along with rules for transitioning an issue from one status to another. Among other properties, the administrator can specify actions applicable to an issue at each state, who can transition an issue from one state to another, and any functions that are triggered by a workflow transition.
To find out how to customize workflows in Jira, see Configuring workflow page. It describes workflows from the perspective of Jira administrator.
In this tutorial, you will create an app that makes custom elements available for workflows. This tutorial is organized into three parts. Each part covers a particular type of workflow module, as follows:
- Part 1 shows you how to create a condition that prevents a sub-task from being reopened if the parent task is resolved or closed.
- Part 2 shows you how to add a function that closes the parent issue when the last sub-task is closed.
- Part 3 shows you how to add custom validation to your workflow.
The completed app will consist of the following components:
- Java classes encapsulating the app logic.
- Resources for display of the app UI.
- An app descriptor (that is, an XML file) to enable the plugin module in the Atlassian application.
When you are finished, all components will be packaged in a single JAR file.
About these instructions
You can use any supported combination of operating system and IDE to create this app. These instructions were written using IntelliJ IDEA 2017.2 on Ubuntu Linux. If you use another operating system or IDE combination, you should use the equivalent operations for your specific environment.
This tutorial was last tested with Jira 7.7.1.
Before you begin
To complete this tutorial, you need to know the following:
- The basics of Java development: classes, interfaces, methods, how to use the compiler, and so on.
- How to create an Atlassian plugin project using the Atlassian Plugin SDK.
- The basics of Jira administration, in particular, designing and administering project workflows.
App source
We encourage you to work through this tutorial. If you want to skip ahead or check your work when you are finished, you can find the app source code on Atlassian Bitbucket.
To clone the repository, run the following command:
1
2git clone https://bitbucket.org/atlassian_tutorial/tutorial-jira-add-workflow-extensions
Alternatively, you can download the source as a ZIP archive.
Part 1. Create the app project and the workflow condition module
In this part, you will create a custom workflow condition. A condition prevents an issue from transitioning from one state to another based on a particular condition. In our case, the condition prevents a sub-task from being reopened if the parent task is resolved or closed.
Step 1. Create the app project
In this step, you'll use the Atlassian Plugin SDK to generate the skeleton for your app project. The Atlassian Plugin SDK automates much of the work of app development for you. It includes commands for creating an app and adding modules to the app.
-
Set up the Atlassian Plugin SDK and build a project if you did not do that yet.
-
Open a Terminal window and navigate to directory where you would like to keep the app project.
-
Run the following SDK command:
1 2
atlas-create-jira-plugin -
Enter the new app settings when prompted.
group-id
com.example.plugins.tutorialartifact-id
add-workflow-extensionsversion
1.0-SNAPSHOTpackage
com.example.plugins.tutorial -
Confirm your entries when prompted.
The SDK generates the project home directory with project files, such as the POM (that is, Project Object Model definition file), stub source code, and app resources.
-
Import project in your favorite IDE.
Step 2. Tweak the POM
It's a good idea to familiarize yourself with the project configuration file, known as the POM. Among other functions, the POM declares project dependencies and controls build settings. It also contains descriptive information for your app.
Tweak the metadata and add a dependency as follows:
-
Navigate to root folder of your project and open the
pom.xmlfile. -
Add your company or organization name and website URL to the
organizationelement:1 2
<organization> <name>Example Company</name> <url>http://www.example.com/</url> </organization> -
To add a meaningful description for your app, update the project
descriptionelement. For example:1 2
<description>Extends JIRA issue reports.</description>The
organizationanddescriptionvalues you enter are passed to the app descriptor file,atlassian.plugin.xml. From there, Jira uses them in the administration console display for your app. -
Uncomment the
jira-coredependency and change itsscopetotest.1 2
<dependency> <groupId>com.atlassian.jira</groupId> <artifactId>jira-core</artifactId> <version>${jira.version}</version> <scope>test</scope> </dependency>Although we discourage the use of Jira core classes in your app, you'll need them for some testing code that the SDK will add for your module.
-
Save the file.
Step 3. Add a plugin module to the project
In this step, you'll add a module to your app project. A module can be considered a unit of functionality in the Atlassian plugin framework. We'll add one that implements our custom workflow condition. Later, you'll add modules for the post function and validator.
You can use the plugin module generator (that is, another atlas command) to generate the stub code for modules
that are required by the app.
-
Open a Terminal window and navigate to the app root folder where the
pom.xmlfile is located. -
Run the following command:
1 2
atlas-create-jira-plugin-module -
Enter the number for the Workflow Condition module (currently 32).
-
Enter the following information when prompted.
Enter New Classname
ParentIssueBlockingConditionPackage Name
com.example.plugins.tutorial.jira.workflow -
Select
Nfor Show Advanced Setup. -
Select
Nfor Add Another Plugin Module.
The SDK generates starter Java files, template files, and test code for the module. It also
adds the workflow-condition module to pom.xml and atlassian-plugin.xml files.
It's worth taking a look at the atlassian-plugin.xml file. This is an XML file that identifies the
app to Jira and defines the required app functionality. The file is located in your project under src/main/resources.
In the descriptor, you'll notice that the SDK added a workflow-condition module with three Velocity
resources. The view resource uses the parent-issue-blocking-condition.vm template file, while the
input-parameters and edit-parameters resources use parent-issue-blocking-condition-input.vm.
Since the end user interaction between entering the initial configuration settings for a feature
(the workflow condition, in our case) is the same thing as editing those settings, we assigned a single
template to both resources. If your app called for it, you could define separate templates for these views.
In the next step, we'll modify the templates.
Step 4. Write the user interface
Our condition is going to be relatively straightforward. The parent issue needs to be in a particular state for the condition to be satisfied. Implement the logic for this in the templates as follows:
-
In Terminal window, navigate to
src/main/resources/templates/conditions/and open theparent-issue-blocking-condition.vmfile. -
Add a description of the intent of the condition, and then add logic for iterating through and displaying a list of statuses.
These will be provided to the view by the Java classes that you will create later. Your template should look something like this:
1 2 3 4 5 6 7 8 9 10 11 12 13 14
The parent issue must have one of the following statuses to allow sub-task transitions: #foreach ($status in $statuses) <b>$status.getName()</b> #if($velocityCount != $statuses.size()) #if($velocityCount == ($statuses.size() - 1)) or #else , #end #else . #end #endThe code is indented to make it easier to read, but as with all templates, you may have to put this all on one line to avoid unwanted whitespace. As you can see, it simply loops around the provided Velocity parameter
$statusesand prints a comma-separated list of each status. -
In the same directory, open the
parent-issue-blocking-condition-input.vmfile. -
Add template code that allows users to choose the states that the parent issue must be in so that the child issue can be closed, such as the following:
1 2 3 4 5 6 7 8 9 10 11 12 13 14 15 16 17 18 19 20 21 22 23
<tr bgcolor="ffffff"> <td align="right" valign="top" bgcolor="fffff0"> <span class="label">Statuses:</span> </td> <td bgcolor="ffffff" nowrap> <table cellpadding="2" cellspacing="2"> #foreach ($status in $statuses) <tr> <td><input type="checkbox" name="$status.getId()" #if (${selectedStatuses}) #if (${selectedStatuses.contains($status.getId())}) CHECKED #end #end ></td> <td>#displayConstantIcon ($status) $status.getName()</td> </tr> #end </table> <br><font size="1">The parent issue statuses required to allow sub-task issue transitions.</font> </td> </tr>Notice that we use the
displayConstantIconmacro to display the status icon next to each status.
Step 5. Write the Java classes
So far, you have generated the stubs for your plugin modules and defined the views. In this step, you will write Java classes.
-
Open the
ParentIssueBlockingConditionFactory.javafile. Notice that it contains methods that provide parameters to each of the views. For now, the parameter is a single Velocity parameterwordwith the default valuetest. We will modify the methods to do the following:- The
getVelocityParamsForInputmethod should populate the Velocity parameterstatuseswith all available statuses. - The
getVelocityParamsForViewmethod should populate the Velocity parameterstatuseswith only those statuses that have been selected by the user. To do this, we retrieve thestatusesargument from theConditionDescriptor. - The
getVelocityParamsForEditmethod should populate theselectedStatusesVelocity parameter with the statuses stored in the argument ofConditionDescriptorstatuses. - The
getDescriptorParamsmethod is used to retrieve the parameters in theConditionDescription, so we will have it retrieve the statuses supplied in the inputmapand store them in thestatusesparameter. A comma-separated list is used here, but you can use any mechanism you like to achieve this result.
- The
-
Replace the class with the following:
1 2
package com.example.plugins.tutorial.jira.workflow; import com.atlassian.jira.config.ConstantsManager; import com.atlassian.jira.issue.comparator.ConstantsComparator; import com.atlassian.jira.issue.status.Status; import com.atlassian.jira.plugin.workflow.AbstractWorkflowPluginFactory; import com.atlassian.jira.plugin.workflow.WorkflowPluginConditionFactory; import com.atlassian.jira.util.collect.MapBuilder; import com.atlassian.plugin.spring.scanner.annotation.component.Scanned; import com.atlassian.plugin.spring.scanner.annotation.imports.JiraImport; import com.opensymphony.workflow.loader.AbstractDescriptor; import com.opensymphony.workflow.loader.ConditionDescriptor; import java.util.ArrayList; import java.util.Collection; import java.util.Collections; import java.util.List; import java.util.Map; import java.util.StringTokenizer; @Scanned public class ParentIssueBlockingConditionFactory extends AbstractWorkflowPluginFactory implements WorkflowPluginConditionFactory { @JiraImport private final ConstantsManager constantsManager; public ParentIssueBlockingConditionFactory(ConstantsManager constantsManager) { this.constantsManager = constantsManager; } protected void getVelocityParamsForInput(Map<String, Object> velocityParams) { //all available statuses Collection<Status> statuses = constantsManager.getStatuses(); velocityParams.put("statuses", Collections.unmodifiableCollection(statuses)); } protected void getVelocityParamsForEdit(Map<String, Object> velocityParams, AbstractDescriptor descriptor) { getVelocityParamsForInput(velocityParams); velocityParams.put("selectedStatuses", getSelectedStatusIds(descriptor)); } protected void getVelocityParamsForView(Map<String, Object> velocityParams, AbstractDescriptor descriptor) { Collection selectedStatusIds = getSelectedStatusIds(descriptor); List<Status> selectedStatuses = new ArrayList<>(); for (Object selectedStatusId : selectedStatusIds) { String statusId = (String) selectedStatusId; Status selectedStatus = constantsManager.getStatus(statusId); if (selectedStatus != null) { selectedStatuses.add(selectedStatus); } } selectedStatuses.sort(new ConstantsComparator()); velocityParams.put("statuses", Collections.unmodifiableCollection(selectedStatuses)); } public Map<String, Object> getDescriptorParams(Map conditionParams) { // process the map which will contain the request parameters // for now simply concatenate into a comma separated string // production code would do something more robust. Collection statusIds = conditionParams.keySet(); StringBuilder statIds = new StringBuilder(); for (Object statusId : statusIds) { statIds.append((String) statusId).append(","); } return MapBuilder.build("statuses", statIds.substring(0, statIds.length() - 1)); } private Collection getSelectedStatusIds(AbstractDescriptor descriptor) { Collection<String> selectedStatusIds = new ArrayList<>(); if (!(descriptor instanceof ConditionDescriptor)) { throw new IllegalArgumentException("Descriptor must be a ConditionDescriptor."); } ConditionDescriptor conditionDescriptor = (ConditionDescriptor) descriptor; String statuses = (String) conditionDescriptor.getArgs().get("statuses"); StringTokenizer st = new StringTokenizer(statuses, ","); while (st.hasMoreTokens()) { selectedStatusIds.add(st.nextToken()); } return selectedStatusIds; } } -
Open the
ParentIssueBlockingCondition.javafile. Notice that it extendsAbstractJiraConditionand implements thepassesConditionmethod. This method will contain the logic of theWorkflowConditionitself. It takes three arguments:transientVarsis aMapof variables available for this method only. It is populated by Jira and ensures that commonly needed variables are available, such asoriginalissueobject, which contains theIssueObjectassociated with the workflow.argsis aMapthat contains values lifted straight from the form input and theConditionDescriptor, so your"statuses"will be available from here.pscontains properties that are defined in the workflow XML and persisted across workflow steps. In practice, this is rarely used.
-
Replace the auto generated code with the following:
1 2
package com.example.plugins.tutorial.jira.workflow; import com.atlassian.jira.issue.Issue; import com.atlassian.jira.issue.IssueManager; import com.atlassian.jira.workflow.WorkflowFunctionUtils; import com.atlassian.jira.workflow.condition.AbstractJiraCondition; import com.atlassian.plugin.spring.scanner.annotation.component.Scanned; import com.atlassian.plugin.spring.scanner.annotation.imports.JiraImport; import com.opensymphony.module.propertyset.PropertySet; import java.util.StringTokenizer; import org.slf4j.Logger; import org.slf4j.LoggerFactory; import java.util.Map; @Scanned public class ParentIssueBlockingCondition extends AbstractJiraCondition { private static final Logger log = LoggerFactory.getLogger(ParentIssueBlockingCondition.class); public static final String FIELD_WORD = "word"; @JiraImport private IssueManager issueManager; public ParentIssueBlockingCondition(IssueManager issueManager){ this.issueManager = issueManager; } public boolean passesCondition(Map transientVars, Map args, PropertySet ps) { Issue subTask = (Issue) transientVars.get(WorkflowFunctionUtils.ORIGINAL_ISSUE_KEY); Issue parentIssue = issueManager.getIssueObject(subTask.getParentId()); if (parentIssue == null) { return false; } String statuses = (String) args.get("statuses"); StringTokenizer st = new StringTokenizer(statuses, ","); while (st.hasMoreTokens()) { String statusId = st.nextToken(); if (parentIssue.getStatus().getId().equals(statusId)) { return true; } } return false; } }Here we inject IssueManager using constructor injection, also we put
@Scannedand@JiraImportannotation to make Atlassian Spring Scanner notice our class and importIssueManagerfrom Jira.The logic for checking the condition is straightforward: the method obtains the sub-task issue from the
transientVarsmap, obtains the list of allowable statuses fromargs, gets the parent issue from theIssueManagerusinggetParentId(), and if the parent's status is one of the allowable statuses, the method returns true.
Step 6. Build, install, and run the app
In this step, you will start Jira and see what you have done so far. However, first you need to deal with the tests that the SDK provided. So far, you've made enough changes to the source code that the assertions in the test code will give you errors.
The details of app testing are out of scope of this tutorial. But if you're already familiar with writing and running app tests, you can try updating the tests yourself. For a quicker alternative, try one of these options:
- Replace your
src/testdirectory with the equivalent test directory in the Bitbucket repository for this tutorial. Be sure to use thepart1branch, because the other branches have test code for classes you haven't added yet. - Run the
atlas-runcommand mentioned later with the-DskipTests=trueflag that bypasses testing (although the tests are still compiled). - Remove the
src/testdirectory from your project for now.
To start Jira with your app installed, follow these steps:
-
Make sure you have saved all code changes to this point.
-
Open a Terminal window and navigate to the app root folder where the
pom.xmlfile is. -
Run the following command:
1 2
atlas-runAs a reminder, add
-DskipTests=trueto avoid running the test code for now.This command builds your app code, starts a Jira instance, and installs your app. This may take a minute or two. When its done, you should see something like this at the end of Terminal output:
1 2
[INFO] [talledLocalContainer] Tomcat 6.x started on port [2990] [INFO] jira started successfully in 149s at http://atlas-laptop:2990/jira [INFO] Type Ctrl-D to shutdown gracefully [INFO] Type Ctrl-C to exit -
In your browser, go to Jira local instance (URL is indicated in the Terminal output).
-
Log in using the default admin/admin.
-
Create a project when prompted.
In the next step, you will create the workflow and test your app.
Step 7. Customize a workflow and test the condition
The following steps describe how to apply your workflow condition in Jira as a Jira administrator. If you're not familiar with workflows or do not know how administrators can customize and apply them, read more on the Configuring workflow page in Jira documentation.
Here's the summary version:
-
Click
 > Issues, and then click Workflows from
the left menu or use "." shortcut to open search and start typing
> Issues, and then click Workflows from
the left menu or use "." shortcut to open search and start typing Workflows. -
Click the Copy link next to the Jira workflow (it may be hidden under
Inactivesection). We'll work with a modified version of the default workflow. Alternatively, you could create a new one and start from scratch. -
In the text view, click the Reopen Issue transition from the Transitions column.
-
In the Conditions tab, click Add.
-
Click the Parent Issue Blocking Condition > Add.
-
In the Add Parameters To Condition page, select Open and Reopened.
-
In the left menu, click the Workflow Schemes > Add Workflow Scheme.
-
Enter a name and description for the scheme and click Add.
-
Click Add Workflow > Add Existing and select the workflow you created.
-
Assign the workflow to the sub-task issue type and click Finish.
-
Go to the administration page for your Jira project, change the default workflow scheme to your new workflow scheme. Follow the steps to associate and migrate the project to the new scheme.
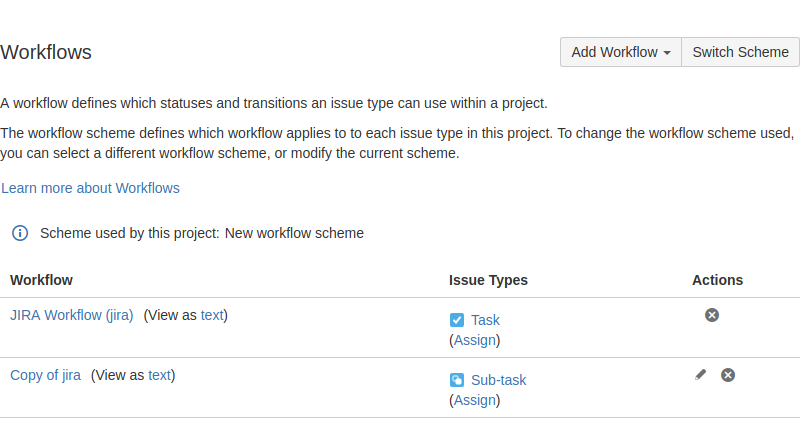
When you are finished your workflow settings will look like this.
-
Create a task and a sub-task in your project, and then close both of them. Notice that you cannot reopen the sub-task, as it's missing the Reopen button. It reappears only if you reopen the parent task.
You can leave Jira running and use atlas-package command that triggers
QuickReload
to reload your app changes on the go. This saves the time of having to restart Jira every time you
change the app code or resource files.
Part 2. Create the workflow post function
In this step, you will create a workflow function that automatically closes the parent issue when all sub-tasks are closed.
If you've cloned the Bitbucket repository for this tutorial, you can see the solution for this part by
checking out to the part2 branch:
1
2git checkout part2
Step 1. Create the module
You can use the plugin module generator (that is, another atlas command) to generate the stub code for modules
required by the app.
-
Open a Terminal window and navigate to the project root directory.
-
Run the following command:
1 2
atlas-create-jira-plugin-module -
Enter the number for the Workflow Post Function module (currently 33).
-
Enter the following information when prompted.
Enter New Classname
CloseParentIssuePostFunctionPackage Name
com.example.plugins.tutorial.jira.workflow -
Select
Nfor Show Advanced Setup. -
Select
Nfor Add Another Plugin Module.
As before, this will generate boilerplate templates and factories for you.
Step 2. Write the app
-
Because we don't need UI for this function, we'll remove those capabilities from our module:
- Open the
atlassian-plugin.xmlfile and find the newworkflow-functionmodule. - Change the class from
com.example.plugins.tutorial.jira.workflow.CloseParentIssuePostFunctionFactorytocom.atlassian.jira.plugin.workflow.WorkflowNoInputPluginFactory. - Remove
edit-parametersandinput-parametersresource elements from the same module declaration. That should leave you with onlyviewresource declaration for the module, which points to theclose-parent-issue-post-function.vmtemplate. - Save the file.
- Delete these files:
CloseParentIssuePostFunctionFactory.javafromsrc/main/java/com/example/plugins/tutorial/jira/workflow/.close-parent-issue-post-function-input.vmtemplate fromsrc/main/resources/templates/postfunctions/.
- Open the
-
Open the
close-parent-issue-post-function.vmtemplate and replace its content with meaningful information about your function, such as:1 2
Parent Issue will be closed on closing final associated sub-task (all other associated sub-tasks are already closed). -
Navigate to
src/main/java/com/example/plugins/tutorial/jira/workflow/and open theCloseParentIssuePostFunction.javafile. -
Add a few variable declarations and a constructor for our class, also mark class with
@Scannedannotation, as we did before:1 2
private static final Logger log = LoggerFactory.getLogger(CloseParentIssuePostFunction.class); @JiraImport private final WorkflowManager workflowManager; @JiraImport private final SubTaskManager subTaskManager; @JiraImport private final JiraAuthenticationContext authenticationContext; @JiraImport private IssueManager issueManager; private final Status closedStatus; public CloseParentIssuePostFunction(ConstantsManager constantsManager, WorkflowManager workflowManager, SubTaskManager subTaskManager, JiraAuthenticationContext authenticationContext, IssueManager issueManager) { this.issueManager = issueManager; this.workflowManager = workflowManager; this.subTaskManager = subTaskManager; this.authenticationContext = authenticationContext; closedStatus = constantsManager .getStatus(Integer.toString(IssueFieldConstants.CLOSED_STATUS_ID)); } -
Implement the
execute()method. This method does most of our work. Replaceexecute()with the following:1 2
public void execute(Map transientVars, Map args, PropertySet ps) throws WorkflowException { // Retrieve the sub-task MutableIssue subTask = getIssue(transientVars); // Retrieve the parent issue MutableIssue parentIssue = issueManager.getIssueObject(subTask.getParentId()); // Ensure that the parent issue is not already closed if (parentIssue == null || IssueFieldConstants.CLOSED_STATUS_ID == Integer .parseInt(parentIssue.getStatusId())) { return; } // Check that ALL OTHER sub-tasks are closed Collection<Issue> subTasks = subTaskManager.getSubTaskObjects(parentIssue); for (Iterator<Issue> iterator = subTasks.iterator(); iterator.hasNext(); ) { Issue associatedSubTask = iterator.next(); if (!subTask.getKey().equals(associatedSubTask.getKey()) && IssueFieldConstants.CLOSED_STATUS_ID != Integer.parseInt(associatedSubTask.getStatus().getId())) { return; } } // All sub-tasks are now closed - close the parent issue try { closeIssue(parentIssue); } catch (WorkflowException e) { log.error( "Error occurred while closing the issue: " + parentIssue.getKey() + ": " + e, e); e.printStackTrace(); } }Take a moment to look at the code. As you can see, it's complex because to get the status of all the sub-tasks we need to interact with the workflow, IssueManager , and SubTaskManager, and then, in our case, close the parent issues. Our function gets the sub-task from the
transientVarsmap, and then retrieves theparentIssue. If the parent issue is already closed, it simply performsreturn. Next, it retrieves the sub-tasks usingSubTaskManager.When writing your own post function, you can either inject this in the constructor (as here) or use
ComponentAccessorto get an instance. If all the other sub-tasks are closed, the parent issue will be closed as well. -
Implement the method we use to close the issue in our
execute()method:1 2
private void closeIssue(Issue issue) throws WorkflowException { Status currentStatus = issue.getStatus(); JiraWorkflow workflow = workflowManager.getWorkflow(issue); List<ActionDescriptor> actions = workflow.getLinkedStep(currentStatus).getActions(); // look for the closed transition ActionDescriptor closeAction = null; for (ActionDescriptor descriptor : actions) { if (descriptor.getUnconditionalResult().getStatus().equals(closedStatus.getName())) { closeAction = descriptor; break; } } if (closeAction != null) { ApplicationUser currentUser = authenticationContext.getLoggedInUser(); IssueService issueService = ComponentAccessor.getIssueService(); IssueInputParameters parameters = issueService.newIssueInputParameters(); parameters.setRetainExistingValuesWhenParameterNotProvided(true); IssueService.TransitionValidationResult validationResult = issueService.validateTransition(currentUser, issue.getId(), closeAction.getId(), parameters); IssueService.IssueResult result = issueService.transition(currentUser, validationResult); } }Here we find the close transition using the
WorkflowManager. When you have the transition, you can validate this transition using theIssueService, and then close the issue using theIssueService#transitionmethod. -
Add the import statements for the new code. As before, you can use the import suggestions made by your IDE or refer to the Bitbucket repository.
-
Save the file.
-
Navigate to
src/test/java/com/example/plugins/tutorial/jira/workflowand remove auto generatedCloseParentIssuePostFunctionTest.java.
Step 3. Test the app
In this step, you will test that your app closes the parent task when all sub-tasks are closed.
-
Reload your app in Jira:
- Using QuickReload
with
atlas-packagecommand. - By restarting Jira.
- Using QuickReload
with
-
Go to the workflow administration page and edit your custom workflow.
-
Add the Close Parent Issue Post Function to the Close transition on your workflow. Note that there are multiple Close transitions, so be sure to add the function to each one.
-
Publish your workflow.
-
Go back to your project and create a task with one or more sub-tasks.
-
Close all the sub-tasks and make sure that the parent task is closed by your post function.
Part 3. Create a validator
In this part of the tutorial, you will add a validator that checks whether the user has entered a
fixVersion. If not, the transition fails. The finished code for this part is in the part3 branch
of the Bitbucket repository for this tutorial.
Step 1. Create the module
-
Open a Terminal window and navigate to the project root directory.
-
Run the following command:
1 2
atlas-create-jira-plugin-module -
Enter the number for the Workflow Validator module.
-
Enter the following information when prompted.
Enter New Classname
CloseIssueWorkflowValidatorPackage Name
com.example.plugins.tutorial.jira.workflow -
Select
Nfor Show Advanced Setup. -
Select
Nfor Add Another Plugin Module.
Step 2. Edit the code
Like the post function, this module does not need configuration screens. So first you'll remove the UI parts of the app, and then write the validator logic.
-
To disable the validator factory that the app created, do one of the following:
-
Remove the
CloseIssueWorkflowValidatorFactory.javaclass. -
Edit the class so that it does nothing. For example, replace its content with the following:
1 2
package com.example.plugins.tutorial.jira.workflow; import com.atlassian.jira.plugin.workflow.AbstractWorkflowPluginFactory; import com.atlassian.jira.plugin.workflow.WorkflowPluginValidatorFactory; import com.google.common.collect.Maps; import com.opensymphony.workflow.loader.AbstractDescriptor; import java.util.Map; public class CloseIssueWorkflowValidatorFactory extends AbstractWorkflowPluginFactory implements WorkflowPluginValidatorFactory { public static final String FIELD_WORD="word"; protected void getVelocityParamsForInput(Map velocityParams) { } protected void getVelocityParamsForEdit(Map velocityParams, AbstractDescriptor descriptor) { } protected void getVelocityParamsForView(Map velocityParams, AbstractDescriptor descriptor) { } public Map getDescriptorParams(Map validatorParams) { return Maps.newHashMap(); } }
-
-
Open
CloseIssueWorkflowValidator.javaand replace thevalidate()method with the following:1 2
public void validate(Map transientVars, Map args, PropertySet ps) throws InvalidInputException { Issue issue = (Issue) transientVars.get("issue"); // The issue must have a fixVersion otherwise you cannot close it if(null == issue.getFixVersions() || issue.getFixVersions().size() == 0) { throw new InvalidInputException("Issue must have a fix version"); } }This code checks that the issue has a
fixVersion. If not, it throws anInvalidInputException. -
Open the
close-issue-workflow-validator.vmresource file and replace its content with a descriptive sentence or two, for example:1 2 3 4 5 6 7 8 9 10 11 12 13
The parent issue must have one of the following statuses to allow sub-task transitions: #foreach ($status in $statuses) <b>$status.getName()</b> #if($velocityCount != $statuses.size()) #if($velocityCount == ($statuses.size() - 1)) or #else, #end #else. #end #end -
Since it won't be called, you can delete the
close-issue-workflow-validator-input.vmtemplate. -
In the
atlassian-plugin.xmlfile, edit the resource declarations in the newworkflow-validatorelement to have theirlocationvalues refer to the remainingclose-issue-workflow-validator.vmtemplate. -
Remove the auto generated test class or fix red tests.
Step 3. Test the finished app
- Reload your app using QuickReload
with the
atlas-packagecommand. - Edit your workflow to have the close issue transitions use the new Close Issue Workflow Validator that you just created.
- Go to the project administration page and create a version for your project.
- Try to close a sub-task that does not have a fix version. You will get a validation error.
- Give your sub-task a version and see if you can close it now.
Congratulations, that's it!
Have a treat!
Rate this page: