JIRA Developer Documentation : DRAFT - Tutorial - Creating a project template
Applicable: | This tutorial applies to JIRA 7.2.x and later. |
Level of experience: | This is an intermediate tutorial. You should have completed at least one beginner tutorial before working through this tutorial. See the list of developer tutorials. |
Time estimate: | It should take you approximately an hour to complete this tutorial. |
Overview of the Tutorial
JIRA project templates allow administrators to quickly create JIRA projects with a predefined set of project configuration settings and properties. JIRA comes with several built-in project templates, but you can create your own as JIRA plugins.
Besides hooking into the JIRA project creation process, a project template plugin can define issue-type schemes (with a set of custom issue types) and workflow schemes that link the issue types to JIRA workflows.
This tutorial shows you how to build a project template plugin. Our project template will define a custom issue type scheme with three issue types and a workflow scheme with two imported workflows. The completed JIRA plugin will consist of the following components:
- Java classes encapsulating the plugin logic.
- Resources for display of the plugin user interface (UI).
- A plugin descriptor (XML file) to enable the plugin module in the Atlassian application.
- A configuration file (JSON file) for your Project Template.
- A couple JIRA workflow bundles for importing the workflows in your project template.
When you have finished, all these components will be packaged in a single JAR file.
About these Instructions
You can use any supported combination of OS and IDE to create this plugin. These instructions were written using IntelliJ IDEA on Mac OS. If you are using another OS or IDE combination, you should use the equivalent operations for your specific environment.
This tutorial was last tested with JIRA 7.2.6.
Required Knowledge
To complete this tutorial, you need to know the following:
- The basics of Java development: classes, interfaces, methods, how to use the compiler, and so on.
- How to create an Atlassian plugin project using the Atlassian Plugin SDK.
- How to use and administer JIRA, particularly how to configure JIRA projects.
Plugin source
We encourage you to work through this tutorial. If you want to skip ahead or check your work when you have finished, you can find the plugin source code on Atlassian Bitbucket. Bitbucket serves a public Git repository containing the tutorial's code. To clone the repository, issue the following command:
1
2git clone git@bitbucket.org:atlassian_tutorial/jira-project-templates-tutorial.git
Alternatively, you can download the source as a ZIP archive by choosing download here: https://bitbucket.org/atlassian_tutorial/jira-project-templates-tutorial
Step 1. Create the plugin project
In this step, you'll use the atlas SDK to generate stub code for your plugin. The atlas commands are part of the Atlassian Plugin SDK, and automate much of the work of plugin development for you.
-
If you have not already set up the Atlassian Plugin SDK, do that now: Set up the Atlassian Plugin SDK and Build a Project.
-
Open a terminal and navigate to the directory where you want to create the project.
-
Enter the following command to create a plugin skeleton:
1 2
atlas-create-jira-plugin -
As prompted, enter the following information to identify your plugin:
group-id
com.atlassian.plugins.tutorialartifact-id
my-project-templateversion
1.0-SNAPSHOTpackage
com.example.plugins.tutorial -
Confirm your entries when prompted.
The SDK generates the project home directory with project files, such as the POM (Project Object Model definition file), stub source code, and plugin resources.
Step 2. Tweak the POM
It's a good idea to familiarise yourself with the project configuration file, known as the POM (Project Object Model definition file). Among other functions, the POM declares project dependencies and controls build settings. It also contains descriptive information for your plugin.
Tweak the metadata and add a dependency as follows:
-
Open the POM (
pom.xml) for editing. You can find it in the root folder of your project. -
Add your company or organization name and website URL to the
organizationelement:1 2
<organization> <name>Example Company</name> <url>http://www.example.com/</url> </organization> -
Update the project
descriptionelement to add a meaningful description, such as:1 2
<description>This is the Project Template plugin tutorial for Atlassian JIRA.</description>The
organizationanddescriptionvalues you enter are propagated to the plugin descriptor file,atlassian.plugin.xml. From there, JIRA uses them in the administration console display for your plugin. -
Save the file.
Step 3. Add the plugin module to the plugin descriptor
Now you will add plugin modules to your plugin descriptor. The plugin descriptor is an XML file that identifies the plugin to JIRA and defines the functionality that the plugin requires. We need to add two plugin modules, one for our project template and another for a web resource.
Project templates have their own module type, named project-blueprint, which takes care of the necessary configuration. Add it to your descriptor as follows:
-
Open the plugin descriptor at
src/main/resources/atlassian-plugin.xml. -
Remove the existing <web-resource> element.
-
Add the following as a child of the
atlassian-pluginelement:1 2
<atlassian-plugin ...> ... <web-resource key="my-project-template-resources" name="my-project-template Web Resources"> <dependency>com.atlassian.auiplugin:ajs</dependency> <transformation extension="soy"> <transformer key="soyTransformer"/> </transformation> <resource type="download" name="MyProjectTemplate.soy.js" location="/soy/MyProjectTemplate.soy"/> <resource type="download" name="images/" location="/images"> <param name="content-type" value="image/png; charset=binary"/> </resource> <context>atl.general</context> <context>atl.admin</context> </web-resource> <project-blueprint key="my-project-template" weight="90"> <label key="my.project.template.name"/> <projectTypeKey>business</projectTypeKey> <description key="my.project.template.description"/> <longDescription key="my.project.template.description.long"/> <infoPage soy-template="JIRA.Templates.ProjectTemplates.Tutorial.renderMyProjectTemplateExplanation" /> <icon location="images/my-template-icon.png"/> <backgroundIcon location="images/my-template-background.png"/> <add-project> <hook class="com.example.plugins.tutorial.MyAddProjectHook"/> <descriptor file="/config/my-project-template-config.json"/> </add-project> </project-blueprint> ... </atlassian-plugin>At a minimum, you would only need to add the
project-blueprintelement, but since we're also adding an optional information page to the wizard, we need to define aweb-resourceelement as well. Ourweb-resourceelement identifies the Soy template file that presents our text page in the wizard. -
Save the file.
Let's take a closer look at the attributes and child elements of the project-blueprint plugin that we defined here.
| Name | Required | Description | Default |
|---|---|---|---|
| key | yes | The identifier of the plugin module. The key should be unique in the context of your plugin. | N/A |
| weight | Determines the order in which the project templates appear. | 100 | |
| label | yes | The key attribute defines the localisation key for the human-readable name of the plugin module. This name is used to identify the project template in the Project Templates dialog. | N/A |
| projectTypeKey | yes | (JIRA 7.0+) All the project templates must provide the key for the type of the projects created with the template. Valid values for the project type key are "business", "software", and "service_desk". | N/A |
| description | yes | The key attribute defines the localisation key for the human-readable short description of the plugin module. This description is used on the first page of the project templates dialog where all the available project templates are listed. | N/A |
| longDescription | The key attribute defines the localisation key for the human-readable long description of the plugin module. The long description is used on the right side of the Create Project form of the Project Templates dialog wizard. If no longDescription is specified, the short description will be used. | description | |
| infoPage | The Make sure that the Soy Template is also declared as a web-resource in both | No information page | |
| icon | The location attribute defines an icon to be used when listing the available project templates in the selection screen of the Project Templates dialog. | Default icon | |
| backgroundIcon | The location attribute defines the background image to use on the Create Project form of the wizard. | Default background image | |
| add-project | yes | Holds the custom configuration instructions for the project that will be created. |
The add-project element also holds a number of configuration parameters that are specific for the actual project creation.
| Name | Required | Description | Default |
|---|---|---|---|
| hook | The class attribute refers to the Java class which implements the AddProjectHook interface. This allows project templates to hook into the validation and configuration of JIRA projects. | ||
| descriptor | The file attribute refers to a JSON file which defines parts of the configuration for the project. |
Step 4. Generate your Workflow Bundles
Project templates can incorporate one or more JIRA workflows as part of their project configuration. To incorporate a workflow in your project template, you first need to define the workflow in an existing JIRA project and then use the workflow sharing feature to export the workflow from there.
Exporting a workflow results in a JIRA Workflow Bundle (.jwb) file, one for each exported workflow. You can then use the .jwb file in your project template plugin. Keep in mind that an exported JIRA workflow doesn't include custom fields, post functions, validators and conditions. If you want your workflow to have this functionality when using a project template, you can use the AddProjectHook to create it, as we do in this example.
To get a workflow bundle file for the plugin, you can either:
- Create a workflow export bundle of the workflow you want to use in your project by following the instructions for exporting a workflow, or
- Get the workflow bundles we've built for you:
 wfb.zip
Once you generate or get the JIRA workflow bundle file, put them in a new directory under your project home, src/main/resources/wfb.
Step 5. Set up the JSON configuration file
The JSON configuration file allows you to declare a number of configuration options for your project template:
- Issue types
- Issue type scheme
- Workflows
- Workflow type scheme
- The mapping of issue types to workflows
The JSON configuration file for a project template is optional, and needed only if the hook element is declared in the add-project element of a project-blueprint plugin module. We'll add one to ours:
-
Create a new JSON file named
my-project-template-config.jsonin thesrc/main/resources/configdirectory -
Add the following code to the file:
my-project-template-config.json
1 2
{ "issue-type-scheme": { "name": "my.project.template.issuetype.scheme.name", "description": "my.project.template.issuetype.scheme.description", "issue-types": [ { "key": "issueType1", "name": "New Feature", "description": "A new feature of the product, which has yet to be developed.", "icon": "/images/icons/newfeature.png", "workflow": "wf1" }, { "key": "issueType2", "name": "Bug", "description": "A problem which impairs or prevents the functions of the product.", "icon": "/images/icons/bug.png" }, { "key": "issueType3", "name": "Sub-Task", "description": "The sub-task of the issue", "icon": "/images/icons/subtask_alternate.png", "sub-task": true, "workflow": "wf2" } ] }, "workflow-scheme": { "name": "my.project.template.workflow.scheme.name", "description": "my.project.template.workflow.scheme.description", "default-workflow": "wf1", "workflows": [ { "key": "wf1", "name": "my.project.template.workflow.wf1.name", "workflow-bundle": "/wfb/Issue-Tracking-Workflow.jwb" }, { "key": "wf2", "name": "my.project.template.workflow.wf2.name", "workflow-bundle": "/wfb/Software-Development-Workflow.jwb" } ] } }
Let's take a closer look at the meaning of the configuration options here:
- The values of the
nameanddescriptionattributes ofissue-type-schemeandworkflow-schemerefer to i18n keys. - The
keyattribute of an issue type only serves as an internal identifier within the project templates infrastructure. - The
iconattribute of an issue type refers to an icon location in thesrc/main/resourcesdirectory of your plugin. - The
sub-taskattribute of an issue type lets you declare whether the issue type is a normal issue type (default) or a sub-task. - If the issue types that are declared in the
issue-type-schemedon't exist in the JIRA instance, they will be created using the declared configuration. - The
keyattribute of a workflow can be used to map issue types to workflows, or to declare thedefault-workflowfor aworkflow-scheme. - The
default-workflowattribute of aworkflow-schemelets you define which workflow to use if an issue type is used without an explicit workflow mapping. The value refers to thekeyattribute of a workflow. - The
workflow-bundleof a workflow refers to a JIRA workflow bundle location in thesrc/main/resourcesdirectory of your plugin.
Step 6. Write your Java class
Now write the Java class. This example simply creates a basic project which checks whether the project key is not "TEST". When the project is successfully created, it redirects the user from the create project dialog to the issues browser.
-
Create a new class named
MyAddProjectCreateHookin thesrc/main/java/com/example/plugins/tutorialdirector. -
Add the following code to the class:
MyAddProjectHook
1 2
package com.atlassian.plugins.tutorial; import com.atlassian.jira.project.template.hook.AddProjectHook; import com.atlassian.jira.project.template.hook.ConfigureData; import com.atlassian.jira.project.template.hook.ConfigureResponse; import com.atlassian.jira.project.template.hook.ValidateData; import com.atlassian.jira.project.template.hook.ValidateResponse; public class MyAddProjectHook implements AddProjectHook { @Override public ValidateResponse validate(final ValidateData validateData) { ValidateResponse validateResponse = ValidateResponse.create(); if (validateData.projectKey().equals("TEST")) { validateResponse.addErrorMessage("Invalid Project Key"); } return validateResponse; } @Override public ConfigureResponse configure(final ConfigureData configureData) { ConfigureResponse configureResponse = ConfigureResponse.create().setRedirect("/issues/"); return configureResponse; } }
Notice that the new class implements the AddProjectHook interface. The interface defines two methods:
validate()allows your plugin to validate the parameters to be used for creating the project. It takes the parameters as an argument, and can return errors in theValidateResponseobject. The errors, if any, are merged with any other errors resulting from JIRA's project validation and returned to the client.configure()performs setup actions for the project post-creation. It takes the newConfigureDataas an argument, which holds all the created entities (project, workflow scheme, workflows, issue type scheme, issue types). Its return values specifies the redirect page target. If no redirect is set, the default redirect (browse project) is used. Theconfigure()function can be used for a wide variety of configuration options. For example, you can use this to create Workflow Post Functions, Resolutions, and more.
Step 7. Add the i18n keys
In a couple of places we referenced i18n keys. We need to provide values for those i18n keys in the i18n properties file:
-
Open the
src/main/resources/my-project-template.propertiesfile. -
Add the following lines:
1 2
#put any key/value pairs here my.project.template.name=My Project Template my.project.template.description=This is my custom Project Template my.project.template.description.long=This custom Project Template will create a new Project with customized workflows and issue types. my.project.template.info.page.description=Explain the configurations specifics of your template here. my.project.template.issuetype.scheme.name=My Project Template Issue Type Scheme my.project.template.issuetype.scheme.description=This is my Issue Type Scheme my.project.template.workflow.scheme.name=My Project Template Workflow Scheme my.project.template.workflow.scheme.description=My Project Template Workflow Scheme my.project.template.workflow.wf1.name=My Workflow 1 my.project.template.workflow.wf2.name=My Workflow 2 -
To ensure this file is used for translations, make sure the following line is in your
atlassian-plugin.xml:1 2
<resource type="i18n" name="i18n" location="my-project-template"/>
Step 8. Add the required resources
In atlassian-plugin.xml, there are resource elements referencing soy templates and images. We need to add these:
-
Create the file
src/main/resources/soy/MyProjectTemplate.soy. -
Fill in the contents of the file with:
1 2
{namespace JIRA.Templates.ProjectTemplates.Tutorial} /** * Render the information page for My Project Template. */ {template .renderMyProjectTemplateExplanation} <p>{getText('my.project.template.info.page.description')}</p> {/template} -
Download the following zip:
images.zip -
Replace the existing
src/main/resources/imagesdirectory with the contents of the zip.
Step 9. Build, install and run the plugin
Now you're ready to try out the new project plugin:
-
Open a terminal and change to the project root directory (where the
pom.xmlfile is located). -
Enter the following SDK command:
1 2
atlas-run -
When JIRA finishes starting up, open the JIRA home page in a browser. JIRA prints the URL to use in the console output.
-
Log in with the default user and password combination, admin/admin.
-
Create a new project based on the
My Project Templatetemplate. This is the template you created.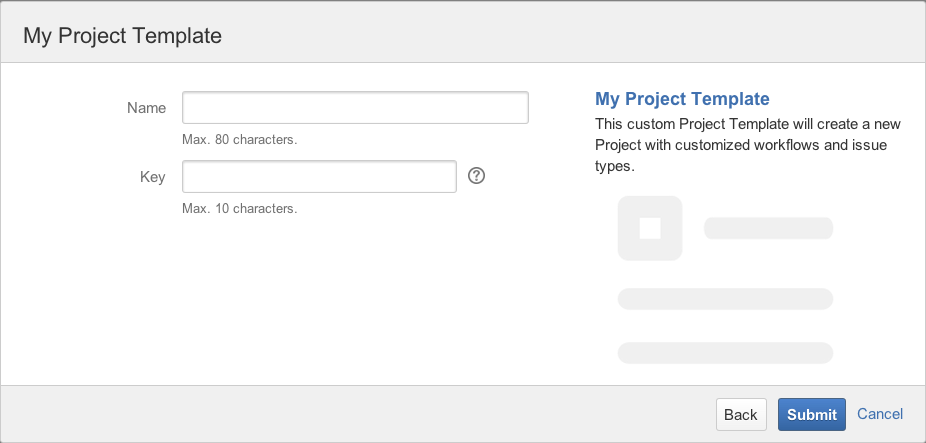
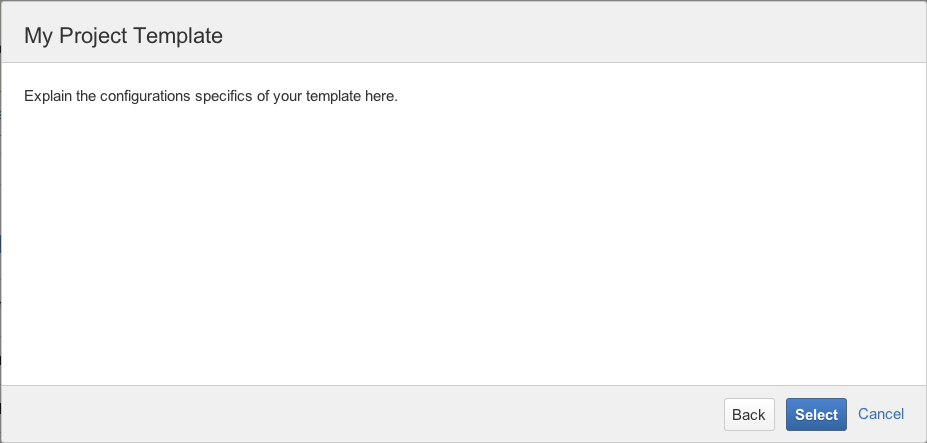
-
Check that the information page is shown.
-
Enter a project name and key, as usual.
-
Click Submit. Confirm that you are redirected to the issue browser page.
Success!
Rate this page: