Writing a dashboard item app
Applicable: | Jira 7.0.0 and later. |
Level of experience: | This is an intermediate tutorial. You should have completed at least one beginner tutorial before working through this tutorial. See the list of tutorials in DAC. |
Time estimate: | It should take you approximately 1 hour to complete this tutorial. |
Overview of the tutorial
This tutorial shows you how to write an app that adds a dashboard item to gadget directory, so users can install it to customize their dashboards.
The dashboard item will have a static content rendered on server and dynamic content rendered client-side. Using this app you can track issues that are about to due.
You can add dashboard item elements to Jira by adding module definitions to the app descriptor. In this tutorial, you'll add the web section module to define the dashboard item in your Jira.
Your completed app will consist of the following components:
- An app descriptor to enable the app in Jira.
- The required plugin modules that define the dashboard item.
- Soy templates to render dashboard item
- Context provider to pass variables to Soy template.
- JavaScript AMD module to load content dynamically.
About these instructions
You can use any supported combination of operating system and IDE to create this app. These instructions were written using IntelliJ IDEA 2017.3 on macOS Sierra. If you use another operating system or IDE combination, you should use the equivalent operations for your specific environment.
This tutorial was last tested with Jira 7.10.0 using the Atlassian SDK 6.3.10.
Before you begin
To complete this tutorial, you need to know the following:
- The basics of Java development: classes, interfaces, methods, how to use the compiler, and so on.
- How to create an Atlassian plugin project using the Atlassian Plugin SDK.
- The basics of using and administering Jira.
- Be familiar with Soy templates and JavaScript.
App source
We encourage you to work through this tutorial. If you want to skip ahead or check your work when you are finished, you can find the app source code on Atlassian Bitbucket.
To clone the repository, run the following command:
1
2git clone https://bitbucket.org/atlassian_tutorial/dashboard-item-tutorial.git
Alternatively, you can download the source as a ZIP archive
Step 1. Create the app project
In this step, you'll use an atlas- command to generate stub code for your app.
-
Set up the Atlassian Plugin SDK and build a project if you did not do that yet.
-
Open a Terminal and navigate to the directory where you would like to keep the project code.
-
To create an app skeleton, run the following command:
1 2
atlas-create-jira-plugin -
To identify your app, enter the following information.
group-id
com.example.plugins.tutorialartifact-id
dashboard-item-tutorialversion
1.0-SNAPSHOTpackage
com.example.plugins.tutorial -
Confirm your entries when prompted. The SDK generates the initial app project files in a directory named
dashboard-item-tutorial. -
Navigate to the directory created in the previous step.
-
Delete the test directories.
Setting up testing for your app isn't part of this tutorial. To delete the generated test skeleton, run the following commands:
1 2
rm -rf ./src/test/java rm -rf ./src/test/resources/ -
Delete the unneeded Java class files.
1 2
rm -rf ./src/main/java/com/example/plugins/tutorial/* -
Import project in your favorite IDE.
Step 2. Review and tweak the stub code
It is a good idea to familiarize yourself with the project configuration file known as the POM (that is, Project Object Model definition file).
In this step, you'll review and tweak the pom.xml file.
The POM is located at the root of your project and declares the project dependencies and other information.
-
Navigate to the root folder of your app and open the
pom.xmlfile. -
Add your company or organization name and your website URL to the
organizationelement (the following code blocks show how it looks in plain text):1 2
<organization> <name>Example Company</name> <url>http://www.example.com/</url> </organization> -
To add a meaningful description for your app, update the project
descriptionelement. For example:1 2
<description>This plugin adds company links to a new menu in the JIRA header.</description> -
Save the file.
-
Your stub code contains an app descriptor file called
atlassian-plugin.xml. This is an XML file that identifies the app to the host application (that is, Jira) and defines the required app functionality.Open the
atlassian-plugin.xmlfile.You should see something like this (comments removed):
1
2<?xml version="1.0" encoding="UTF-8"?>
<atlassian-plugin key="${atlassian.plugin.key}" name="${project.name}" plugins-version="2">
    <plugin-info>
        <description>${project.description}</description>
        <version>${project.version}</version>
        <vendor name="${project.organization.name}" url="${project.organization.url}"/>
        <param name="plugin-icon">images/pluginIcon.png</param>
        <param name="plugin-logo">images/pluginLogo.png</param>
    </plugin-info>
    <resource type="i18n" name="i18n" location="dashboard-item-tutorial"/>
    <web-resource key="dcd ashboard-item-tutorial-resources" name="dashboard-item-tutorial Web Resources">
        <dependency>com.atlassian.auiplugin:ajs</dependency>
        <resource type="download" name="dashboard-item-tutorial.css" location="/css/dashboard-item-tutorial.css"/>
        <resource type="download" name="dashboard-item-tutorial.js" location="/js/dashboard-item-tutorial.js"/>
        <resource type="download" name="images/" location="/images"/>
        <context>dashboard-item-tutorial</context>
    </web-resource>
</atlassian-plugin>
Step 3. Create a dashboard item with server-side rendering
In this step, you'll create a dashboard item that will use context provider to pass value to Soy template.
-
Define a new dashboard item in the app descriptor (that is,
atlassian-plugin.xml) file:1 2
<dashboard-item key="new-dashboard-item" i18n-name-key="com.example.plugins.tutorial.dashboard.item.title"> <definition> <title key="com.example.plugins.tutorial.dashboard.item.title"/> <categories> <category>Jira</category> </categories> <author> <name>Author's name</name> </author> <thumbnail location="/download/resources/${atlassian.plugin.key}:dashboard-item-tutorial-resources/images/pluginLogo.png"/> </definition> <description key="com.example.plugins.tutorial.dashboard.item.description"/> <resource name="view" type="soy" location=":dashboard-item-tutorial-resources/Dashboard.Item.Tutorial.Templates.Static"/> <context-provider class="com.example.plugins.tutorial.DashboardItemContextProvider"/> </dashboard-item>- A
definitionelement is used to display a dashboard item in gadget directory (that is, where users search for gadgets). - You can reference
pluginLogo.pngas a thumbnail location, because SDK included it in your project and declared it inweb-resourceelement. dashboard-item-tutorial-resourcesis web resource's module key.
- A
-
To use Soy template to render the dashboard item, update
web-resourceselement with the following:1 2
<web-resource key="dashboard-item-tutorial-resources" name="dashboard-item-tutorial Web Resources"> <dependency>com.atlassian.auiplugin:ajs</dependency> <transformation extension="soy"> <transformer key="soyTransformer"/> </transformation> <resource type="download" name="dashboard-item-tutorial.css" location="/css/dashboard-item-tutorial.css"/> <resource type="download" name="dashboard-item-tutorial.js" location="/js/dashboard-item-tutorial.js"/> <resource type="download" name="images/" location="/images"/> <resource type="download" location="soy/dashboard-item.soy" name="soy/dashboard-item.soy.js"/> <resource type="soy" location="/soy/dashboard-item.soy" name="Dashboard.Item.Tutorial.Templates.Static"/> <context>atl.dashboard</context> <context>dashboard-item-tutorial</context> </web-resource>Notice that we declared
atl.dashboard, so resources will be included on dashboard page. -
Save the file.
Step 4. Create a Soy template
-
Navigate to
src/main/resourcesand create asoydirectory. -
Create a
dashboard-item.soyfile. -
Add the following code to the Soy template:
1 2
{namespace Dashboard.Item.Tutorial.Templates} /** * @param pluginName * @param version */ {template .Static} <div>Welcome to <span class="aui-lozenge aui-lozenge-success">{$pluginName}</span> v{$version}!</div> {/template} -
Save the file.
Step 5. Add a context provider
In this step, to make the new dashboard item work, you will create a context provider to inject
pluginName and version variables in Soy template.
-
Navigate to
src/main/java/com/example/plugins/tutorialand create a new Java classDashboardItemContextProvider. -
Add the following code to it:
1 2
package com.example.plugins.tutorial; import com.atlassian.plugin.Plugin; import com.atlassian.plugin.PluginAccessor; import com.atlassian.plugin.PluginInformation; import com.atlassian.plugin.PluginParseException; import com.atlassian.plugin.spring.scanner.annotation.component.Scanned; import com.atlassian.plugin.spring.scanner.annotation.imports.ComponentImport; import com.atlassian.plugin.web.ContextProvider; import com.google.common.collect.Maps; import java.util.Map; @Scanned public class DashboardItemContextProvider implements ContextProvider { private final PluginAccessor pluginAccessor; public DashboardItemContextProvider( @ComponentImport PluginAccessor pluginAccessor) { this.pluginAccessor = pluginAccessor; } @Override public void init(final Map<String, String> params) throws PluginParseException { } @Override public Map<String, Object> getContextMap(final Map<String, Object> context) { final Map<String, Object> newContext = Maps.newHashMap(context); Plugin plugin = pluginAccessor.getEnabledPlugin("com.example.plugins.tutorial.dashboard-item-tutorial"); newContext.put("version", plugin.getPluginInformation().getVersion()); newContext.put("pluginName", plugin.getName()); return newContext; } }We used Atlassian Spring Scanner to inject
PluginAccessorfrom host application. -
Since we declared i18n keys in app descriptor, it's time to update
dashboard-item-tutorial.propertieselement in theatlassian-plugin.xmlfile.1 2
com.example.plugins.tutorial.dashboard.item.title=Dashboard tutorial com.example.plugins.tutorial.dashboard.item.description=Writing a dashboard item app tutorial
Step 6. Test your dashboard item
-
In Terminal window, run the following the SDK command:
1 2
atlas-runThis command starts a Jira instance and loads your app. In the output, look for a line that looks something like this:
1 2
[INFO] jira started successfully in 134s at http://localhost:2990/jiraIt tells you that Jira instance has been started and shows you the Jira home page URL.
-
In a browser, go to Jira home page that is indicated in the Terminal output.
-
Log in using the default admin/admin username and password combination.
-
Create a new project as prompted. Jira prompts you to create a new project only when you start a new instance.
-
At the top right of the page, click Dashboard > Manage dashboards.
-
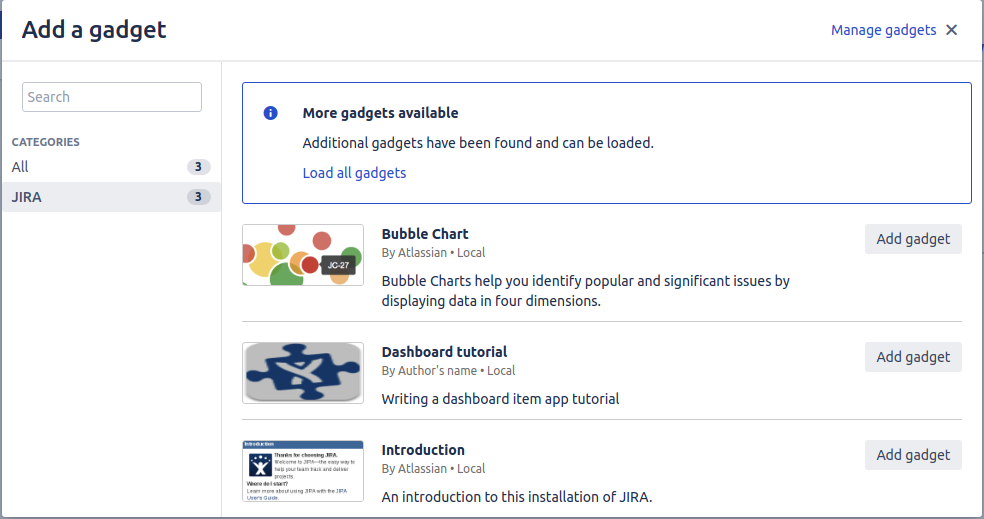
Create a new dashboard and click Add gadget button. Here is an example of how your gadget should look like.
-
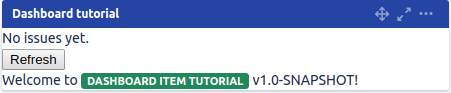
After you add dashboard item to dashboard you will see it in work.

The app works, but so far it doesn't do much. You will enhance it in the next steps.
Leave Jira running in browser for now.
Step 7. Load content dynamically
So far you have created a simple app that renders a dashboard item server-side.
Dashboard item API provides a way to include JavaScript using AMD modules.
In this step, you will use JavaScript to make REST call and search for issues that are about to due.
-
Open the
atlassian-plugin.xmlfile and add the following insidedashboard-itemelement:1 2
<amd-module>dashboard-items/tutorial</amd-module> -
Navigate to
src/main/resources/soyand open thedashboard-item.soyfile. -
Create a
divelement for dynamic content and add templates — first to render issues, second to handle empty list.1 2
{namespace Dashboard.Item.Tutorial.Templates} /** * @param pluginName * @param version */ {template .Static} <div id="dynamic-content"/> <div>Welcome to <span class="aui-lozenge aui-lozenge-success">{$pluginName}</span> v{$version}!</div> {/template} /** * @param issues */ {template .IssueList} <table class="aui"> <thead> <tr> <th id="basic-icon"></th> <th id="basic-fname">Issue key</th> <th id="basic-lname">Due date</th> </tr> </thead> <tbody> {foreach $issue in $issues} <tr> <td headers="basic-number"><img src="{$issue.fields.issuetype.iconUrl}"/></td> <td headers="basic-fname">{$issue.key}</td> <td headers="basic-lname">{$issue.fields.duedate}</td> </tr> {/foreach} </tbody> </table> <div class="buttons-container"> <div class="buttons"> <input class="button submit" type="submit" value="Refresh"> </div> </div> {/template} /** * Use this template if there is no issues in response */ {template .Empty} No issues yet. <div class="buttons-container"> <div class="buttons"> <input class="button submit" type="submit" value="Refresh"> </div> </div> {/template} -
Navigate to
src/main/resources/js/and open thedashboard-item-tutorial.jsfile. -
To define AMD module, add the following JavaScript code to the file:
1 2
define('dashboard-items/tutorial', ['underscore', 'jquery', 'wrm/context-path'], function (_, $, contextPath) { var DashboardItem = function (API) { this.API = API; this.issues = []; }; /** * Called to render the view for a fully configured dashboard item. * * @param context The surrounding <div/> context that this items should render into. * @param preferences The user preferences saved for this dashboard item (e.g. filter id, number of results...) */ DashboardItem.prototype.render = function (context, preferences) { this.API.showLoadingBar(); var $element = this.$element = $(context).find("#dynamic-content"); var self = this; this.requestData().done(function (data) { self.API.hideLoadingBar(); self.issues = data.issues; if (self.issues === undefined || self.issues.length === 0) { $element.empty().html(Dashboard.Item.Tutorial.Templates.Empty()); } else { $element.empty().html(Dashboard.Item.Tutorial.Templates.IssueList({issues: self.issues})); } self.API.resize(); $element.find(".submit").click(function (event) { event.preventDefault(); self.render(element, preferences); }); }); this.API.once("afterRender", this.API.resize); }; DashboardItem.prototype.requestData = function () { return $.ajax({ method: "GET", url: contextPath() + "/rest/api/2/search?jql=due<=3d" }); }; return DashboardItem; });In this snippet, we make a REST call to get issues that are due in 3 days (this is hardcoded for now) and render different templates depending on response.
-
Save the changes.
Step 8. Test dynamic loading
-
To test updates, rebuild your app using QuickReload:
1 2
atlas-package -
Go to the local Jira instance that you left running before.
-
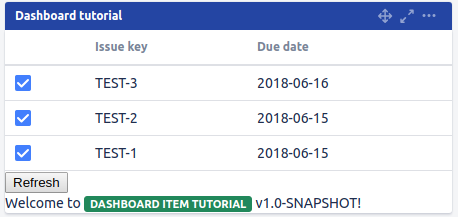
Disable caching in browser and refresh dashboard page. Your dashboard item should look like this.
-
Create few issues with due date in less than 3 days and click Refresh.
Step 9. Add a configuration screen and test the app
In this step, you will create a configuration screen for dashboard item that will be used to pass due date field in REST call.
-
Open the
atlassian-plugin.xmlfile, finddashboard-itemdefinition, and addconfigurableattribute:1 2
<dashboard-item key="new-dashboard-item" i18n-name-key="com.example.plugins.tutorial.dashboard.item.title" configurable="true"> -
Open the
dashboard-item.soyfile. To create another Soy template to render configuration form, add following to the file:1 2
/** * configuration */ {template .Configuration} <form class="aui"> <div class="field-group"> <label for="due-date-input">Due Date <span class="aui-icon icon-required">(required)</span></label> <input class="text medium-field" type="text" id="due-date-input" name="due-date-input" value="3d"> <div class="description">Syntax: 3(d|w|m) </div> </div> <div class="buttons-container"> <div class="buttons"> <input class="button submit" type="submit" value="Save" id="comment-save-button"> <a class="cancel" href="#">Cancel</a> </div> </div> </form> {/template} -
Open the
dashboard-item-tutorial.jsfile. Because we addedconfigurableattribute, dashboard callsrenderEditmethod if dashboard item is not configured yet.Add the following
renderEditmethod to the file:1 2
DashboardItem.prototype.renderEdit = function (context, preferences) { var $element = this.$element = $(context).find("#dynamic-content"); $element.empty().html(Dashboard.Item.Tutorial.Templates.Configuration()); this.API.once("afterRender", this.API.resize); var $form = $("form", $element); $(".cancel", $form).click(_.bind(function() { if(preferences['due-date-input']) this.API.closeEdit(); }, this)); $form.submit(_.bind(function(event) { event.preventDefault(); var preferences = getPreferencesFromForm($form); var regexp = /^\d+([dwm])$/; if(regexp.test(preferences['due-date-input'])) { this.API.savePreferences(preferences); this.API.showLoadingBar(); } }, this)); }; function getPreferencesFromForm($form) { var preferencesArray = $form.serializeArray(); var preferencesObject = {}; preferencesArray.forEach(function(element) { preferencesObject[element.name] = element.value; }); return preferencesObject; } -
Update
renderandrequestDatamethods to work with preferences:1 2
DashboardItem.prototype.render = function (context, preferences) { this.API.showLoadingBar(); var $element = this.$element = $(context).find("#dynamic-content"); var self = this; this.requestData(preferences).done(function (data) { self.API.hideLoadingBar(); self.issues = data.issues; if (self.issues === undefined || self.issues.length === 0) { $element.empty().html(Dashboard.Item.Tutorial.Templates.Empty()); } else { $element.empty().html(Dashboard.Item.Tutorial.Templates.IssueList({issues: self.issues})); } self.API.resize(); $element.find(".submit").click(function (event) { event.preventDefault(); self.render(context, preferences); }); }); this.API.once("afterRender", this.API.resize); }; DashboardItem.prototype.requestData = function (preferences) { return $.ajax({ method: "GET", url: contextPath() + "/rest/api/2/search?maxResults=10&jql=due<=" + preferences['due-date-input'] }); }; -
Save the changes.
-
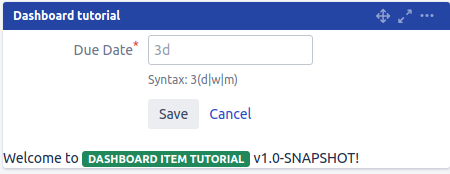
Rebuild your app and test changes, your configuration screen should look like this:
Congratulations, that's it!
Have a treat!
Next steps
Your app JAR file is located at target\dashboard-item-tutorial-1.0-SNAPSHOT.jar.
You can install the app using the Universal Plugin Manager.
Related topics
Rate this page: