Writing a JQL standalone gadget
Level of experience: Beginner
Our tutorials are classified as 'beginner', 'intermediate' and 'advanced'. This one is at 'beginner' level, so you can follow it even if you have never developed a plugin before.
Overview
This tutorial shows you how to write a gadget that will load data from a JIRA JQL Query into the gadget window and allow the user to click on an item to load the issues content in their browser. For simplicity this tutorial we will pull data from a local installation of JIRA (localhost:8070) into a local installation of Confluence (localhost:8080/confluence) and using a gadget.xml file coming from a different web server, in this case they are being served by our SVN server . To adapt the tutorial to your environment simply change out the server name ("localhost") and ports ("8070" and "8080") as appropriate.
The reason this tutorial uses local installations of both Confluence and JIRA is because this gadget requires that you configure Confluence as an OAUTH consumer for JIRA. Therefore this tutorial requires that the reader be an Administrator on both Confluence and JIRA. Please refer to the installation guides for information on installing Confluence or JIRA.
Your gadget will be a 'standalone' gadget. That means that it will consist entirely of HTML, CSS and Javascript, all contained within the gadget XML specification. There is no plugin involved, you can place this gadget xml file on any web server eliminating the need to create a plugin to host your gadget. If you are interested, you can compare standalone gadgets and gadgets embedded in plugins.
This gadget assumes you have an understanding of how OAUTH works and follows the "Sample Gadget Walkthrough " from Google.
Step 1. Create the Gadget Specification
-
Copy the following code to create the basic XML file that will become your gadget specification:
1 2
<?xml version="1.0" encoding="UTF-8" ?> <Module> <ModulePrefs title="My Gadget Title" description="My Gadget Description" author="My Name" author_email="my-email-address@example.com"> <Optional feature="gadget-directory"> <Param name="categories">Other</Param> </Optional> </ModulePrefs> <Content type="html"> <![CDATA[ Hello world! ]]> </Content> </Module> -
Paste the code into a text editor and save the file as jql-gadget.xml
Step 2. Update the Gadget Title and Other Descriptive Details
-
Update the values of the following attributes in the
<ModulePrefs>element of your gadget specification:titleEnter 'JQL Gadget'.
descriptionEnter 'This gadget pulls content from a JIRA JQL Query and displays the results in the gadget window'.
authorEnter your own name.
author_emailEnter your own email address or remove this attribute.
-
Update the value of the
categoriesparameter of thegadget-directoryfeature to 'JIRA'. This controls which category your gadget appears in within the JIRA gadget directory. NOTE: Valid values are "JIRA", "Confluence", "FishEye", "Crucible", "Crowd", "Clover", "Bamboo", "Admin", "Charts", "External Content", and "Other".
The resulting XML should look something like this:
1
2<?xml version="1.0" encoding="UTF-8" ?>
<Module>
  <ModulePrefs title="JQL Gadget"
  description="This gadget pulls content from an arbitrary JIRA JQL Query and displays the results in the gadget window"
  author="Atlassian"
  author_email="sales@atlassian.com">
    <Optional feature="gadget-directory">
      <Param name="categories">JIRA</Param>
    </Optional>
  </ModulePrefs>
  <Content type="html">
    <![CDATA[
    Hello world!
    ]]>
  </Content>
</Module>
Step 3. Make the Gadget Available on a Server
Because you are developing a standalone gadget, you can host your gadget specification on any server that will make it available to a gadget container such as a Confluence page or the JIRA Dashboard. You can host the gadget xml file on any webserver at your disposal. If you want to use the same XML that I used you can follow along using the hosted files from our SVN server . NOTE: These files assume that you have JIRA running at localhost:8070 and Confluence running at localhost:8080/confluence.
Each file is saved after each step: jql-gadget-step1.xml, jql-gadget-step2.xml, etc.
Step 4. Add the Gadget to a Confluence Page for Testing
Your gadget can already do something: It can say 'Hello world!'. Test it by adding it to a Confluence page.
- Go to Confluence Administration and click 'External Gadgets'.
- The 'External Gadgets' screen appears, showing the list of gadgets available in the Macro Browser.
- Enter the Gadget Specification URL and click 'Add'.
- Edit a Confluence Page that you want to add your gadget to.
- Click the 'Insert/Edit Macro'
 button.
 - Enter 'JQL' in the search box
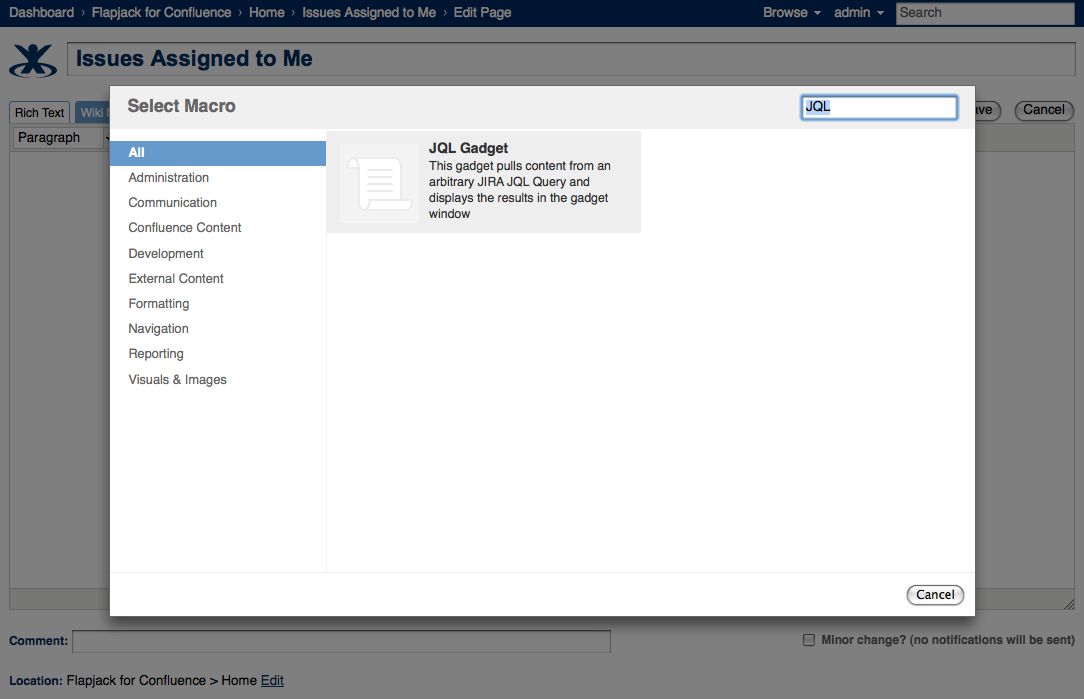
- Highlight your gadget and click the 'Add' button to add the wiki markup for the gadget macro to the wiki page.
Step 5. Make the Gadget Do Something Useful
Now you will write the JavaScript and HTML code to retrieve data from JIRA so we can display the information in the gadget on a Confluence page.
The <Content> element in your gadget specification contains the working parts of the gadget. The <Content> element consists of:
- A
CDATAdeclaration, to prevent the XML parser from attempting to parse the gadget content. Include '<![CDATA[GADGETDEV:' (without the quotes) at the beginning and ']]>' (without the quotes) at the end of your<Content>element. - Optional static HTML. When a dashboard renders the gadget, it will render this HTML.
- Optional JavaScript. You can declare JavaScript functions and call them in the usual way. Refer to the OpenSocial JavaScript API for details of gadget-specific API functions that any OpenSocial gadget container should support.
- Optional CSS style sheets.
In this tutorial you will need a JavaScript function that makes a REST call to JIRA to retrieve data. Out of the box JIRA provides a rich Gadget Javascript Framework that eases development of gadgets as plugins. We are going to take advantage of these helper javascript files from the remote server to illustrate how easy it can be to get a customized gadget running without touching any plugin code.
To start continue filling out the ModulePrefs to include a screenshot and thumbnail for the gadget - these are optional - but will make the gadget look better in the gadget directory.
| |
|
We also need to add the settings to enable this gadget for OAUTH by adding this XML in the ModulePrefs tag
1
2<Require feature="oauthpopup" />
<OAuth>
    <Service>
        <Access url="http://localhost:8070/plugins/servlet/oauth/access-token" method="POST" />
        <Request url="http://localhost:8070/plugins/servlet/oauth/request-token" method="POST" />
        <Authorization url="http://localhost:8070/plugins/servlet/oauth/authorize?oauth_callback=http%3A%2F%2Foauth.gmodules.com%2Fgadgets%2Foauthcallback" />
    </Service>
</OAuth>
Now change the <content> of the gadget to look like this:
1
2<Content type="html">
  <![CDATA[
      <!-- shindig oauth popup handling code -->
      <script src="http://svn.atlassian.com/svn/public/contrib/tutorials/jira-standalone-jql-gadget/static/js/popup.js"></script>

      <div id="main" style="display: none">
      </div>

      <div id="approval" style="display: none">
        <img src="http://svn.atlassian.com/svn/public/contrib/tutorials/jira-standalone-jql-gadget/static/images/new.gif">
        <a href="#" id="personalize">Personalize this gadget</a>
      </div>

      <div id="waiting" style="display: none">
        Please click
        <a href="#" id="approvaldone">I've approved access</a>
        once you've approved access to your data.
      </div>

      <script type="text/javascript">
        // Display UI depending on OAuth access state of the gadget (see <divs> above).
        // If user hasn't approved access to data, provide a "Personalize this gadget" link
        // that contains the oauthApprovalUrl returned from makeRequest.
        //
        // If the user has opened the popup window but hasn't yet approved access, display
        // text prompting the user to confirm that they approved access to data.  The user
        // may not ever need to click this link, if the gadget is able to automatically
        // detect when the user has approved access, but showing the link gives users
        // an option to fetch their data even if the automatic detection fails.
        //
        // When the user confirms access, the fetchData() function is invoked again to
        // obtain and display the user's data.
        function showOneSection(toshow) {
          var sections = [ 'main', 'approval', 'waiting' ];
          for (var i=0; i < sections.length; ++i) {
            var s = sections[i];
            var el = document.getElementById(s);
            if (s === toshow) {
              el.style.display = "block";
            } else {
              el.style.display = "none";
            }
          }
        }

        // Process returned JSON feed to display data.
        function showResults(result) {
          showOneSection('main');

          var titleElement = document.createElement('div');
          var nameNode = document.createTextNode(result.description);
          document.getElementById("main").appendChild(nameNode);
          document.getElementById("main").appendChild(document.createElement("br"));


          var bodyNode = document.createElement("div");
          bodyNode.innerHTML = result.table;
          document.getElementById("main").appendChild(bodyNode);
        }

        // Invoke makeRequest() to fetch data from the service provider endpoint.
        // Depending on the results of makeRequest, decide which version of the UI
        // to ask showOneSection() to display. If user has approved access to their
        // data, display data.
        // If the user hasn't approved access yet, response.oauthApprovalUrl contains a
        // URL that includes a Google-supplied request token. This is presented in the
        // gadget as a link that the user clicks to begin the approval process.
        function fetchData() {
          var params = {};
          url = "http://localhost:8070/rest/gadget/1.0/issueTable/jql?jql=";
          url = url + escape("assignee = currentUser() AND resolution = unresolved ORDER BY priority DESC, created ASC");

          params[gadgets.io.RequestParameters.CONTENT_TYPE] = gadgets.io.ContentType.JSON;
          params[gadgets.io.RequestParameters.AUTHORIZATION] = gadgets.io.AuthorizationType.OAUTH;
          params[gadgets.io.RequestParameters.METHOD] = gadgets.io.MethodType.GET;

          gadgets.io.makeRequest(url, function (response) {
            if (response.oauthApprovalUrl) {
              // Create the popup handler. The onOpen function is called when the user
              // opens the popup window. The onClose function is called when the popup
              // window is closed.
              var popup = shindig.oauth.popup({
                destination: response.oauthApprovalUrl,
                windowOptions: null,
                onOpen: function() { showOneSection('waiting'); },
                onClose: function() { fetchData(); }
              });
              // Use the popup handler to attach onclick handlers to UI elements.  The
              // createOpenerOnClick() function returns an onclick handler to open the
              // popup window.  The createApprovedOnClick function returns an onclick
              // handler that will close the popup window and attempt to fetch the user's
              // data again.
              var personalize = document.getElementById('personalize');
              personalize.onclick = popup.createOpenerOnClick();
              var approvaldone = document.getElementById('approvaldone');
              approvaldone.onclick = popup.createApprovedOnClick();
              showOneSection('approval');
            } else if (response.data) {
              showOneSection('main');
              showResults(response.data);
            } else {
              // The response.oauthError and response.oauthErrorText values may help debug
              // problems with your gadget.
              var main = document.getElementById('main');
              var err = document.createTextNode('OAuth error: ' +
                response.oauthError + ': ' + response.oauthErrorText);
              main.appendChild(err);
              showOneSection('main');
            }
          }, params);
        }
        // Call fetchData() when gadget loads.
        gadgets.util.registerOnLoadHandler(fetchData);
      </script>


  ]]>
</Content>
Check out the resulting XML in jql-gadget-step3.xml .
Step 6. Update the Gadget on the Server
- Follow the steps from 'Step 4' above to add this version of the gadget to your confluence instance and add it to the page for testing.
- If you make changes to the xml file you may need to restart Confluence to pick up the changes.
The gadget caching issue
Confluence will cache the gadget specification, with the result that your updates will not appear in Confluence until the cache has timed out or you restart Confluence. This caching problem affects other containers too, including iGoogle. There are workarounds, but these are too complex for this tutorial. Here's a short summary of the workarounds, in case you find them useful:
- In Confluence, you need to restart Confluence or run it in development mode.
- In iGoogle, you can use the Google 'My Gadgets' gadget, which allows you to turn off caching for specific gadgets.
When you test the gadget you might see an error that says 'OAuth error: consumer_key_unknown'. This indicates that OAuth has not been configured between JIRA and Confluence. We will do this in the next step.
Step 7. Configure OAuth
- To configure OAuth log in to JIRA as an administrator.
- Scroll down to the 'System' section of the Administration options and click 'OAuth'
- Click 'Add OAuth Consumer' .
- Enter 'http://localhost:8080/confluence' in the 'Consumer Base URL' field.
- Click 'Add'
- If you click into the new consumer you will see that it as been configured with the secret key that allows OAuth requests between the two servers.
Step 8. Test Working Gadget on Confluence Page
After configuring OAuth you should now be able to authorise the gadget for use by Confluence.
- Reload the page that contains the gadget.
- Click the 'Authorise this Gadget' link
- Click the 'Approve Access' button
- View the list of issues
Step 9. Make the Gadget Look Better
Since the gadget is just HTML, Javascript and CSS you can change the look and feel of the gadget by adding some CSS to the file. A lot more can be done than this, but adding just a few classes makes the gadget look much better.
1
2<style>
      #issuetable {margin:0 0 0.25em;width:100%;}
      #issuetable .issuetype {width:1%;}
      td.colHeaderLink {
          font-family:Arial,Helvetica,sans-serif;
          font-size:12px;
          white-space:nowrap;
      }
      .grid, .bordered {
          background-color:#FCFCFC;
          border:1px solid #D2D2D2;
          border-collapse:collapse;
          margin-bottom:0.5em;
          margin-top:0.5em;
      }
      .grid th, .grid td {
          border:1px solid #D2D2D2;
          padding:4px;
          vertical-align:top;
      }

  </style>
Check out the resulting XML in jql-gadget-step4.xml
Congratulations, that's it
Your gadget is complete. Have a chocolate!
Next Steps
Now that you have created a working gadget, you may like to look at some more advanced topics:
Rate this page: