This is an archive of a 3-part tutorial written by Bentley Cook, originally written for our retired Trello blog. All code used in this tutorial can be found in our example project collection. Look for the folders titled "trello-power-up-tutorial-part-x".
Please also take a look at the repository's README first.
Building A Trello Power-Up: Part Three
Want to authorize with and use a third-party service in your Power-Up? This post has you covered!
That Power-Up from our previous post isn't looking too bad! 👾 So far we've only added features that lean on tools provided by the Trello platform. However, in the real world of the Internet, tools are much more interconnected and you've got data all over the place.
Trello 💙s providing perspective and nothing provides perspective quite like pulling in useful data from external resources. For this part of the tutorial, we're going to use our imagination a bit to create a scenario that requires us to reach out to a third-party service for data.
Start your imagination engines: Your team, in addition to building great Power-Ups, has built a service that is able to predict estimates for tasks for different teams based on just the name of the task! Your service tracks teams and learns their velocity based on task names. Given a new task name, it is able to provide a rough estimate for the task based on the team's history. We'll call it: 🥑.
If a user has authorized with the service, instead of showing the "No Estimate" badge on our current Power-Up, we want to show an estimate from the service. But let's not get ahead of ourselves.
We'll spend the majority of this post working through authorizing with 🥑. You can follow along by starting with the Glitch project from our previous post or by using the complete Glitch project from this post.
Authorization Capabilities
We'll start the authorization flow by making use of the authorization-status and show-authorization capabilities. Head on over to your custom Power-Up admin portal and turn on the capabilities and save the form.
The authorization-status capability provides us a way to determine whether the current Trello user is authorized or not. It is up to us to determine what it means to be authorized. In our case, we'll say that the user is authorized if they have an authToken set in Power-Up storage at the member level. authorization-status's response expects a Promise that resolves to a JSON object with a boolean value for the key authorized. We'll add the following to our public/client.js:
1
2'authorization-status': function(t, options){
  return t.get('member', 'private', 'authToken')
  .then(function(authToken) {
    return { authorized: authToken != null }
  });
}
To determine if a user is authorized, we look for an authToken and if we find it, we return that the user is authorized.
Note: In future iterations, we may want to do a check here to validate that not only do we have a token, but that it is valid. We could do this by making a simple request to our service and ensuring that we get back an expected response.
If we return that the user is not authorized, the Power-Up library will automatically show the "Authorize Account" option in our Power-Up's settings for us:
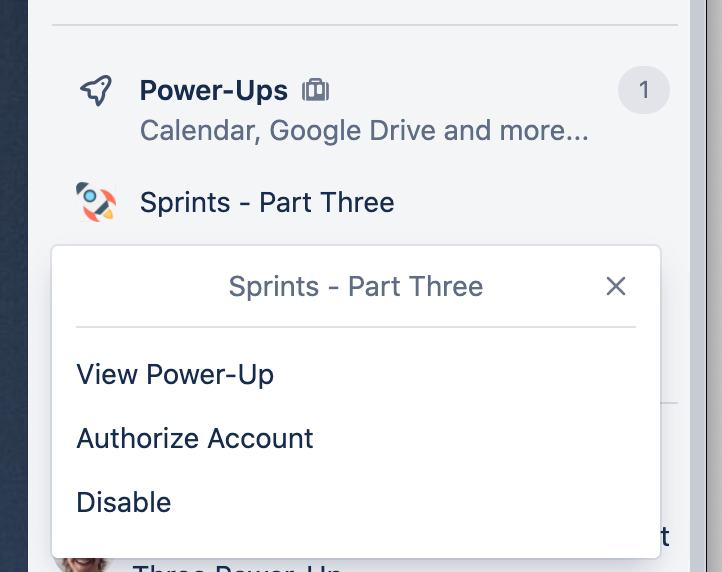
But what happens if the user clicks that? 🤷
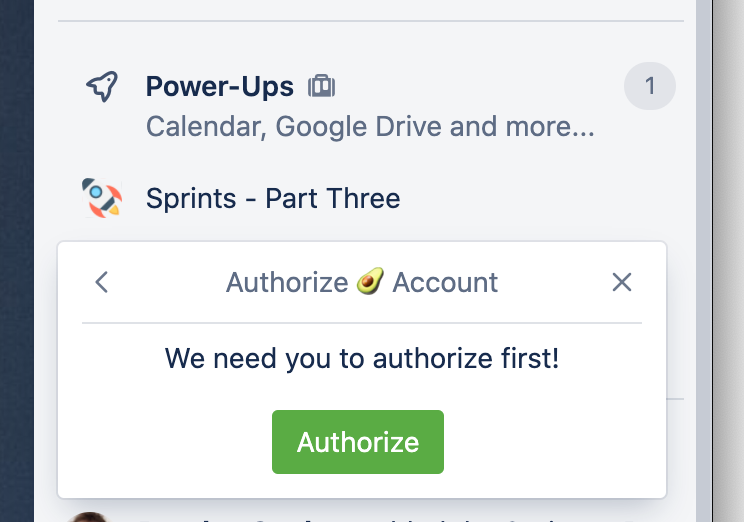
Well right now, nothing! But we've got a capability to fix that. We can use show-authorization to determine what to do when the user clicks "Authorize Account". In our case, we want to show them a pop-up that gives them a button from which we can launch our third-party authorization service. We'll add the following to our public/client.js:
1
2'show-authorization': function(t, options){
  return t.popup({
    title: 'Authorize 🥑 Account',
    url: './auth.html',
    height: 140,
  });
}
Kicking Off the Auth Flow
When the user clicks "Authorize Account" they'll be shown a pop-up with the contents of auth.html. We probably want to go ahead and add that in now so that we have something to show our user! So here's our public/auth.html:
1
2<html>
  <head>
    <script src="https://p.trellocdn.com/power-up.min.js"></script>
    <link rel="stylesheet" href="https://p.trellocdn.com/power-up.min.css" />
    <style>
      select {
        height: 30px;
      }
      * {
        text-align: center;
      }
    </style>
  </head>
  <body>
    <div id="content">
      <p>We need you to authorize first!</p>
      <button id="authorize" type="submit" class="mod-primary">Authorize</button>
    </div>
  </body>
  <script src="./js/auth.js"></script>
</html>
And that gets us a bit of good-looking UI...
But it doesn't do a lot just yet; let's add in our public/js/auth.js:
1
2var t = window.TrelloPowerUp.iframe();

t.render(function () {
  return t.sizeTo("#content");
});

var oauthUrl = window.origin + "/3rd-party/authorize.html";

var authBtn = document.getElementById("authorize");
authBtn.addEventListener("click", function () {
  t.authorize(oauthUrl)
    .then(function (token) {
      return t.set("member", "private", "authToken", token);
    })
    .then(function () {
      return t.closePopup();
    });
});
There's where the magic is happening! When the user clicks on our "Authorize" button, we kick off t.authorize. The first argument to t.authorize should be a URL that will be opened in a new window that contains an auth flow for a service. t.authorize returns a Promise that will resolve when the page opened by t.authorize does one of two things: the window.opener.authorize(token) function is called, or an item is stored in localStorage on the same domain under the key 'token'. This is the jumping-off point of our authorization flow! From here on out, we'll want 🥑 to step in.
Note: We could also pass in an options object to t.authorize. The options allow you to specify the size of the window, as well as a validation function if you want to check the token that comes back. For the sake of simplicity, we've excluded options here but recommend you make use of it!
Create A 3rd Party Service
Alright, time to start setting up 🥑! To make our lives a bit easier we'll host it out of the same place that we're hosting the Power-Up and just pretend that it is a service all on it's own (fake microservices!).
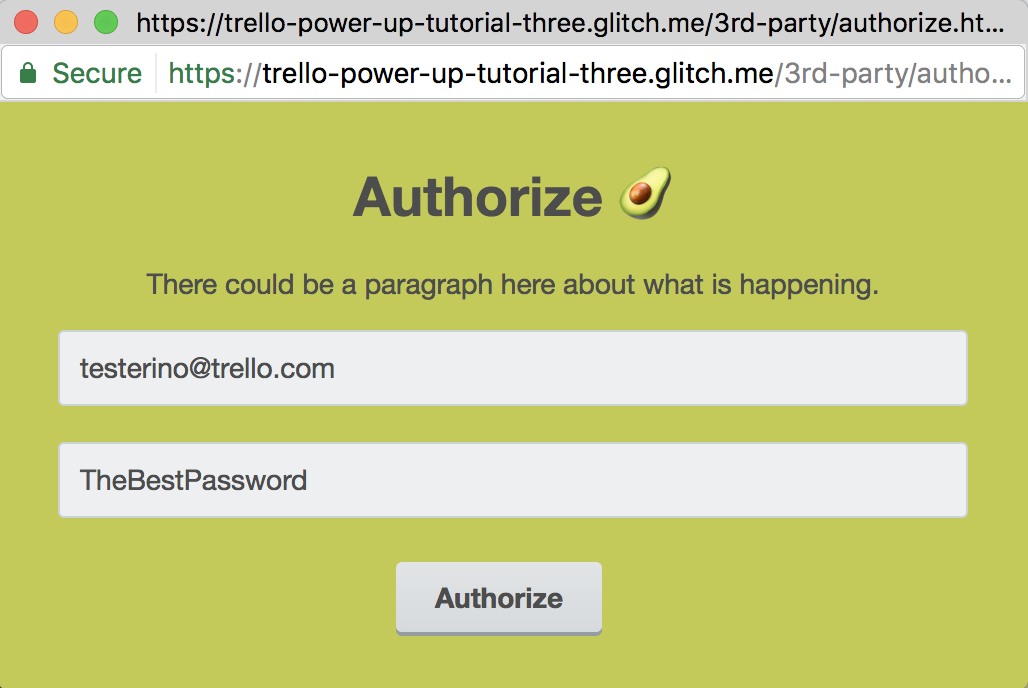
Our 🥑 auth flow will have a page that prompts the user to input their username and password, and when the page is submitted, will POST both to an authorization API endpoint. If the endpoint believes that the username and password are correct, it will send back a token that the user can use for future requests.
The authorization page will then try calling window.opener.authorize(token) or storing a token in localStorage, which will resolve our Promise returned by t.authorize.
Let's start with our very simple authorization endpoint! We'll add the following to our server.js:
1
2app.post("/auth", function (request, response) {
  response.send({
    token: "198374638a1caca81e1827376460201982baed5155e6c4934784625fa52372f",
  });
});
Talk about being security conscious! 😜 Don't worry, that isn't a real token. We're going to leave this as simple as possible so that we don't get distracted. In the real world, you should have an actual authentication endpoint that does a lot more. But for now, we're always going to assume that any POST to this resource is valid and deserving of a nice, hard-coded token!
Onto the authentication page we'll show when we pass
1
2var oauthUrl = window.origin + '/3rd-party/authorize.html';
to t.authorize. We want a form for our 🥑 users to enter their username and password. When they submit the form it should reach out to our endpoint above to get a token. Let's start with the form at public/3rd-party/authorize.html:
1
2<html>
  <link rel="stylesheet" href="https://p.trellocdn.com/power-up.min.css" />
  <style>
    body {
      background: #c3ca5a;
    }
    #content {
      padding: 30px;
      text-align: center;
      text-color: #f4aa97;
    }
    input[type="text"] {
      margin: 0 auto;
      padding: 10px;
    }
  </style>
  <script src="https://p.trellocdn.com/power-up.min.js"></script>
  <body>
    <div id="content">
      <h1>Authorize 🥑</h1>
      <p>There could be a paragraph here about what is happening.</p>
      <input type="text" id="username" name="username" value="testerino@trello.com" />
      <br />
      <input type="text" id="password" name="password" value="TheBestPassword" />
      <br />
      <button id="authorize">Authorize</button>
    </div>
  </body>
  <script src="./js/authorize.js"></script>
</html>
That looks like a HTML page with two inputs on it and a button! Let's add in public/3rd-party/js/authorize.js:
1
2var username = document.getElementById("username");
var password = document.getElementById("password");
var authBtn = document.getElementById("authorize");
authBtn.addEventListener("click", function () {
  fetch("/auth", {
    headers: {
      Accept: "application/json",
      "Content-Type": "application/json",
    },
    method: "POST",
    body: JSON.stringify({
      username: username.value,
      password: password.value,
    }),
  }).then(function (response) {
    const token = response.token;
    if (window.opener && typeof window.opener.authorize === "function") {
      window.opener.authorize(token);
    } else {
      localStorage.setItem("token", token);
    }
    setTimeout(function () {
      window.close();
    }, 1 * 1000);
  });
});
Now we're on 🔥! We add an event listener to the button; when a user clicks it, we make a POST to our authorization API and get back our token. Once we have the token, we try calling window.opener.authorize(token) with it, and if that fails, fall back to putting it into localStorage. Doing this resolves our promise, so we can close the window. And just like that, we have access to our third party token in Trello!
Here is what our auth pop up looks like:
If we revisit public/auth.js we can see that we save the returned token to the Power-Up so that it can be used at a later time:
1
2t.authorize(oauthUrl)
  .then(function(token) {
    return t.set('member', 'private', 'authToken', token)
  })
  .then(function() {
    return t.closePopup();
  });
Next Up
Now that we have a token for our 🥑 service, we can start making requests to it and using the responses we receive in our existing capabilities. In the next post we'll cover: retrieving the token and using it to make new requests, building a few more fake endpoints for those deep-learning generated estimates 😆, and pulling all of it together into card-badges!
Remember, you can see all of the code for this project here.
Rate this page: