Authorizing With Trello's REST API
Introduction
Trello's API uses token-based authentication to grant third-party applications access to the Trello API. Once a Trello user has granted an application access to their Trello account and data, the application is given a token that can be used to make requests to the Trello API on behalf of the user.
There are two ways to authorize a client and receive a User Token. The first is
via our 1/authorize route, the second is via basic OAuth1.0. We'll cover the
former now. If you'd rather use OAuth, you can skip ahead to Using Basic
OAuth.
Authorizing A Client
To begin the authentication process, you need an API key. As an API key is tied to a Power-Up, you can visit the https://trello.com/apps/admin page, access your Power-Up, navigate to the API Key tab and select the option Generate a new API Key if you haven't generated the API key yet.
Once you have an API key, you will use it to ask a Trello user to grant access to your application. To do so, you should direct a user to the authorize URL and pass along the query parameters needed as documented below. The authorize prompt can be opened in a number of different ways and with a number of different options.
When you kick off the authorization flow, the user will see the following screen:
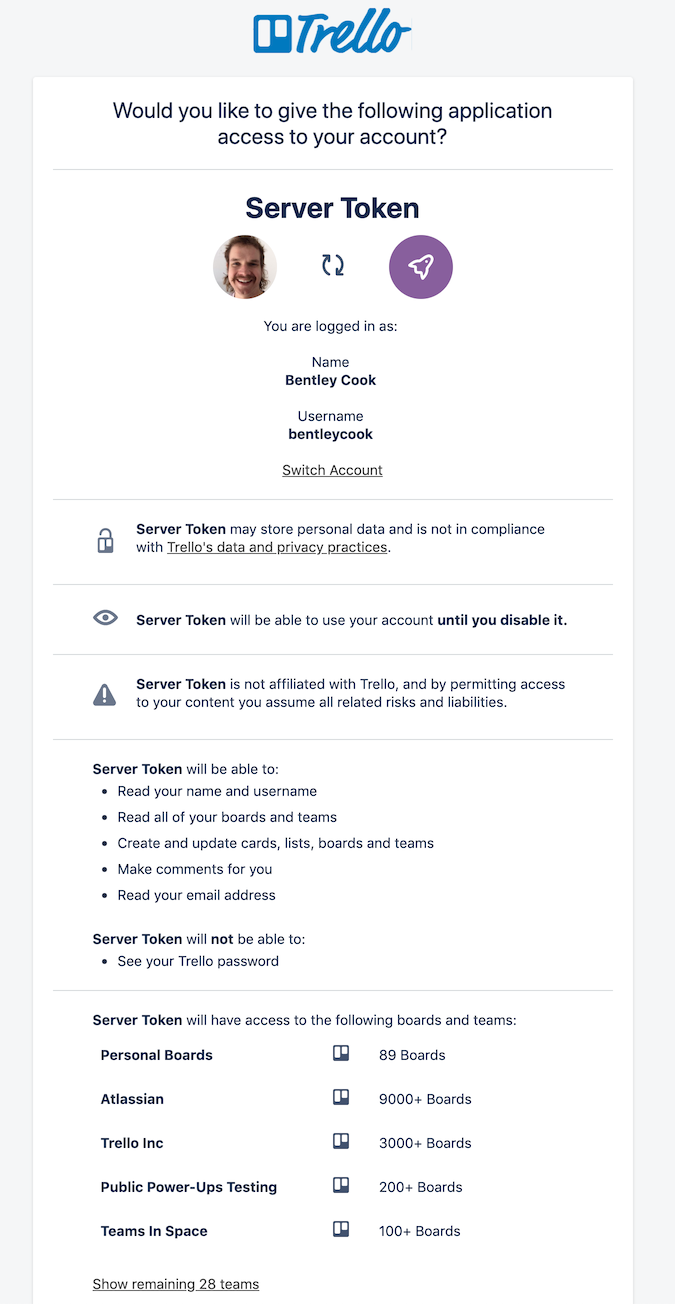
The length of access and scope of permissions are all configurable via query params (documented below).
For instance, if you're just getting started with Trello's API and you'd like to explore what is possible, you can generate a token for yourself using your API key and the following URL: https://trello.com/1/authorize?expiration=1day&scope=read&response_type=token&key={YourAPIKey}
After visiting this page and clicking the green Allow button, you'll be redirected to a page with your token. You can now use that token and your API key to make a request to the Trello API. You can give it a try with: https://api.trello.com/1/members/me/?key={yourAPIKey}&token={yourAPIToken}. This should return an object containing information about your Trello user.
Keep Trello Tokens Secret
Tokens for users should always be securely stored as they grant access to the entire user's account! It is ok for your API key to be publicly available, but a token should never be publicly available. If a token becomes public, it should be revoked immediately by the user.
If you’re authorizing a web client, you may want to check out client.js, a wrapper for the API in javascript. It includes built-in authorization methods that you may find useful. However, it uses the same route as is documented below.
1/authorize/ Route Options
| Parameter | Valid Values | Description |
|---|---|---|
| callback_method string | postMessage or fragment | Defines how the token is returned to the you when the user allows the authorization. Must be used in conjunction with return_url. postMessage should be used for popups. When postMessage is passed, Trello will call window.postMessage() to send the token to the popup's opener (i.e. your Power-Ups iframe) The return_url is used as the origin of the postMessage. See the postMessage documentation for more details. fragment should be used for redirects. When fragment is passed, Trello redirects the user to the specified return_url with the token in the URL's hash. That page should have javascript to be able to capture and save this token. |
| return_url string | A valid URL that the token should be returned to. | Defines where the token is returned to you. Must be used in conjuction with callback_method (see above). |
| scope string | Comma-separated list of one or more of read, write, account. | Read: reading of boards, organizations, etc. on behalf of the user Write: writing of boards, organizations, etc. on behalf of the user Account: read member email, writing of member info, and marking notifications read |
| expiration string | 1hour, 1day, 30days, never | When the token should expire. |
| key string | Valid Trello API key. | Used to generate the user's token. |
| response_type string | token | If both return_url and callback_method are not passed, setting the response_type to token will return the full user token in the browser window once the user allows the authorization. Trello will not redirect or use postMessage. |
If you're developing a Power-Up, consider using the t.authorize Power-Up Client Library function. For more information, see its documentation.
Accessing User Emails
Member emails can only be accessed when the account scope is requested. Once
granted, the token generated can only be used to access the email address of
the user who granted access.
Handling User Deny
Depending on the response_type you are using, Trello will do one of two things when a user clicks "Deny" from the authorization flow's prompt.
response_type | Trello's Response |
|---|---|
fragment | Trello will now add an empty token= query parameter and error= parameter with error message to the fragment when redirecting back to the return_url specified. |
postMessage | Trello will postMessage an error key in the postMessage with the error message being the value. This will be sent to the return_url specified. |
Revoking Tokens
Trello users can view metadata regarding the applications they have authorized and granted a token by visiting their account settings page: https://trello.com/u/{username}/account. There, under the Applications heading, they will see a list of every application they've granted access to, the scope of the access, the date access was approved, and the date that the token expires.
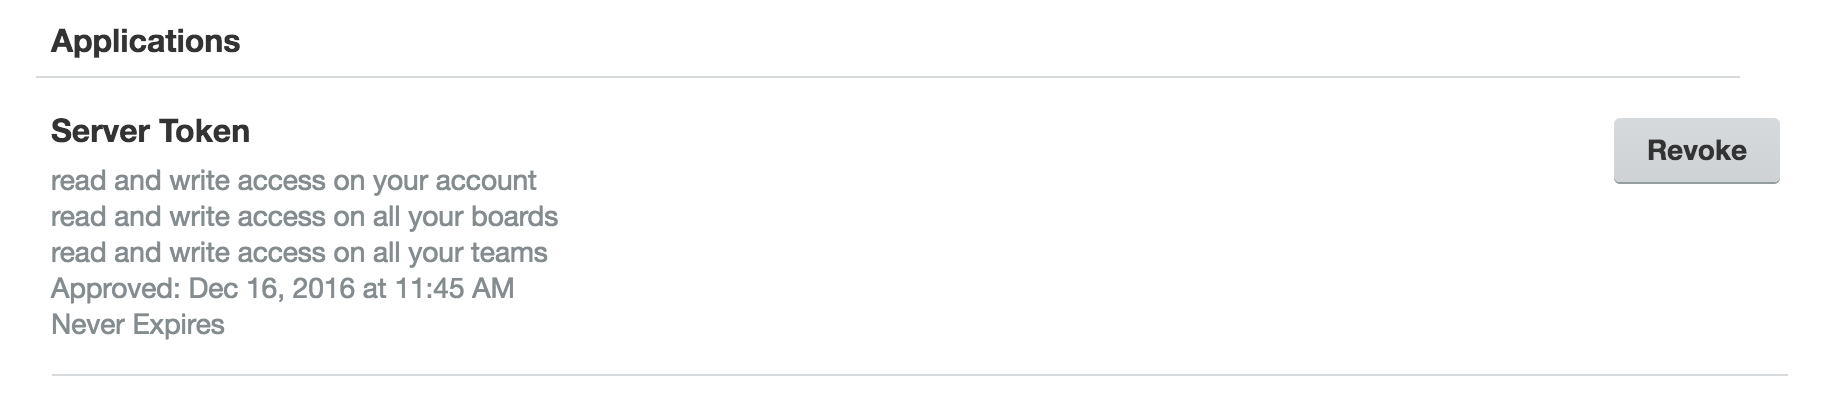
Users are able to revoke a token by clicking on the Revoke button next to the listing. Revoking the token removes the token's access to the user's account and it can no longer be used to make requests to Trello's API on behalf of the user.
Tokens can also be deleted via the API. There is a /1/tokens resource that includes a DELETE action.
Applications and Power-Ups should handle token revocation gracefully. If a token has been revoked, the API will respond with a 401 HTTP status and the message: invalid token. At that point in time, the Power-Up or integration should ask the user to re-authorize the application.
Allowed Origins
Your API key's allowed origins define which origins Trello can redirect to after a user gives consent for your application.
If the URL in the return_url parameter does not match one of your API key's allowed origins, the redirect is blocked. This prevents malicious actors from using your API key and secretly redirecting users to their application instead.
For example, if you wanted users to be redirected to https://myapplication.com/authorize, you can add https://myapplication.com to your allowed origins. You can also use the wildcard symbol * in these origins, e.g. https://*.myapplication.com. When developing locally, you may also use http//localhost:3000 as an allowed origin.
You can manage your API key's allowed origins via the https://trello.com/apps/admin page, then access your Power-Up and navigate to the API Key tab.
Note: If your API key has no allowed origins set, then no redirect URL will work.
Using Basic OAuth
The Trello API supports basic OAuth 1.0; you can use an OAuth library and the following URLs:
1
2https://trello.com/1/OAuthGetRequestToken
https://trello.com/1/OAuthAuthorizeToken
https://trello.com/1/OAuthGetAccessToken
You’ll also need your application secret (used to sign your requests). That’s listed in the API Key tab on your Power-Up management page https://trello.com/apps/admin.
Example OAuth Project In Node.js
We've put together an example project in node that demonstrates the basic routes and configuration necessary to use OAuth to access Trello's API. You can view the Glitch project here. Note that this is an archive of a Glitch project, and is not meant to be deployed as-is in its current state. See this README for more details.
Passing Token and Key In API Requests
Once you have an API key and a user's token, you can pass authorization information to Trello one of three ways:
- Query parameters
Authorizationheader- PUT/POST body
Authorization via Query Parameters
The easiest and quickest way to pass authorization to Trello is via query parameters.
You can include a key= and token= query parameter in your request.
For instance, here is a simple request passing authorization via query parameters:
1
2curl https://api.trello.com/1/members/me?key={{apiKey}}&token={{apiToken}}
Authorization header
The Trello API will also accept authorization via an Authorization header
with the format: OAuth oauth_consumer_key="{{apiKey}}", oauth_token="{{apiToken}}".
For instance, here is the same request as above, but using an Authorization header:
1
2curl -H "Authorization: OAuth oauth_consumer_key=\"{{apiKey}}\", oauth_token=\"{{apiToken}}\"" https://api.trello.com/1/members/me
PUT/POST Body
If you are making a PUT or POST request to Trello's API, you may also include the key and token in the request's body:
1
2curl -X PUT \
https://api.trello.com/1/cards/5e568d33e9b5e88bb99996d0/name \
-H "Content-Type: application/json" \
-d '{"key": "{{apiKey}}", "token": "{{apiToken}}", "value": "Finish Final Presentation" }'
Rate this page: