Working with Maven
While the SDK conceals many of the complexities of Maven, it is helpful to understand how it is used, particularly when you are troubleshooting or using advanced Maven features. This page discusses concepts behind Maven and how it is used with the SDK.
What is Maven?
Calling Maven a 'build tool' would be an understatement. But if you have no experience with Maven yet, start by thinking of it as a tool for simplifying your life by building your plugin. Quoting the Maven home page:
Maven is a software project management and comprehension tool. Based on the concept of a project object model (POM), Maven can manage a project's build, reporting and documentation from a central piece of information.
Maven is particularly useful, because it can automatically manage massive dependency trees, especially transitive dependencies where Plugin X depends on Product Y, which depends on Shared Library Z. Using Maven, you should be able to quickly and easily retrieve all the dependencies that your plugin will need, and create a working development environment in just a few steps.
Maven and the Atlassian Plugins SDK
Maven is bundled with the Atlassian Plugin SDK, so you do not need to install it manually. Even if you already have
Maven on your system, you should use the one bundled with the SDK, since the SDK requires a specific version of Maven.
The version bundled with the SDK is already configured for the SDK, so you do not need to specify repositories. The
Atlassian Plugin SDK includes a correctly-configured Maven settings.xml file.
The Atlassian SDK wraps Maven commands with its own interactive, script-based commands. The SDK commands offers command-line help and auto-completion, easing development tasks.
Running Maven commands
If you already know Maven, you may want to invoke Maven commands directly. When running Maven commands against your project, make sure that you use the version of Maven bundled with the Atlassian Plugin SDK. This is important if you have a local version of Maven installed, as well as the Atlassian Plugin SDK.
The simplest way is to use the atlas-mvn wrapper command
instead of mvn. You can invoke any Maven command by preceding it with the 'atlas-' prefix.
For example:
1
2atlas-mvn clean
The command performs the same function as the Maven command mvn clean, which removes build artifacts from the current
project.
If you have multiple versions of Maven on your system, you should use the SDK command wrapper to ensure that the correct
Maven version is executed. Alternatively, you can put the bundled Maven on your path. (Run atlas-version to discover
the location of the SDK's Maven instance binary file.)
For information on the standard SDK command format, see Working with the SDK.
Verifying your Maven settings
The Maven settings file, settings.xml, controls the general behavior of Maven. For instance, it identifies the
repositories used to resolve plugin dependencies. It also specifies development environment properties. For example, the
settings.xml file is where you configure your proxy settings if you need to connect to the Internet through a web proxy.
The location of settings.xml
This file is located in the following directory:
<atlassian-plugin-sdk-home>/apache-maven/conf
When installed with the Atlassian SDK, the settings.xml is pre-configured with the Atlassian repositories needed to
build plugin projects. If you want to include additional repositories in the default profile, you can add them to the file.
Adding the Atlassian plugin repository
We recommend that you use the Maven instance installed with the SDK, which is already configured to rely on the required
repositories. However, if for some reason you are attempting to use a settings.xml file that was not bundled with
the Atlassian SDK, you will likely encounter problems resolving dependencies required by the SDK commands. To prevent
such problems, add the pluginGroups and profile elements to your local settings.xml file:
1
2<pluginRepository>
    <id>atlassian-plugin-sdk</id>
    <url>file://${env.ATLAS_HOME}/repository</url>
     <releases>
        <enabled>true</enabled>
        <checksumPolicy>warn</checksumPolicy>
      </releases>
      <snapshots>
         <enabled>false</enabled>
      </snapshots>
 </pluginRepository>
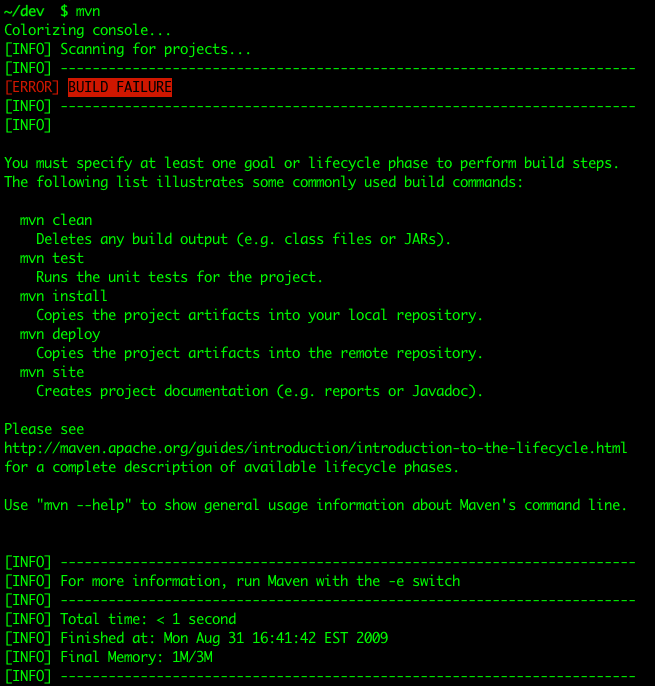
Colour-coding your Maven output
If you are using the Atlassian Plugin SDK in a Unix, Linux, or macOS environment, you can ensure that your Maven output
comes in true colour. Just set the MAVEN_COLOR environment variable to true:
1
2export MAVEN_COLOR=true
Your Maven output will look something like this:
Using the AMPS Maven plugin directly
The Atlassian Plugin SDK is built on top of the Atlassian Maven Plugin Suite (AMPS). AMPS extends the Maven build environment specifically for developing Atlassian plugins. When you create a project with the Atlassian Plugin SDK, AMPS is automatically configured as the build environment for your project.
This page provides more information about AMPS. You won't normally need to use AMPS directly, since the Atlassian Plugin SDK wraps AMPS commands with its own script-style commands. However, in some cases, you may wish to invoke AMPS commands directly or specify configuration settings for AMPS, which you can do in the project POM.
For information on configuring AMPS settings, see the AMPS Build Configuration Reference.
AMPS architecture
As a suite of Maven plugins, AMPS combines multiple plugins, conventions, and POM configuration.
Diagram: AMPS architecture:
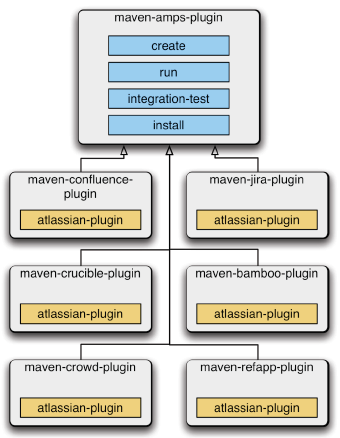
The product-specific configuration is as follows:
Product | AMPS plugin |
|---|---|
Bamboo |
|
| Bitbucket | bitbucket-maven-plugin |
Confluence |
|
Crowd |
|
Fisheye/Crucible |
|
Jira |
|
| Refapp | refapp-maven-plugin |
Basic Commands
AMPS commands are of the form mvn PRODUCT:CMD, where:
PRODUCTis the name of the product plugin above, for examplejira, andCMDis one of the commands listed below.
Examples:
mvn confluence:runmvn confluence:createmvn jira:installmvn jira:debug
In the table below, replace PRODUCT with the name of Atlassian product for which you are developing a plugin.
Fisheye and Crucible use the same plugin, so PRODUCT should be replaced with fecru if you are developing for either
of those products.
PRODUCT:create | Create a plugin skeleton from a Maven archetype, specific to the Atlassian product for which you are developing. |
PRODUCT:run | Download the product binaries (if not already downloaded), install your plugin, start the product with the container (application server) of your choice and your deployed plugin. |
PRODUCT:debug | As for PRODUCT:run, but with remote debugging enabled. |
PRODUCT:integration-test | Start the product with the container of your choice, run all |
PRODUCT:unit-test | Run the unit tests, excluding |
PRODUCT:create-home-zip | Creates a zip of the current product's home directory for use in future runs of the SDK. |
PRODUCT:copy-bundled-dependencies | Copy all runtime and compile-scoped dependencies into |
PRODUCT:install | Install your plugin (via the PDK). |
PRODUCT:uninstall | Uninstall your plugin (via the PDK). |
Examples
This section describes how to run the following commands:
Creating a new Confluence plugin from scratch
To create a new Confluence plugin skeleton, go to the directory where you want to create the plugin and type:
1
2mvn confluence:create
Running a plugin in a product
To run an arbitrary plugin in Confluence, go to the plugin's project directory and type:
1
2mvn confluence:run
Specifying the version of the product
To run your plugin with Confluence 3.4:
1
2mvn confluence:run -Dproduct.version=3.4
To run your plugin with Jira 4.2:
1
2mvn jira:run -Dproduct.version=4.2
Specifying an application server (servlet container)
To run that plugin but with Confluence 3.4 and Tomcat 7:
1
2mvn confluence:run -Dproduct.version=3.4 -Dcontainer=tomcat7x
Running your plugin in debug mode from your IDE
To run that plugin in debug mode from your IDE, set up an IDEA run configuration that executes from the project directory:
1
2mvn confluence:run -Dcontainer=jetty6x
Writing integration tests
To write a new plugin for Confluence, with integration tests, but with a minimal POM XML and not extending any other POM:
1
2<packaging>confluence-plugin</packaging>
...
<plugin>
  <groupId>com.atlassian.maven.plugins</groupId>
  <artifactId>confluence-maven-plugin</artifactId>
  <extensions>true</extensions>
</plugin>
Running integration tests against a different product
Say you had a Refapp plugin, but wanted to run your integration tests against Confluence:
1
2mvn package confluence:integration-test
Running your plugin in multiple products
Say you want to run the plugin in multiple products simultaneously. In three separate tabs in your terminal (command window), type:
1
2mvn refapp:run
1
2mvn confluence:run -Dproduct.version=3.4
1
2mvn jira:run -Dproduct.version=4.2
You can now test your plugin on three products side by side in your browser. This also means you can redeploy your plugin simultaneously:
1
2mvn package confluence:install refapp:install
Specifying the version of AMPS
The short form of the mvn PRODUCT:run and mvn PRODUCT:create commands will use the latest version of the AMPS
plugins. If you want to run a specific version of an AMPS command, use the longer form of the command. For example:
1
2mvn com.atlassian.maven.plugins:confluence-maven-plugin:8.2.3:create
Atlassian Maven repositories
This documentation has recently changed. From the 1st Feburary 2025 third party packages will no longer to mirrored via packages.atlassian.com/maven-external/. We recommend that you update to the latest version of the Atlassian Plugin SDK which will correctly configure upstream dependencies. See our maven documentation for more information.
Atlassian provides various Maven repositories for Plugin Developers. We recommend using the Atlassian Plugin SDK to make sure you've got the correct settings for using our servers.
The Plugin SDK handles almost all of this Maven tweaking for you. The SDK includes an embedded Maven installation and
a settings.xml that will be kept up to date as necessary. We believe it makes the plugin development process
much easier. For more information, see here.
Atlassian Maven proxy
The Atlassian Maven repository provides a Atlassian produced and maintained artifacts. It is recommended that you use our Atlassian Plugin SDK which comes with a configuration of maven which will allow you to build your plugins successfully.
Atlassian packages are available at the following repository
1
2<repository>
      <id>atlassian-public</id>
      <url>https://packages.atlassian.com/maven-atlassian-all/</url>
      <snapshots>
        <enabled>true</enabled>
        <updatePolicy>never</updatePolicy>
        <checksumPolicy>warn</checksumPolicy>
      </snapshots>
       <releases>
         <enabled>true</enabled>
         <checksumPolicy>warn</checksumPolicy>
      </releases>
</repository>
Atlassian 3rd-party repository
This repository is deprecated
The third-party repository contains JARs that we are allowed to re-distribute or re-host, but which we do not own.
It is contained in packages.atlassian.com/maven-external/.
Atlassian public repository
The Atlassian public repository contains all artifacts owned by Atlassian necessary to build a plugin for our products. It contains binaries, source and Javadoc for our open-source components, and binaries and javadoc for our closed-source components.
It is contained in packages.atlassian.com/maven-external/
We are in the process of deprecating all maven.atlassian.com URLs. If you are using any of those, please change them to a URL mentioned above as soon as practical. We will advise the developer community more widely when we expect to permanently decommission the maven.atlassian.com URLs.
Developing plugins with Maven
Maven is included in the Atlassian SDK, so you do not normally need to install it yourself. The version that the SDK bundles is Maven 3.
RELATED TOPICS
Rate this page: