Scheduling events via SAL tutorial
Level of experience: Advanced
Our tutorials are classified as 'beginner', 'intermediate' and 'advanced'. This one is at 'advanced' level. If you have never developed a plugin before, we advise you to try a beginner tutorial first.
Overview
This tutorial shows you how to schedule Java tasks in your plugin that run in the background at regular intervals. To this end we will use the cross-product PluginScheduler component from SAL (Shared Access Layer).
Scheduled background tasks can be useful in many situations where relatively expensive tasks, or housekeeping works needs to be run periodically. In this tutorial our periodic background task will be a search on Twitter that runs every 5 seconds and stores the results of the most recent search in memory (for the sake of this tutorial we'll pretend that a Twitter search is a very expensive task).
To make the tutorial a little interesting, the invisible background search task is accompanied by a JIRA administration page that renders the latest search result and offers the user the ability to change both the search query and the interval period. This also implements the necessary plumbing to unschedule and reschedule events.
In order to do all this, our plugin will consist of the following components:
- Java classes encapsulating the plugin logic (a webwork 1 action and the SAL scheduled event)
- A velocity template for the admin page that renders the Twitter search results
- A web item to add a link to the administration context menu
- An internationalisation resource bundle
All these components will be contained within a single JAR file. Each component is further discussed in the examples below.
Plugin Source
We encourage you to work through this tutorial. If you want to skip ahead or check your work when you are done, you can find the plugin source code on Atlassian Bitbucket. Bitbucket serves a public Git repository containing the tutorial's code. To clone the repository, issue the following command:
1
2$ git clone https://atlassian_tutorial@bitbucket.org/atlassian_tutorial/jira-scheduled-events.git
Alternatively, you can download the source using the Downloads page here: bitbucket.org/atlassian_tutorial/jira-scheduled-events
Required Knowledge
To complete this tutorial, you must already understand the basics of Java development: classes, interfaces, methods, how to use the compiler, and so on. You should also understand:
- how to create an Atlassian plugin project using the Atlassian Plugin SDK
- how to open the plugin project in your IDE
- how to compile your project and create a JAR file using Maven.
This tutorial will teach you:
- how to use a SAL (Shared Access Library) component in a plugin
- how to tap into the plugin framework's lifecycle system
- how to use a webwork action with a velocity template
- how to create and use internationalisation resource bundles
- how to add a Web Item
Step 1. Create the Plugin Project
Use the appropriate atlas-create-application-plugin command to create your plugin. For example, atlas-create-jira-plugin or atlas-create-confluence-plugin.
We'll be using the Atlassian Plugin SDK throughout the tutorial, so make sure you have it installed and working as described here. To check that you're ready to go, try the atlas-version command; you should see output like the following:
1
2$ atlas-version

ATLAS Version:    3.0.4
ATLAS Home:       /Users/administrator/usr/atlassian-plugin-sdk-3.0.4
ATLAS Scripts:    /Users/administrator/usr/atlassian-plugin-sdk-3.0.4/bin
ATLAS Maven Home: /Users/administrator/usr/atlassian-plugin-sdk-3.0.4/apache-maven
--------
Executing: /Users/administrator/usr/atlassian-plugin-sdk-3.0.4/apache-maven/bin/mvn --version
Apache Maven 2.1.0 (r755702; 2009-03-19 06:10:27+1100)
Java version: 1.6.0_15
Java home: /System/Library/Frameworks/JavaVM.framework/Versions/1.6.0/Home
Default locale: en_US, platform encoding: MacRoman
OS name: "mac os x" version: "10.6" arch: "x86_64" Family: "mac"
$
Then create a new JIRA plugin by running the atlas-create-jira-plugin command and filling in appropriate values for the plugin's groupId and artifactId when prompted.
Read below for an example of this:
1
2$ atlas-create-jira-plugin
Executing: /Users/administrator/usr/atlassian-plugin-sdk-3.0.4/apache-maven/bin/mvn com.atlassian.maven.plugins:jira-maven-plugin:3.0.4:create
[INFO] Scanning for projects...
[INFO] ------------------------------------------------------------------------
[INFO] Building Maven Default Project
[INFO]    task-segment: [com.atlassian.maven.plugins:jira-maven-plugin:3.0.4:create] (aggregator-style)
[INFO] ------------------------------------------------------------------------
[INFO] [jira:create]
[INFO] Setting property: classpath.resource.loader.class => 'org.codehaus.plexus.velocity.ContextClassLoaderResourceLoader'.
[INFO] Setting property: velocimacro.messages.on => 'false'.
[INFO] Setting property: resource.loader => 'classpath'.
[INFO] Setting property: resource.manager.logwhenfound => 'false'.
[INFO] [archetype:generate]
[INFO] Generating project in Interactive mode
[INFO] Archetype repository missing. Using the one from [com.atlassian.maven.archetypes:jira-plugin-archetype:5 -> https://maven.atlassian.com/public] found in catalog internal
Define value for groupId: : com.atlassian.example
Define value for artifactId: : scheduling
Define value for version:  1.0-SNAPSHOT: :
Define value for package:  com.atlassian.example: : com.atlassian.example.scheduling
Confirm properties configuration:
groupId: com.atlassian.example
artifactId: scheduling
version: 1.0-SNAPSHOT
package: com.atlassian.example.scheduling
 Y: :
[INFO] ----------------------------------------------------------------------------
[INFO] Using following parameters for creating OldArchetype: jira-plugin-archetype:3.0.4
[INFO] ----------------------------------------------------------------------------
[INFO] Parameter: groupId, Value: com.atlassian.example
[INFO] Parameter: packageName, Value: com.atlassian.example.scheduling
[INFO] Parameter: package, Value: com.atlassian.example.scheduling
[INFO] Parameter: artifactId, Value: scheduling
[INFO] Parameter: basedir, Value: /private/tmp
[INFO] Parameter: version, Value: 1.0-SNAPSHOT
[INFO] ********************* End of debug info from resources from generated POM ***********************
[INFO] OldArchetype created in dir: /private/tmp/scheduling
[INFO] ------------------------------------------------------------------------
[INFO] BUILD SUCCESSFUL
[INFO] ------------------------------------------------------------------------
[INFO] Total time: 1 minute 1 second
[INFO] Finished at: Mon Feb 22 18:13:41 EST 2010
[INFO] Final Memory: 42M/252M
[INFO] ------------------------------------------------------------------------
$
Step 2. Add the required Maven dependencies
In this tutorial we are using both SAL and the open source Java Twitter library twitter4j. Add both to the pom.xml file:
1
2<dependencies>
    ...
    <dependency>
        <groupId>net.homeip.yusuke</groupId>
        <artifactId>twitter4j</artifactId>
        <version>2.0.10</version>
    </dependency>
    <dependency>
        <groupId>com.atlassian.sal</groupId>
        <artifactId>sal-api</artifactId>
        <version>2.0.0</version>
        <scope>provided</scope>
    </dependency>
    ...
</dependencies>
Step 3. Import the SAL scheduler component to the Plugin Descriptor
For the plugin framework to be able to inject the SAL PluginScheduler, we need to import the component explicitly in atlassian-plugin.xml, so add the following element:
1
2<component-import key="pluginScheduler">
    <description>SAL Scheduler</description>
    <interface>com.atlassian.sal.api.scheduling.PluginScheduler</interface>
</component-import>
Step 4. Write the Background Task
Now let's write a component that gets the SAL PluginScheduler injected and then registers the periodic background task at startup.
First implement the job itself, which must be a public class that implements com.atlassian.sal.api.scheduling.PluginJob:
1
2package com.atlassian.example.scheduling;

import com.atlassian.sal.api.scheduling.PluginJob;
import org.apache.log4j.Logger;
import twitter4j.Query;
import twitter4j.Twitter;
import twitter4j.TwitterException;

import java.util.Date;
import java.util.Map;

public class TwitterQueryTask implements PluginJob {

    private final Logger logger = Logger.getLogger(TwitterQueryTask.class);

    /**
     * Executes this job.
     *
     * @param jobDataMap any data the job needs to execute. Changes to this data will be remembered between executions.
     */
    public void execute(Map<String, Object> jobDataMap) {

        final TwitterMonitorImpl monitor = (TwitterMonitorImpl)jobDataMap.get(TwitterMonitorImpl.KEY);
        assert monitor != null;
        try {
            final Twitter twitter = new Twitter();
            monitor.setTweets(twitter.search(new Query(monitor.getQuery())).getTweets());
            monitor.setLastRun(new Date());
        } catch (TwitterException te) {
            logger.error("Error talking to Twitter: " + te.getMessage(), te);
        }
    }
}
Note the map that is passed to our execute() method at runtime by the central scheduler. It provides us with a means of communicating with the job.
The way the scheduler works is that when we register a job, we pass the scheduler the class name of our task, rather than a concrete instance, while it is the scheduler that will instantiate our class. This has a number of consequences, namely that it must have a default, public constructor and that we'll need to use the jobDataMap if we want to provide the job with runtime configuration.
When passing data to your job using the jobDataMap, use unique string keys to identify them. In our implementation we store a reference to our TwitterMonitorImpl plugin component which is responsible to scheduling our task and also receives the Twitter search results.
We store this reference using the key TwitterMonitorImpl.KEY, which we'll declare in our component in the next section.
Finally see how we use the twitter4j library that allows us to do a public, anonymous search with only 2 lines of code.
Step 5. Write the Component that Schedules the Task
This is the class that we register as a plugin component in atlassian-plugin.xml. It gets instantiated by the plugin framework at application startup and is responsible for registering our job. It also stores the Twitter search results and is accessible the webwork action we will add later.
1
2package com.atlassian.example.scheduling;

import com.atlassian.sal.api.lifecycle.LifecycleAware;
import com.atlassian.sal.api.scheduling.PluginScheduler;
import org.apache.log4j.Logger;
import twitter4j.Tweet;

import java.util.Date;
import java.util.HashMap;
import java.util.List;

public class TwitterMonitorImpl implements TwitterMonitor, LifecycleAware {

    /* package */ static final String KEY = TwitterMonitorImpl.class.getName() + ":instance";
    private static final String JOB_NAME = TwitterMonitorImpl.class.getName() + ":job";

    private final Logger logger = Logger.getLogger(TwitterMonitorImpl.class);
    private final PluginScheduler pluginScheduler;  // provided by SAL

    private String query = "Atlassian"; // default Twitter search
    private long interval = 5000L;      // default job interval (5 sec)
    private List<Tweet> tweets;         // results of the last search
    private Date lastRun = null;        // time when the last search returned

    public TwitterMonitorImpl(PluginScheduler pluginScheduler) {
        this.pluginScheduler = pluginScheduler;
    }

    // declared by LifecycleAware
    public void onStart() {
        reschedule(query, interval);
    }

    public void reschedule(String query, long interval) {
        this.query = query;
        this.interval = interval;

        pluginScheduler.scheduleJob(
                JOB_NAME,                   // unique name of the job
                TwitterQueryTask.class,     // class of the job
                new HashMap<String,Object>() {{
                    put(KEY, TwitterMonitorImpl.this);
                }},                         // data that needs to be passed to the job
                new Date(),                 // the time the job is to start
                interval);                  // interval between repeats, in milliseconds
        logger.info(String.format("Twitter search task scheduled to run every %dms", interval));
    }

    public String getQuery() {
        return query;
    }

    /* package */ void setTweets(List<Tweet> tweets) {
        this.tweets = tweets;
    }

    /* package */ void setLastRun(Date lastRun) {
        this.lastRun = lastRun;
    }
}
Notice how we implement SAL's com.atlassian.sal.api.lifecycle.LifecycleAware interface and use its onStart() method to register the job.
It is critical that we do not attempt to (un)register any jobs in our component's constructor, as the scheduler (and indeed SAL itself) may not yet be fully initialised by the time your constructor is called. Therefore, always implement com.atlassian.sal.api.lifecycle.LifecycleAware and register your job in onStart().
As with every plugin component, we create an interface that we use when sharing our component with other plugin modules:
1
2package com.atlassian.example.scheduling;

public interface TwitterMonitor {

    public void reschedule(String query, long interval);
}
Step 6. Add the Component to atlassian-plugin.xml
1
2...
    <component key="schedulerComponent" class="com.atlassian.example.scheduling.TwitterMonitorImpl"
             system="true" public="true">
        <description>The plugin component that schedules the Twitter search.</description>
        <interface>com.atlassian.sal.api.lifecycle.LifecycleAware</interface>
        <interface>com.atlassian.example.scheduling.TwitterMonitor</interface>
    </component>
...
Notice the explicit declaration of the com.atlassian.sal.api.lifecycle.LifecycleAware interface and how our component is declared public, so that SAL's lifecycle manager can access it.
Step 7. Have a Beer and Put Your Feet Up!
At this point your should have your scheduled event working, complete with Twitter search!
Start JIRA, connect your debugger and place a breakpoint in your component's constructor, its reschedule() method and your job's execute() method and watch it go.
The Plugin SDK facilitates quick and easy deployment and debugging. To run our plugin in JIRA in debug mode, simply run:
$ atlas-debug
or explicitly using the Maven target:
$ mvn jira:debug
If you're satisfied with this intermediate result, go forth and schedule your events. If you want more, stick around and see how the remainder of this tutorial adds a Web Item, a webwork action, velocity template and internationalisation support to make things a bit more interactive and interesting.
Up to this point our plugin uses no product specific features or API's, and will therefore run in every Atlassian product, not just JIRA.
Step 8. Extend the Component Interface
In order to display the tweets in an admin page, we'll need to add some methods to the TwitterMonitor interface.
This is necessary because we'll have the TwitterMonitorImpl component injected into our webwork action and these extra methods in the interface will allow the action to communicate with the component and retrieve the latest search results and interval period.
1
2package com.atlassian.example.scheduling;

import twitter4j.Tweet;

import java.util.Date;
import java.util.List;

public interface TwitterMonitor {

    public String getQuery();
    public long getInterval();
    public List<Tweet> getTweets();
    public Date getLastRun();
    public void reschedule(String query, long interval);
}
And implement them in TwitterMonitorImpl:
1
2...
public class TwitterMonitorImpl implements TwitterMonitor, LifecycleAware {

...
    public long getInterval() {
        return interval;
    }

    public Date getLastRun() {
        return lastRun;
    }

    public List<Tweet> getTweets() {
        return tweets;
    }
...
Step 9. Add a WebWork Action
In the remainder of the tutorial we shall limit ourselves to JIRA and we'll create page in the administration section to display the Twitter search results. We'll also allow the user to change the search query and the search interval.
First let's implement the webwork action:
1
2package com.atlassian.example.scheduling;

import com.atlassian.jira.web.action.JiraWebActionSupport;
import twitter4j.Tweet;

import java.util.Date;
import java.util.List;

public class SchedulerAction extends JiraWebActionSupport {

    private final TwitterMonitor twitterMonitor;
    private String query;
    private long interval;

    public SchedulerAction(TwitterMonitor twitterMonitor) {
        this.twitterMonitor = twitterMonitor;
        this.query = twitterMonitor.getQuery();
        this.interval = twitterMonitor.getInterval();
    }

    @Override
    protected String doExecute() throws Exception {
        return SUCCESS;
    }

    public String doReschedule() {
        twitterMonitor.reschedule(query, interval);
        return getRedirect("TwitterScheduler!default.jspa");
    }

    public List<Tweet> getTweets() {
        return twitterMonitor.getTweets();
    }

    public String getQuery() {
        return query;
    }

    public void setQuery(String query) {
        this.query = query;
    }

    public long getInterval() {
        return interval;
    }

    public void setInterval(long interval) {
        this.interval = interval;
    }

    public Date getLastRun() {
        return twitterMonitor.getLastRun();
    }
}
We have two entry methods into this action: the doExecute() method that has no side effects and merely provides access to the current search results and there's the doReschedule() method that we'll use when the user wants to change the interval or the search query, which causes the background job to be canceled and recreated.
Note that after a reschedule action, we won't render a page, but instead we'll redirect the browser back to the read-only action of doExecute() to avoid exposing the reschedule URL in the browser, as that would continuously reschedule our job every time the user hits the browser's reload button.
Step 10. Register the WebWork Action in atlassian-plugin.xml
We'll register the webwork action in atlassian-plugin.xml and also add a Web Item to add a link to the context menu of the JIRA administration section that will link to our new page:
1
2...
    <resource type="i18n" name="i18n" location="com.atlassian.example.scheduling.TwitterSchedulerBundle"/>

    <web-item key="schedulerActionLink" section="system.admin/system"
            i18n-name-key="com.atlassian.example.scheduling.adminLink"
            name="Scheduled Twitter Search" weight="1">
        <label key="com.atlassian.example.scheduling.adminLink"/>
        <link linkId="schedulerActionLink">/secure/admin/TwitterScheduler.jspa</link>
    </web-item>

    <webwork1 key="schedulerAction" name="SAL Scheduler Example">
        <actions>
            <action name="com.atlassian.example.scheduling.SchedulerAction"
                    alias="TwitterScheduler">
                <view name="success">/templates/scheduler.vm</view>
                <view name="input">/templates/scheduler.vm</view>
            </action>
        </actions>
    </webwork1>
...
Notice how we also add an 118n resource bundle for internationalisation support, so we can render different string depending on the user's locale.
Always using i18n is a good habit, even if you only provide one language bundle. However, if you can't be bothered at this stage, feel free to omit the bundle declaration and just hardcode your text.
- See the contents of the language bundle we use.
Step 11. Add the Velocity Template
Finally we'll add the src/main/resources/templates/scheduler.vm velocity template that renders the page. The snippet below only focuses on the interesting bits while omitting most of the layout. The full template is on Bitbucket.
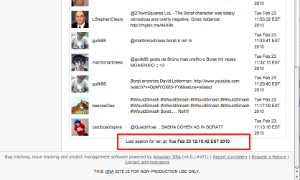
1
2...
    <form method="post" action="TwitterScheduler!reschedule.jspa">
        <p>
            <table>
                <tr>
                    <td>$i18n.getText("com.atlassian.example.scheduling.queryCell")</td>
                    <td><input type="text" name="query" value="$query"></td>
                </tr>
                <tr>
                    <td>$i18n.getText("com.atlassian.example.scheduling.intervalCell")</td>
                    <td><input type="text" name="interval" value="$interval"></td>
                </tr>
                <tr>
                    <td colspan="2"><input type="submit" value="$i18n.getText("com.atlassian.example.scheduling.applyButton")"></td>
                </tr>
            </table>
        </p>
    </form>
...
    <table class="jiraform maxWidth">
        <thead class="jiraformheader">
            <tr>
                <th colspan="2">$i18n.getText("com.atlassian.example.scheduling.result.header.from")</th>
                <th>$i18n.getText("com.atlassian.example.scheduling.result.header.tweet")</th>
                <th>$i18n.getText("com.atlassian.example.scheduling.result.header.date")</th>
            </tr>
        </thead>
        <tbody id="tweets">
            #foreach ( $tweet in $tweets )
            <tr>
                <td><img src="$tweet.profileImageUrl" width="48" height="48"></td>
                <td>$tweet.fromUser</td>
                <td>$tweet.text</td>
                <td>$tweet.createdAt</td>
            </tr>
            #end
        </tbody>
    </table>
    <div style="text-align: center;">$i18n.getText("com.atlassian.example.scheduling.lastRun") <b>$lastRun</b></div>
...
Step 12. Start JIRA
That concludes all code for our tutorial, so let's start it up and check it out:
1
2$ mvn jira:run
Screenshots


Rate this page: