Create a plugin skeleton
This section covers creating a plugin skeleton and launching it in the Atlassian Reference Application (RefApp). RefApp is a lightweight web application built for the sole purpose of developing plugins that work in any Atlassian application. If your plugin works in RefApp, you can run it in any other Atlassian application.
Get introduced to RefApp
We use RefApp intentionally in this tutorial. RefApp is a tool uniquely suited to plugin development: No Atlassian application is identical, but the RefApp provides the shared framework between all Atlassian applications. This means that you can develop your plugin without accidentally relying on dependencies or features specific to one application, or encountering an application-specific bug later on. Developing a plugin with RefApp eliminates guesswork about the functionality of your project. You can rest assured that since all Atlassian applications share at least the framework present in RefApp, your plugin will work as expected.
RefApp features common components like SAL (Secure access layer) or the REST API browser (we won't be using REST in this tutorial).
While the RefApp might not be much to look at, it's the perfect place to start your plugin development.
Step 1. Create a skeleton
Here, you'll create the foundation for your plugin project in the form of a plugin skeleton. Maven builds the plugin skeleton as Java and XML files, and downloads dependencies necessary for your plugin project.
-
Create a directory called
atlastutorial.1 2
$ mkdir atlastutorial -
Change to your new
atlastutorialdirectory.1 2
$ cd atlastutorial -
Generate a skeleton for your add-on.
1 2
$ atlas-create-refapp-plugin -
Create the following when prompted.
Press
returnorenterto accept default values shown in brackets.groupIdcom.atlassian.plugins.tutorial.refappartifactIdadminUIversion1.0-SNAPSHOTpackagecom.atlassian.plugins.tutorial.refapp -
Confirm your entries when prompted with
Yory.The code generation runs to completion. You'll see a message similar to the following:
1 2
[INFO] -------------------------------------------------------------------- [INFO] BUILD SUCCESSFUL [INFO] -------------------------------------------------------------------- [INFO] Total time: 36 seconds [INFO] Finished at: Mon Jun 17 11:22:49 PDT 2013 [INFO] -------------------------------------------------------------------- -
Change to the newly created
adminUIproject root.1 2
$ cd adminUI/ -
Remove the test directories.
1 2
$ rm -rf src/test/java/ $ rm -rf src/test/resources/These directories are automatically created from
atlas-create-refapp-plugin, but testing isn't part of this tutorial. Removing them simplifies your work in future steps. -
Remove Java classes from the
src/main/javadirectory:1 2
$ rm ./src/main/java/com/atlassian/plugins/tutorial/refapp/*.javaYou'll create a single Java class encapsulating your plugin logic in later steps.
Step 2. Start up the RefApp
When you generated the skeleton for your plugin, you specified a RefApp plugin skeleton. Your plugin has access to the shared application services and developer tools for all Atlassian applications. Here you'll start up the RefApp and get better acquainted with your resources.
-
Change directory to your project root.
1 2
$ cd adminUI -
Enter the following command to start up RefApp:
1 2
$ atlas-run -
Locate the RefApp URL.
After a few moments your terminal will display a message with the URL of the application. RefApp usually launches on port 5990.1 2
[INFO] [talledLocalContainer] Tomcat 6.x started on port [5990] [INFO] refapp started successfully in 46s at http://localhost:5990/refapp [INFO] Type Ctrl-D to shutdown gracefully [INFO] Type Ctrl-C to exit -
Copy the URL and paste it into your browser.
-
The URL will resemble localhost:5990/refapp.
-
Click Login from the upper right-hand corner.
-
Log in with the username
adminand the passwordadmin. -
Click Login.
-
Click A.D. Ministrator (Sysadmin).
Under the General, Application Links, and Developer Toolbox you'll see the core components shared by all Atlassian applications.
Optional: Import your project into Eclipse IDE
You've launched RefApp from your adminUI project root using just the command line. Now, let's import adminUI into Eclipse so you can make code changes more easily.
Start from a new tab in your terminal:
-
Change directory to your project root.
1 2
$ cd adminUI -
Make your project available to Eclipse.
1 2
$ atlas-mvn eclipse:eclipse -
Start Eclipse.
You can open a new tab in your terminal and run the following commands to open Eclipse.1 2
$ cd ~/eclipse $ ./eclipse -
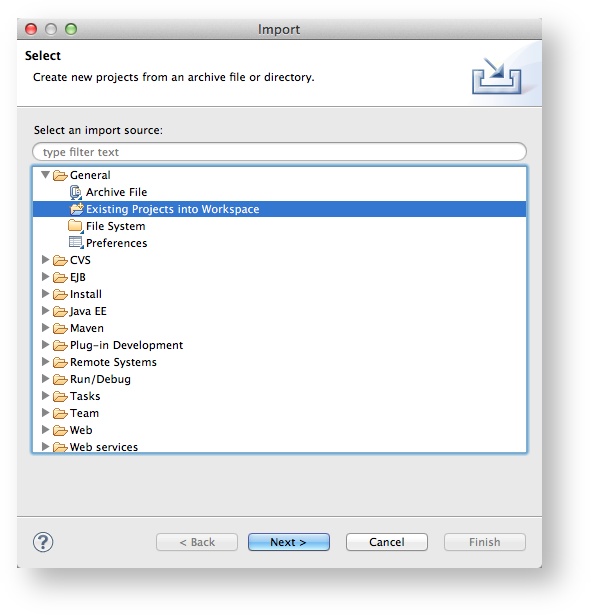
Click File > Import.
-
Under General, choose Existing Projects into Workspace.

-
Click Next.
-
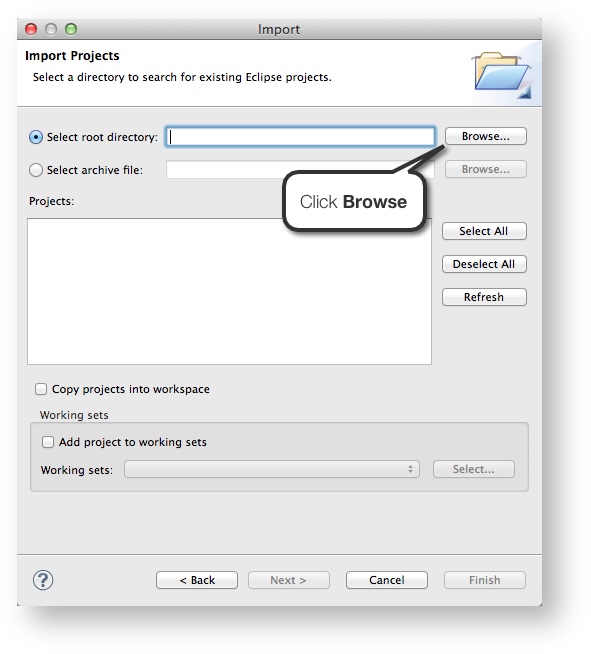
Choose Select root directory.
-
Click Browse.

-
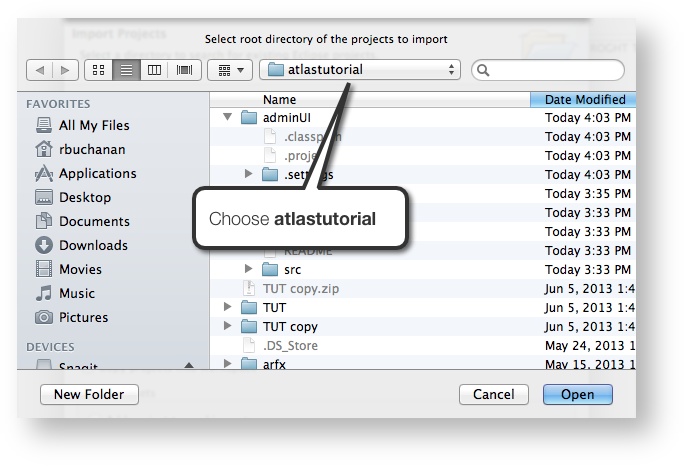
Choose your project's parent directory,
atlastutorial.

-
Click Open.
-
Confirm your
adminUIproject appears in the Projects window.
If you don't see your project, ensure you runatlas-mvn eclipse:eclipsewhile in youradminUIdirectory. -
Click Finish.
Next Steps
Now that your plugin skeleton is built and imported into Eclipse, you'll construct a servlet.
Rate this page: