Create and run unit tests
This page explains how to create and run unit tests in a plugin. You should you have already worked through Generate and Examine Skeleton Tests. The Atlassian Plugin Framework requires that you use JUnit 4.10 or higher. By default, the SDK 4.1 (and higher) atlas- commands all generate a pom.xml file with a dependency on the appropriate JUnit version. If you are working with an older plugin, you should make sure to update JUnit <version> value to 4.10 before continuing.
JUnit Quick Reminders
You use JUnit to annotate test methods in your plugin. These annotations instruct and inform the JUnit framework how to interpret your test. The following table provides a short refresher of some common JUnit annotations:
| Annotation Type | Description |
|---|---|
@After | Release external resources allocated in the @Before method. |
@AfterClass | Release expensive external resources shared among tests. These are allocated in the @BeforeClass method. |
@Before | Create resources or prepares an environment before each @Test. |
@BeforeClass | Performs expensive environment setup or creates expensive resources shared among tests. |
@Ignore | Ignore the @Test method. |
@Test | Identifies a test method. |
Recall that JUnit tests can run in any order. In fact, the order varies across different Java versions. So, remember to keep each unit test independent of another. If your tests are dependent, and they run in a different order than you expect, you may find it difficult to debug test failures. Test failure is another reason to keep your tests independent. If your tests are dependent, the failure of one can cause the remaining tests to fail.
Step 1. Run the Generated MyComponentUnitTest
When you created your plugin, the system generated a skeleton MyPluginComponent.java class. This class has a getName() method whose implementation relies on the Shared Access Layer (SAL) com.atlassian.sal.api.ApplicationProperties API. You'll find a unit test of this method in your MyComponentUnitTest.java class:
1
2@Test
public void testMyName()
{
     MyPluginComponent component = new MyPluginComponentImpl(null);
     assertEquals("names do not match!", "myComponent",component.getName());
}
When you next run your plugin with atlas-run, the command also runs your unit tests. Often, you only want to run your unit tests, you use the atlas-unit-test command to do this. The command executes only the test scope defined by the project pom.xml file. Try the atlas-unit-test command now:
-
Go to a command line.
-
Change to your plugin's top level
PLUGIN_HOMEdirectory. -
Enter the
atlas-unit-testcommand:1 2
atlas-unit-testThe command output should contain test output similar to the following:
1 2
... [INFO] [surefire:test] [INFO] Surefire report directory: /Users/manthony/atlastutorials/testTutorial/target/surefire-reports ------------------------------------------------------- T E S T S ------------------------------------------------------- Running ut.com.example.plugins.tutorial.jira.testTutorial.MyComponentUnitTest Tests run: 1, Failures: 0, Errors: 0, Skipped: 0, Time elapsed: 0.111 sec Results : Tests run: 1, Failures: 0, Errors: 0, Skipped: 0 [INFO] ------------------------------------------------------------------------ [INFO] BUILD SUCCESSFUL [INFO] ------------------------------------------------------------------------ [INFO] Total time: 29 seconds [INFO] Finished at: Thu Nov 15 09:57:19 PST 2012 [INFO] Final Memory: 69M/123M [INFO] ------------------------------------------------------------------------You can see that the generated unit test was successful.
Step 2. Create a Failing Unit Test
The build fails when one of your tests fails. Let's see how this work by adding a failling file. If you haven't already done so, start Eclipse and open the testTutorial you created.
-
Edit the
PLUGIN_HOME/src/main/java/com/atlassian/plugins/tutorials/jira/testTutorial/MyPluginComponent.javafile. -
Add a new method to the file:
1 2
int addNumbers(int x, int y); -
Edit the
PLUGIN_HOME/src/main/java/com/atlassian/plugins/tutorials/jira/testTutorial/MyPluginComponentImpl.javafile. -
Add the following code to the file:
1 2
@Override public int addNumbers(int x, int y) { return x + y; }The plugin method adds two numbers together.
-
Save and close both files.
-
Locate the
PLUGIN_HOME/src/test/java/ut/com/atlassian/plugins/tutorials/jira/testTutorial/MyComponentUnitTest.javafile. -
Edit the file and add the following unit test code:
1 2
@Test public void testAdd() { MyPluginComponent component = new MyPluginComponentImpl(null); assertEquals("Result", 8, component.addNumbers(8, 8)); }You should now have one passing test and a new one that should fail.
-
Close and save the file.
-
Go to a command line.
-
Make sure you are in at the top level
PLUGIN_HOMEdirectory for you plugin. -
Enter the
atlas-unit-testcommand.The failing test returns output similar to the following:
1 2
Failed tests: testAdd(ut.com.example.plugins.tutorial.jira.testTutorial.MyComponentUnitTest): Result expected:<8> but was:<16>With a failing test, the Maven build reports an error. If you were to run
atlas-runat this point, it would fail also because you have a build error. If you have some time, try theatlas-runcommand.
Step 3. Surefire Reports for Your Tests
The Atlassian Plugin SDK uses the Maven Surefire Plugin during the test phase to run your tests. Running atlas-unit-test creates a PLUGIN_HOME/target/test-classes directory containing your compiled test. Surefire also creates a PLUGIN_HOME/target/surefire directory to hold temporary files during the test generation. After the test phase completes, Surefire generates a PLUGIN_HOME/target/surefire-reports directory.
Take a moment and examine the Surefire report generated by your testing:
-
Change directory to
PLUGIN_HOME/target/surefire-reportsdirectory. -
List the directory contents.
You should see something similar to the following:1 2
TEST-ut.com.example.plugins.tutorial.jira.testTutorial.MyComponentUnitTest.xml ut.com.example.plugins.tutorial.jira.testTutorial.MyComponentUnitTest.txtBoth files are Surefire report files. Each time your tests you overwrite these files.
-
Take a minute and review the contents of each file.
The XML report includes a set of environmental properties used in the test.
The @Ignore annotation is useful if you want to skip a test you know is obsolete or you just aren't ready to use. Sometimes, during development, you may encounter tests that fail for other reasons. Remember the atlas- commands that start a host application with you plugin installed, also runs your tests. Failing test are inconvient if you just want to do atlas-run and see your test in a host application. Go ahead and ignore the failing test in your sample code:
-
Edit the
MyComponentUnitTest.java. -
Add an import for the JUnit @Ignore annotation.
1 2
import org.junit.Ignore; -
Add the
@Ignoreannotation to thetestAdd()method:1 2
@Ignore @Test public void testAdd() { MyPluginComponent component = new MyPluginComponentImpl(null); assertEquals("Result", 8, component.addNumbers(8, 8)); } -
Save and close the file.
-
Rerun your unit tests.
You should see that only a single test is run, the first, the framework skips the other:1 2
[INFO] [surefire:test] [INFO] Surefire report directory: /Users/manthony/atlastutorials/testTutorial/target/surefire-reports ------------------------------------------------------- T E S T S ------------------------------------------------------- Running ut.com.example.plugins.tutorial.jira.testTutorial.MyComponentUnitTest Tests run: 2, Failures: 0, Errors: 0, Skipped: 1, Time elapsed: 0.09 sec Results : Tests run: 2, Failures: 0, Errors: 0, Skipped: 1 [INFO] ------------------------------------------------------------------------ [INFO] BUILD SUCCESSFUL [INFO] ------------------------------------------------------------------------ [INFO] Total time: 28 seconds [INFO] Finished at: Thu Nov 15 10:34:32 PST 2012 [INFO] Final Memory: 69M/123M [INFO] ------------------------------------------------------------------------
Step 4. Alternative Ways to Run or to Skip Tests
Both Eclipse and IDEA allow you to run JUnit tests from within your IDE. If you are following along with this tutorial exactly, you should be using Eclipse. Go ahead and try this now:
- Edit the
PLUGIN_HOME/src/test/java/ut/com/atlassian/plugins/tutorials/jira/testTutorial/MyComponentUnitTest.javafile. - Remove the
@Ignoreannotation you added in the previous procedure. - Save the file.
- Select Run As > JUnit Test.
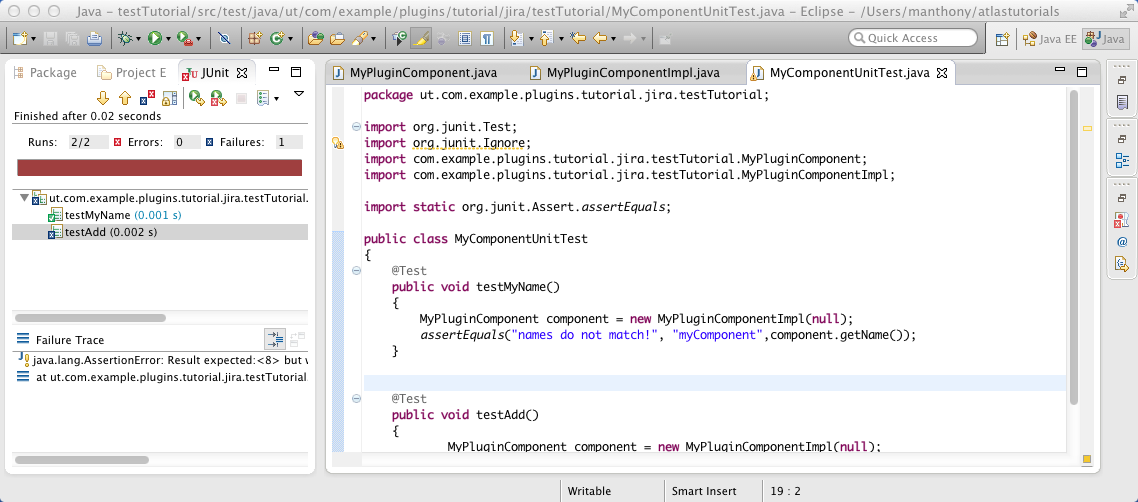
You should see output similar to the following:
Attempt an atlas-run now:
-
Go to the command line.
-
Change to your
PLUGIN_HOMEdirectory: -
Enter the
atlas-runcommand:1 2
atlas-runVery quickly the
testAdd()method fails, the build does not complete, andatlas-runexits without launching the host application. -
Rather than editing your tests to fix the failure, which can be time consuming when you many tests, skip all tests from the command line by entering the following:
1 2
atlas-run -DskipTests=trueIt may have crossed your mind that skipping tests in general may be a good idea if you just want to run the host application and your project has a lot of tests!
Next Steps
In the next section, you learn about the tools and processes for running traditional integration tests.
Rate this page: