Create a GIPHY app using the UI kit on Confluence
This tutorial describes how to make API calls to an external API from your Forge app and display the result on a Confluence Cloud page. You’ll use the GIPHY API to display GIFs on the Confluence page. The result will look like this:
Before you begin
This tutorial assumes you're already familiar with the basics of Forge development. If this is your first time using Forge, see Getting started first.
To complete this tutorial, you need the following:
- The Forge CLI (latest version). To update your CLI version, run
npm install -g @forge/cli@lateston the command line. - A GIPHY API key. Go to GIPHY help to request an API key.
During your GIPHY API key generation, you will be prompted to select the type of API. Make sure to select API (not SDK).
Set up a cloud developer site
An Atlassian cloud developer site lets you install and test your app on Atlassian apps including Confluence and Jira. If you don't have one yet, set it up now:
- Go to http://go.atlassian.com/cloud-dev and create a site using the email address associated with your Atlassian account.
- Once your site is ready, log in and complete the setup wizard.
You can install your app to multiple Atlassian sites. However, app data won't be shared between separate Atlassian apps, sites, or Forge environments.
The limits on the numbers of users you can create are as follows:
- Confluence: 5 users
- Jira Service Management: 1 agent
- Jira Software and Jira Work Management: 5 users
Before we dive into the code, let's review how this app works.
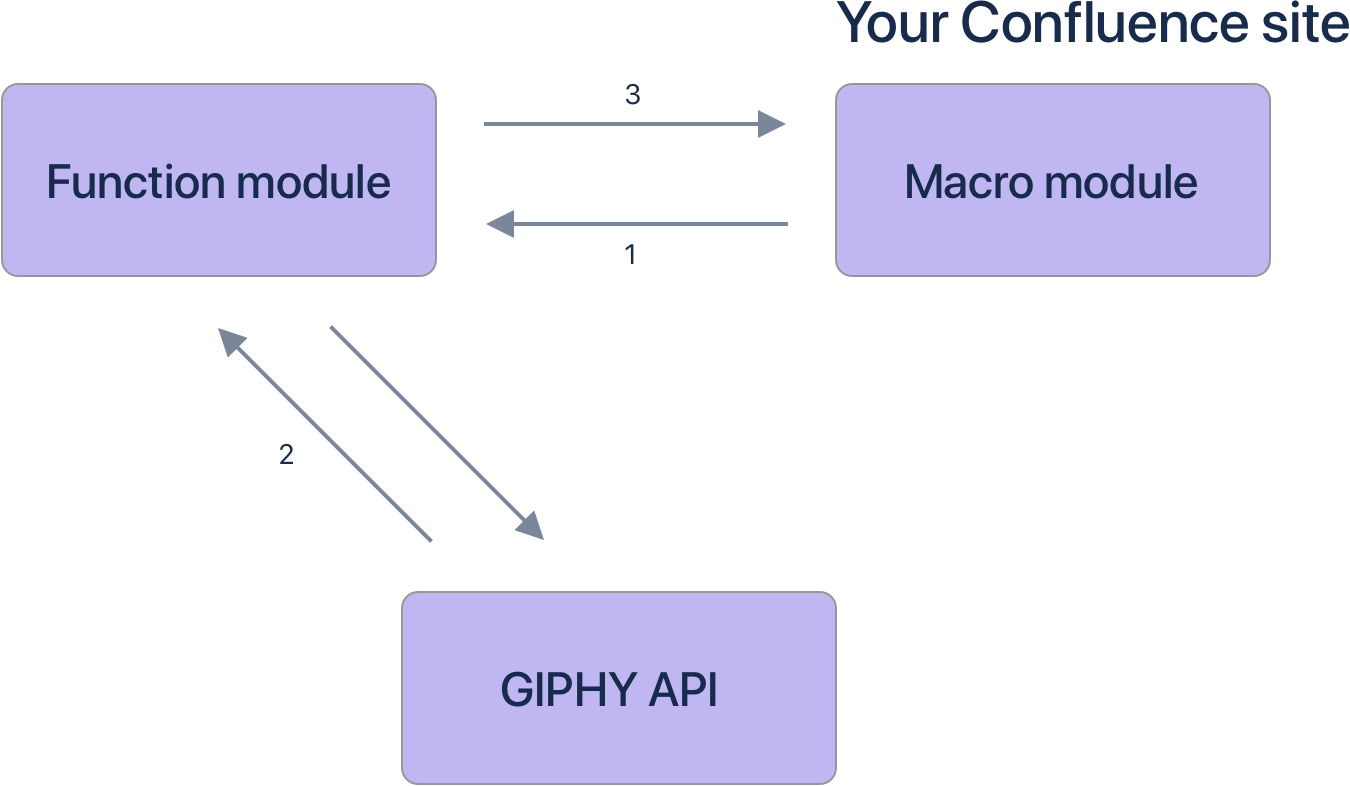
The flow diagram shows the app’s 3 main parts.
- Macro module: Defines the name of the macro in Confluence and associates it with a Forge function that should run when you use the macro on a page in your Confluence Cloud site.
- Function module: The function you’ll write that defines the UI component to be displayed in the app.
- GIPHY API: The API used to fetch the GIFs from GIPHY.
These parts work together as follows:
- When you open a Confluence page that includes this macro, it runs the function you’ve associated with the macro in your app’s manifest.
- That function fetches GIFs using the GIPHY API.
- The GIPHY app adds the fetched GIF to the UI, which is rendered by the app.
Step 1: Create your app
Make sure you run forge login before you creating your app. For more information on how to log in to forge, see Log in with an Atlassian API scoped token.
Create an app using a template.
-
Navigate to the directory where you want to create the app.
-
Create your app by running:
1 2
forge create -
Enter a name for the app. For example, giphy-app.
-
Select the UI Kit category from the list.
-
Select the Confluence app from the list.
-
Select the confluence-macro template from the list.
-
Change to the app subdirectory to see the app files
1 2
cd giphy-app
Step 2: Configure the app manifest
This app uses a Confluence macro module. Macros enable you to add functionality or include dynamic
content in a Confluence page.
- In the app’s top-level directory, open the
manifest.ymlfile. - Change the
keyundermacroto giphy. - Change the
titleundermacroto GIPHY. - Add image egress permissions to whitelist a GIPHY image.
We will be adding this GIPHY source link: https://media3.giphy.com/media/26vUJR5VABcUJaCTm/200.gif?cid=74f3ab6481fcd606c80e02418b301c17130050edc03b7521&rid=200.gif
1 2permissions: external: images: - address: <GIPHY source link >
Your manifest file should look like this:
1
2modules:
  macro:
    - key: giphy
      resource: main
      render: native
      resolver:
        function: resolver
      title: GIPHY
  function:
    - key: resolver
      handler: index.handler
resources:
  - key: main
    path: src/frontend/index.jsx
permissions:
  external:
    images:
      - address: https://media3.giphy.com/media/26vUJR5VABcUJaCTm/200.gif?cid=74f3ab6481fcd606c80e02418b301c17130050edc03b7521&rid=200.gif
app:
  runtime:
    name: nodejs24.x
  id: '<your-app-id>'
See Manifest to learn more about the manifest file.
Step 3: Add a user interface
Install the latest versions of the following packages in the top-level directory of the app:
- UI Kit:
- To update your version run
npm install @forge/ui@latest --saveon the command line.
- To update your version run
- Forge API:
- To update your version run
npm install @forge/api@lateston the command line.
- To update your version run
Add UI Kit components that render when the app is called. You’ll use a sample response from the GIPHY API to make a static app (steps 1 and 3 from the flow diagram above).
-
Open the
src/frontend/index.jsxfile. -
Replace the contents of the file with:
1 2
import React from 'react'; import ForgeReconciler, { Text, Image } from '@forge/react'; // ImageCard component containing text and image const ImageCard = ({title, src}) => ( <> <Text>{title}</Text> <Image src={src} alt={title}/> </> ); const App = () => { const { title, url } = { title: "awesome avalanche GIF", url: "https://media3.giphy.com/media/26vUJR5VABcUJaCTm/200.gif?cid=74f3ab6481fcd606c80e02418b301c17130050edc03b7521&rid=200.gif" }; return ( <> <Text>Random GIF!</Text> <ImageCard src={url} title={title}/> </> ); }; ForgeReconciler.render( <React.StrictMode> <App /> </React.StrictMode> );
In this code:
- The import statement lists the components to use from the UI Kit. You’ll use Image to display the GIF. See UI Kit components to learn more about these components.
titleandsrcare used by the componentImageCard.titlewill come from the GIPHY API response.srcis the URL and fixed height of the GIF.ImageCardconsists of a Text component and anImagecomponent.- The
Appfunction is where the GIPHY API call is linked to the components of the user interface. This function returns aTextand anImageCardcomponent. The code has values for a GIF. Later in this tutorial, you’ll update this to make a call to get a random GIF. The sample response from GIPHY for obtaining a GIF by ID has the information you’ll use fortitleandsrcinImageCard.
Step 4: Install your app
Build, deploy, and install the app to see it in your Confluence site.
To use your app, it must be installed onto an Atlassian site. The
forge deploy command builds, compiles, and deploys your code; it'll also report any compilation errors.
The forge install command then installs the deployed app onto an Atlassian site with the
required API access.
You must run the forge deploy command before forge install because an installation
links your deployed app to an Atlassian site.
-
Navigate to the app's top-level directory and deploy your app by running:
1 2
forge deploy -
Install your app by running:
1 2
forge install -
Select your Atlassian context using the arrow keys and press the enter key.
-
Enter the URL for your development site. For example, example.atlassian.net. View a list of your active sites at Atlassian administration.
Once the successful installation message appears, your app is installed and ready
to use on the specified site.
You can always delete your app from the site by running the forge uninstall command.
Step 5: View your app
With your app installed, it’s time to see the app on a page.
- Edit a Confluence page in your development site.
- Type
/ - Find the macro app by name in the menu that appears and select it.
- Publish the page.
Step 6: Call the GIPHY API to retrieve random images
Next, we'll turn the static app into a dynamic app by replacing the hardcoded response with an API call (step 2 from the flow diagram above).
To allow our app to access external resources:
- Update the manifest to allow API calls to the GIPHY API and add the GIPHY API domain (
api.giphy.com) to the list of approved domains underpermissions.external.fetch.backend. - Whitelist the domain to access the GIPHY imagess under
permissions.external.images
Your manifest.yml permissions should look like this:
1
2permissions:
  external:
    images:
    - address: *.giphy.com
    fetch:
        backend:
        - 'api.giphy.com'
After updating the permissions on the manifest.yaml file, you need to run the forge install --upgrade command.
See fetch and images permissions for information.
You need to set the GIPHY API key as a variable so your code can access it when making calls to the GIPHY API.
Copy the GIPHY API key that you have created, and run
1
2forge variables set --encrypt GIPHY_API_KEY your-key
Make sure to replace your-key with your actual GIPHY API key.
You’ll speed up your development process by starting a tunnel, which automatically deploys your local code changes to the cloud and makes them available to your Confluence site.
Start the tunnel by running:
1
2forge tunnel
To test the API call, use the following command in your terminal:
curl --location 'https://api.giphy.com/v1/gifs/random?api_key=<paste-your-giphy-api-key>&rating=g'
Make sure to replace <paste-your-giphy-api-key> with your actual GIPHY API key. When you run the command, it should return a json response indicating that your API key is active and working.
Next, we will update the app code.
-
Open the
src/resolvers/index.jsfile. -
Add the following code to call the GIPHY API:
1 2
import Resolver from '@forge/resolver'; import api from "@forge/api"; const resolver = new Resolver(); // GIPHY API base URL const GIPHY_API_BASE = 'https://api.giphy.com/v1/gifs/'; // getRandomGif function makes the GIPHY API call to get a random GIF and filter out title and url resolver.define('getRandomGif', async() => { const response = await api.fetch( `${GIPHY_API_BASE}random?api_key=${process.env.GIPHY_API_KEY}&rating=g`, ); const { data: { title, images: { fixed_height: { url }, }, }, } = await response.json(); return { title, url, }; }); export const handler = resolver.getDefinitions();In this code:
GIPHY_API_BASEis a constant containing the URL to call the GIPHY API.getRandomGifis an asynchronous function that makes the API call and returns the result in the format ofGiphyJson.fetchfrom the Runtime API makes a call to GIPHY’s random endpoint and stores the response. This function uses the GIPHY API key from your environment variables withprocess.env.GIPHY_API_KEY.
-
Open the
src/frontend/index.jsxfile. -
Add the UI Kit hook
useStateto the import statement fromreact. -
Replace
const { title, url }and its value in theAppfunction with the following:1 2
const [title, setTitle] = useState(''); const [url, setURL] = useState(''); invoke('getRandomGif', {}).then((title, url) => { setTitle(title); setURL(url); });
Your index.jsx file should look like this:
1
2import React, { useEffect, useState } from 'react';
import ForgeReconciler, { Text, Image } from '@forge/react';
import { invoke } from '@forge/bridge';

// ImageCard component containing text and image
const ImageCard = ({ title, url }) => {
  return (
    <>
      <Text>{title}</Text>
      <Image src={url} alt={title}/>
    </>
  )
};

const App = () => {
  const [title, setTitle] = useState('');
  const [url, setURL] = useState('');

  useEffect(() => {
    invoke('getRandomGif', {}).then((data) => {
      setTitle(data.title);
      setURL(data.url);
    });
  }, [setTitle, setURL, invoke]);

  return (
    <>
      <Text>Random GIF!</Text>
      <ImageCard url={url} title={title}/>
    </>
  );
};

ForgeReconciler.render(
  <React.StrictMode>
    <App />
  </React.StrictMode>
);
When you refresh the page in Confluence, a random GIF is displayed.
Step 7: Add a button
Instead of refreshing the page, add a button to load a new GIF. This will use the Button component from the UI Kit.
-
Open the
src/frontend/index.jsxfile. -
Add
Buttonto the UI Kit import statement. -
Add the button by replacing the return statement in the
Appfunction with:1 2
return ( <> <Text>Random GIF!</Text> <Button onClick={() => { invoke('getRandomGif', {}).then((data) => { setTitle(data.title); setURL(data.url); }) }} >{url ? '🔀 Shuffle!' : 'Generate!'} </Button> {url ? <ImageCard url={url} title={title}/> : <></>} </> );
In this code, the text in the button will read Generate before the first click, and 🔀 Shuffle! afterwards. The ImageCard also will not render until a url is set.
Your index.jsx file should look like this:
1
2import React, { useState } from 'react';
import ForgeReconciler, { Text, Image, Button } from '@forge/react';
import { invoke } from '@forge/bridge';

// ImageCard component containing text and image
const ImageCard = ({ title, url }) => {
  return (
    <>
      <Text>{title}</Text>
      <Image src={url} alt={title}/>
    </>
  )
};

const App = () => {
  const [title, setTitle] = useState('');
  const [url, setURL] = useState('');

  return (
    <>
      <Text>Random GIF!</Text>
      <Button
        onClick={() => {
          invoke('getRandomGif', {}).then((data) => {
            setTitle(data.title);
            setURL(data.url);
          })
        }}
      >{url ? '🔀 Shuffle!' : 'Generate!'}
      </Button>
      {url ? <ImageCard url={url} title={title}/> : <></>}
    </>
  );
};

ForgeReconciler.render(
  <React.StrictMode>
    <App />
  </React.StrictMode>
);
Now you can use the button to display a new GIF.
Step 8: Deploy your updates
Now that the code is working, set your app environment variable and deploy the app so it keeps working after you close the tunnel.
Deploy the app by running:
1
2``` shell
forge deploy
```
That’s it. You now have an app that fetches data from an external API and renders the result in the Confluence editor.
Next steps
Continue to one of the other tutorials or look through the reference pages to learn more.
- Automate Jira using Triggers uses triggers to respond to user actions in Jira.
- See the reference pages to learn what else you can do with what you’ve learned.
Rate this page: