Build a Jira comments summarizer app with OpenAI
In this tutorial, you will build a Forge app that integrates with OpenAI APIs to summarize comments in Jira issues. This app addresses the following challenges:
- When a user goes through lots of comments in a Jira issue, it can be overwhelming and time-consuming. It may become difficult to keep track of important details or decisions made during the discussion.
- As more comments are added, it becomes harder to find the relevant information needed to take action on the issue at hand.
Before you begin
Make sure you have the following:
- Basic knowledge of JavaScript, React and the Forge platform.
- A completed Jira hello world app, to ensure that you have set up the Forge development environment.
- An OpenAI API key which you can obtain from the OpenAI website.
The tutorial uses these components to build the app: Jira issue panel module, permissions, text, fetch API, api.asApp(), .requestJira(), useState() and useEffect().
Set up a cloud developer site
An Atlassian cloud developer site lets you install and test your app on Atlassian apps including Confluence and Jira. If you don't have one yet, set it up now:
- Go to http://go.atlassian.com/cloud-dev and create a site using the email address associated with your Atlassian account.
- Once your site is ready, log in and complete the setup wizard.
You can install your app to multiple Atlassian sites. However, app data won't be shared between separate Atlassian apps, sites, or Forge environments.
The limits on the numbers of users you can create are as follows:
- Confluence: 5 users
- Jira Service Management: 1 agent
- Jira Software and Jira Work Management: 5 users
About the app
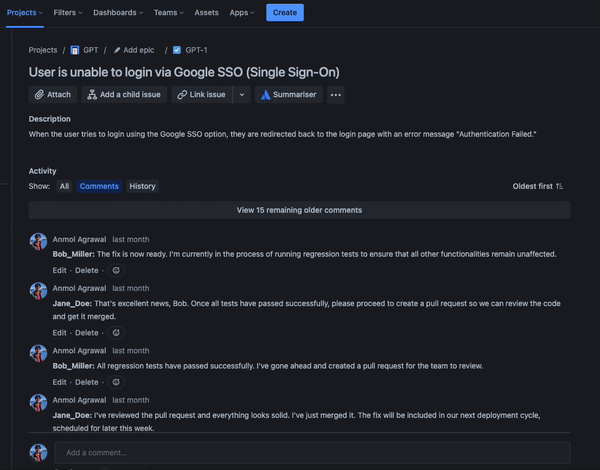
To view a summary of an issue's Jira comments, the user clicks the Summarizer button on an issue page. The app displays an issue panel containing a summary of all the comments for the issue.
You can find the source code for this demo here: atlassian/forge-ai-jira-comment-summarizer.
How does the app work?
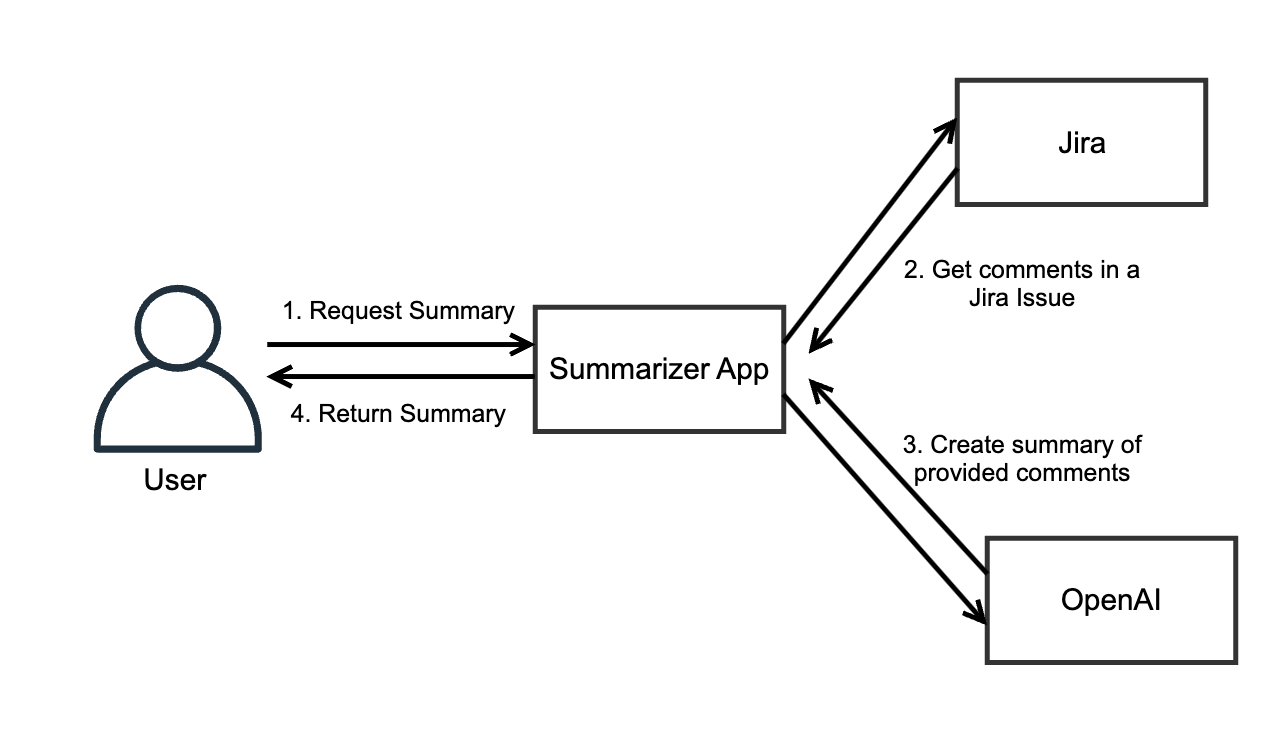
Following the numbered points in the diagram:
- The user first requests the summary. In this case, it will be as simple as a user clicking a button to get the summary as shown in the above video.
- The Summarizer app will get all the comments in the particular Jira issue using the Jira API.
- The Summarizer app will then pass on the comments to OpenAI along with prompt to create summary.
- Once the app gets the summary, it is returned to the user and rendered in the UI.
Step 1: Create the app
Once your development environment is set up, follow these steps to create an initial version of your app:
- Navigate to the directory where you want to create the app.
- Create a new project by running the
forge createcommand in the terminal. - Enter a name for your app when asked. For example,
summarizer. - After you have done that, Forge prompts you to select a template to help you start building the app.
In this case, select the category
UI Kit, theJiraapp, and then the templatejira-issue-panel. - Once the app is created, deploy it and see how the app looks. In the app directory inside the terminal,
enter the command
forge deployto deploy your app. - Enter the command
forge installin terminal. You will be asked to provide the site in which you would like to install the app. - After the app is installed, view the app in your Jira instance by opening any Jira issue. There you will see a new button and a new issue panel below Description.
Depending on your Jira site, you may see the name of your app in the menu, as pictured below, or you may see only its icon.
Step 2: Get all the comments of a Jira Issue via REST API
You can read an explanation of each code block below it.
Update the manifest to include the required permissions
manifest.yml
1
2modules:
  jira:issuePanel:
    - key: summarizer-hello-world-issue-panel
      resource: main
      resolver:
        function: resolver
      render: native
      title: summarizer
      icon: https://developer.atlassian.com/platform/forge/images/icons/issue-panel-icon.svg
  function:
    - key: resolver
      handler: index.handler
resources:
  - key: main
    path: src/frontend/index.jsx
permissions:
  scopes:
    - 'read:jira-work'
  external:
    fetch:
      backend:
        - 'api.openai.com'
app:
  id: <your-app-id>
To call certain Jira APIs and external APIs, you need to give your app permission to do so. This is done by adding scopes and external permissions to the app’s manifest.yml file. The app will call two APIs:
- Get issue comments API - As per the API documentation,
read:jira-workpermission is required to call this API. - OpenAI API -
external.fetch.backendis used to define external domains your Forge functions can talk to.
The jira:issuePanel module entry was added by the jira-issue-panel template. You can learn more
about this module here.
Update src/frontend/index.jsx with the main top-level logic for your app
The top-level code calls other functions to interact with the Jira and Chat GPT APIs, which you’ll add as you work through the tutorial.
src/frontend/index.jsx
1
2import React, { useEffect, useState } from 'react';
import ForgeReconciler, { Text } from '@forge/react';
import { invoke, view } from '@forge/bridge';

const App = () => {
  const [summary, setSummary] = useState();

  // Getting all the comments of the issue.
  useEffect(() => {
    const getCommentSummary = async () => {
      const commentsData = await invoke('getComments');
      console.log("Comments - " + commentsData);
      if (commentsData) {
        // ChatGPT prompt to get the summary
        const prompt = `Here is a sample data where all the comments of a jira issue is joined together: "${commentsData}". I want to summarize this in a way that anybody can get an idea what's going on in this issue without going through all the comments. Create a summary or TLDR for this.`

        // OpenAI API call to get the summary.
        const summary = await invoke('callOpenAI', { prompt });
        console.log("Summary - " + summary);
        setSummary(summary);
      }
    };
    getCommentSummary();
  }, []);

  return (
    <>
      <Text>{summary}</Text>
    </>
  );
};

ForgeReconciler.render(
  <React.StrictMode>
    <App />
  </React.StrictMode>
);
This is the main part of the app, which contains the top-level logic to render the UI and fetch data via Forge Resolvers.
- The app first imports the UI components that will be used in this app.
App()is then triggered. This is where all the magic happens:- Try to get all the comments in the issue by invoking the
getCommentsresolver, which is defined later in this tutorial. - After the comments are retrieved, create the prompt to be used by ChatGPT.
- Pass that prompt to OpenAI by calling the
callOpenAIresolver, which is defined later in this tutorial. - Return the results using the
Textcomponent.
- Try to get all the comments in the issue by invoking the
Update src/resolvers/index.js to call a Jira API to get all comments for this issue
src/resolvers/index.js
1
2import Resolver from '@forge/resolver';
import api, { route, fetch } from '@forge/api';

const resolver = new Resolver();

resolver.define('getComments', async ({context}) => {
  // API call to get all comments of Jira issue with key
  const commentsData = await api.asApp().requestJira(route`/rest/api/3/issue/${context.extension.issue.key}/comment`, {
    headers: {
      'Accept': 'application/json'
    }
  });

  // API call to get all comments of Jira issue with key
  const responseData = await commentsData.json();
  const jsonData = await responseData.comments

  let extractedTexts = [];

  // Extracting all texts in the comments into extractedTexts array
  await jsonData.map(comment => {
    if (comment.body && comment.body.content) {
      comment.body.content.map(contentItem => {
        if (contentItem.type === "paragraph" && contentItem.content) {
          contentItem.content.map(textItem => {
            if (textItem.type === "text" && textItem.text) {
              extractedTexts.push(textItem.text);
            }
          });
        }
      });
    }
  });

  return extractedTexts.join(' ');
});
The app first imports the resolver and API calls that will be used.
We can define the getComments resolver. This resolver calls the
Get issue comments API
using the api.asApp() method.
- The app will find the issue using the
issue.keyfound incontext, and retrieve the comments associated with that issue - Once the app retrieves all the comments using the Jira API, try to extract only the texts
from the comments and exclude other data like
created atandauthor, and join all the comments together into a paragraph. - Join all of the comments together into a paragraph and return it. The app will use this paragraph
to construct the
promptvariable it sends to ChatGPT.
Step 3: Integrate your app with OpenAI API
Now that the app can retrieve all the comments in a Jira Issue via an API, the next step is to pass it to OpenAI API to get the summary.
Update src/resolvers/index.js to call the ChatGPT API to summarize the comments
In the src/frontend/index.jsx, you added the variable prompt, then constructed a prompt using the comments and a command that tells OpenAI what to do with that data (in this case: summarize it). The code passes the prompt variable to an API call callOpenAI, which would call OpenAI API and return the results.
Here is the code for the callOpenAI call, which would be placed underneath the getComments call:
src/resolvers/index.js
1
2resolver.define('callOpenAI', async ({payload, context}) => {

  const choiceCount = 1;
  // OpenAI API endpoint
  const url = `https://api.openai.com/v1/chat/completions`;

  // Body for API call
  const body = {
    model: getOpenAPIModel(),
    n: choiceCount,
    messages: [{
      role: 'user',
      content: payload.prompt
    }]
  };

  // API call options
  const options = {
    method: 'POST',
    headers: {
      Authorization: `Bearer ${getOpenAPIKey()}`,
      'Content-Type': 'application/json',
    },
    redirect: 'follow',
    body: JSON.stringify(body)
  };

  // API call to OpenAI
  const response = await fetch(url, options);
  let result = ''

  if (response.status === 200) {
    const chatCompletion = await response.json();
    const firstChoice = chatCompletion.choices[0]

    if (firstChoice) {
      result = firstChoice.message.content;
    } else {
      console.warn(`Chat completion response did not include any assistance choices.`);
      result = `AI response did not include any choices.`;
    }
  } else {
    const text = await response.text();
    result = text;
  }

  return result;
});

// Get OpenAI API key
const getOpenAPIKey = () => {
  return process.env.OPEN_API_KEY;
}

// Get OpenAI model
const getOpenAPIModel = () => {
  return 'gpt-3.5-turbo';
  // return 'gpt-4';
}
Here, the app makes a basic API call to OpenAI. You can learn more about this through their documentation. The steps involved include:
- Set the URL of the API to which the call will be made.
- Provide the details of the payload which consists of information about the GPT model to which the request will be made and the prompt containing the comments and command.
- Set the options that contains extra information like call method, authorisation headers and the payload in JSON format.
- Use Forge’s fetch method to make the API call. Then, parse through the response to get the text of summary that will be displayed in the Jira UI for that issue.
The getOpenAPIKey() function returns a Forge environment variable called OPEN_API_KEY.
Before running the app for the first time, set this environment variable to the OpenAI API key
that is needed to interact with their APIs.
To create an environment variable in Forge, enter the following command in your terminal:
1
2forge variables set --encrypt OPEN_API_KEY your-key
The --encrypt flag instructs Forge to store the variable in encrypted form.
Step 4: Deploy your app
Once all the above steps are done, you can:
- Run
forge deployin the terminal again as themanifest.ymlfile was updated. - Run
forge install --upgradeand select the installation to upgrade. If you have followed along with this tutorial, it should list the development environment for your Jira instance. - Try out the app in your cloud instance. The first time you run it, Atlassian asks you for permission, for that app to access Jira comments and your user information.
Next steps
Great job on finishing the tutorial on developing a Forge app with OpenAI! Take a moment to celebrate this impressive achievement. If you require any additional help, reach out to our developer community. Keep up the excellent work and continue to explore new opportunities for your apps using Forge and OpenAI technology.
Rate this page: